Oracle 12c DBCA出现PRCR-1079 ORA-12547 CRS-5017

Oracle 12c用dbca创建数据库时出现了PRCR-1079 ORA-12547 CRS-5017不能启动数据库。
12c

因为这里安装了Oracle Restart,所以尝试使用srvctl start database命令来手动启动数据库,但是结果还是一样不能启动。
[grid@oracle12c 12.1]$ srvctl start database -db jycs
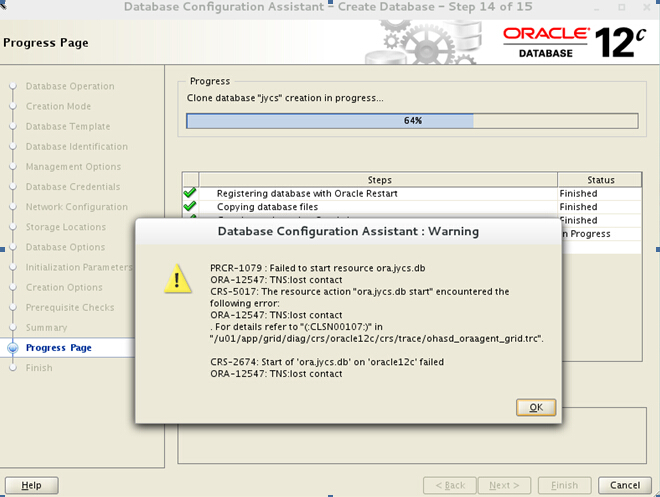
PRCR-1079 : Failed to start resource ora.jycs.db
ORA-12547: TNS:lost contact
CRS-5017: The resource action “ora.jycs.db start” encountered the following error:
ORA-12547: TNS:lost contact
. For details refer to “(:CLSN00107:)” in “/u01/app/grid/diag/crs/oracle12c/crs/trace/ohasd_oraagent_grid.trc”.

CRS-2674: Start of ‘ora.jycs.db’ on ‘oracle12c’ failed
ORA-12547: TNS:lost contact
[grid@oracle12c 12.1]$ crs_stat -t
CRS-275: This command is not supported in Oracle Restart environment.

检查grid的GRID_BASE与GRID_HOME目录与oracle的ORACLE_BASE与ORACLE_HOME目录,发现用户与组权限都是对的。
[grid@oracle12c 12.1]$ ls -lrt
total 8
drwxr-x—. 72 grid oinstall 4096 Mar 30 22:50 grid
drwxrwxr-x. 70 oracle oinstall 4096 Mar 31 12:59 db

[grid@oracle12c app]$ ls -lrt
total 8
drwxr-x—. 72 grid oinstall 4096 Mar 30 22:50 grid
drwxrwxr-x. 70 oracle oinstall 4096 Mar 31 12:59 oracle

在有些情况下由于某些不确定的原因会造成oracle二进制文件的权限,由于检查GRID_HOME/bin与ORACLE_HOME/bin目录下的oracle文件的权限。
[oracle@oracle12c bin]$ ls -lrt oracle
-rwxr-x–x. 1 oracle oinstall 291255038 Mar 30 22:47 oracle

[grid@oracle12c bin]$ ls -lrt oracle
-rwxr-x–x. 1 grid oinstall 291255038 Mar 30 22:47 oracle

[oracle@oracle12c bin]$ cd $ORACLE_HOME/bin
[oracle@oracle12c bin]$ chmod 6751 oracle

[grid@oracle12c bin]$ cd $ORACLE_HOME/bin
[grid@oracle12c bin]$ chmod 6751 oracle
[grid@oracle12c bin]$ srvctl start database -db jycs
在对oracle文件修改权限后成功启动。

RMAN跨小版本跨平台与字节序传输表空间

将Linux平台上的源数据库中的tspitr与test表空间传输到AIX平台上。并在源主机上使用目录/u02/transport来存储被转换的数据文件。操作步骤如下:
1.将要被传输的表空间tspitr与test设置为只读

SQL> alter tablespace tspitr read only;

Tablespace altered.

SQL> alter tablespace test read only;

Tablespace altered.

2.检查源平台与目标平台信息支不支持传输操作
数据库所支持的平台信息:

SQL> select platform_name,endian_format from v$transportable_platform;

PLATFORM_NAME                                                                    ENDIAN_FORMAT
-------------------------------------------------------------------------------- --------------
Solaris[tm] OE (32-bit)                                                          Big
Solaris[tm] OE (64-bit)                                                          Big
Microsoft Windows IA (32-bit)                                                    Little
Linux IA (32-bit)                                                                Little
AIX-Based Systems (64-bit)                                                       Big
HP-UX (64-bit)                                                                   Big
HP Tru64 UNIX                                                                    Little
HP-UX IA (64-bit)                                                                Big
Linux IA (64-bit)                                                                Little
HP Open VMS                                                                      Little
Microsoft Windows IA (64-bit)                                                    Little
IBM zSeries Based Linux                                                          Big
Linux x86 64-bit                                                                 Little
Apple Mac OS                                                                     Big
Microsoft Windows x86 64-bit                                                     Little
Solaris Operating System (x86)                                                   Little
IBM Power Based Linux                                                            Big
Solaris Operating System (x86-64)                                                Little
HP IA Open VMS                                                                   Little

源平台:

SQL> select d.platform_name,endian_format from v$transportable_platform tp,v$database d where tp.platform_name=d.platform_name ;

PLATFORM_NAME                                                                                         ENDIAN_FORMAT
----------------------------------------------------------------------------------------------------- --------------
Linux 64-bit for AMD                                                                                  Little

目标平台


SQL> select d.platform_name,endian_format from v$transportable_platform tp,v$database d where tp.platform_name=d.platform_name ;

PLATFORM_NAME                                                                    ENDIAN_FORMAT
-------------------------------------------------------------------------------- --------------
AIX-Based Systems (64-bit)                                                       Big

3.确认要被传输的表空间是否是自包含表空间(TSPITR,TEST):

SQL> exec sys.dbms_tts.transport_set_check('TSPITR',true);

PL/SQL procedure successfully completed.


SQL> exec sys.dbms_tts.transport_set_check('TEST',true);

PL/SQL procedure successfully completed.

SQL> select * from sys.transport_set_violations;

no rows selected

如果没有行选择,表示该表空间只包含表数据,可以传输。

4.记录表空间传输前表tspitr与test中的记录:


SQL> select count(*) from tspitr.tspitr;

  COUNT(*)
----------
     50315

SQL> select count(*) from test.test;

  COUNT(*)
----------
     50316

5.使用RMAN将源数据库中的表空间tspitr,test转换为目标平台字节序格式,使用format参数来控制被转换后数据文件的文件名和存储目录.

[oracle@oracle11g ~]export NLS_DATE_FORMAT='yyyy-mm-dd hh24:mi:ss'
[oracle@oracle11g ~]rman target/

Recovery Manager: Release 10.2.0.5.0 - Production on Mon Mar 30 10:35:41 2015

Copyright (c) 1982, 2007, Oracle.  All rights reserved.

connected to target database: TEST (DBID=2168949517)


RMAN> convert tablespace "TSPITR","TEST"
2> to platform 'AIX-Based Systems (64-bit)'
3> format ='/u02/transport/%U';

Starting backup at 2015-03-30 10:37:27
allocated channel: ORA_DISK_1
channel ORA_DISK_1: sid=141 devtype=DISK
channel ORA_DISK_1: starting datafile conversion
input datafile fno=00006 name=/u01/app/oracle/oradata/test/tspitr01.dbf
converted datafile=/u02/transport/data_D-TEST_I-2168949517_TS-TSPITR_FNO-6_3aq349v8
channel ORA_DISK_1: datafile conversion complete, elapsed time: 00:00:15
channel ORA_DISK_1: starting datafile conversion
input datafile fno=00007 name=/u01/app/oracle/oradata/test/test01.dbf
converted datafile=/u02/transport/data_D-TEST_I-2168949517_TS-TEST_FNO-7_3bq349vo
channel ORA_DISK_1: datafile conversion complete, elapsed time: 00:00:01
Finished backup at 2015-03-30 10:37:45


[oracle@oracle11g transport]$ ls -lrt
total 112776
-rw-r----- 1 oracle oinstall 104865792 Mar 30 10:37 data_D-TEST_I-2168949517_TS-TSPITR_FNO-6_3aq349v8
-rw-r----- 1 oracle oinstall  10493952 Mar 30 10:37 data_D-TEST_I-2168949517_TS-TEST_FNO-7_3bq349vo

6.使用导出工具创建传输表空间元数据dump文件

SQL> create or replace directory test_dump as '/u02/transport';

Directory created.

SQL> grant read,write on directory test_dump to public;

Grant succeeded.


[oracle@oracle11g dump_test]$ expdp \'sys/zzh_2046@test as sysdba\' directory=test_dump dumpfile=tspitr_test.dmp logfile=tspitr_test.log transport_tablespaces=TSPITR,TEST

Export: Release 10.2.0.5.0 - Production on Monday, 30 March, 2015 10:57:37

Copyright (c) 2003, 2007, Oracle.  All rights reserved.

Connected to: Oracle Database 10g Enterprise Edition Release 10.2.0.5.0 - Production
With the Partitioning, OLAP, Data Mining and Real Application Testing options
Starting "SYS"."SYS_EXPORT_TRANSPORTABLE_01":  "sys/********@test AS SYSDBA" directory=test_dump dumpfile=tspitr_test.dmp logfile=tspitr_test.log transport_tablespaces=TSPITR,TEST
Processing object type TRANSPORTABLE_EXPORT/PLUGTS_BLK
Processing object type TRANSPORTABLE_EXPORT/TABLE
Processing object type TRANSPORTABLE_EXPORT/TABLE_STATISTICS
Processing object type TRANSPORTABLE_EXPORT/POST_INSTANCE/PLUGTS_BLK
Master table "SYS"."SYS_EXPORT_TRANSPORTABLE_01" successfully loaded/unloaded
******************************************************************************
Dump file set for SYS.SYS_EXPORT_TRANSPORTABLE_01 is:
  /u02/dump_test/tspitr_test.dmp
Job "SYS"."SYS_EXPORT_TRANSPORTABLE_01" successfully completed at 10:57:55

[oracle@oracle11g dump_test]ls -lrt

-rw-r----- 1 oracle oinstall      960 Mar 30 15:23 tspitr_test.log
-rw-r----- 1 oracle oinstall    90112 Mar 30 15:23 tspitr_test.dmp

7.将转换后存储在/u02/transport目录中的数据文件与导出的元数据文件tspitr_test.dmp传输到目标主机的目录/yb_oradata/transport中

ftp> put data_D-TEST_I-2168949517_TS-TSPITR_FNO-6_3aq349v8
200 PORT command successful.
150 Opening data connection for data_D-TEST_I-2168949517_TS-TSPITR_FNO-6_3aq349v
8.
226 Transfer complete.
ftp: 发送 104865792 字节,用时 8.86秒 11839.88千字节/秒。
ftp> put data_D-TEST_I-2168949517_TS-TEST_FNO-7_3bq349vo
200 PORT command successful.
150 Opening data connection for data_D-TEST_I-2168949517_TS-TEST_FNO-7_3bq349vo.

226 Transfer complete.
ftp: 发送 10493952 字节,用时 0.90秒 11659.95千字节/秒。
ftp> put tspitr_test.dmp
200 PORT command successful.
150 Opening data connection for tspitr_test.dmp.
226 Transfer complete.

[IBMP740-1:oracle:/yb_oradata]$ls -lrt
-rwxrwxrwx    1 oracle   dba       104865792 Mar 30 12:42 data_D-TEST_I-2168949517_TS-TSPITR_FNO-6_3aq349v8
-rwxrwxrwx    1 oracle   dba        10493952 Mar 30 12:42 data_D-TEST_I-2168949517_TS-TEST_FNO-7_3bq349vo
-rwxrwxrwx    1 oracle   dba           98304 Mar 30 12:42 tspitr_test.dmp

8.将要被传输的表空间附加到目标数据库中

[IBMP740-1:oracle:/yb_oradata]$sqlplus / as sysdba

SQL*Plus: Release 10.2.0.4.0 - Production on Mon Mar 30 11:31:47 2015

Copyright (c) 1982, 2007, Oracle.  All Rights Reserved.


Connected to:
Oracle Database 10g Enterprise Edition Release 10.2.0.4.0 - 64bit Production
With the Partitioning, OLAP, Data Mining and Real Application Testing options

SQL> create user tspitr identified by "tspitr";

User created.

SQL> grant dba,connect,resource to tspitr;

Grant succeeded.

SQL> create user test identified by "test";

User created.

SQL> grant dba,connect,resource to test;

Grant succeeded.


SQL> create or replace directory test_dump as '/yb_oradata/transport';

Directory created.

SQL> grant read,write on directory test_dump to public;

Grant succeeded.


[IBMP740-1:oracle]$impdp system/system directory=test_dump dumpfile=tspitr_test.dmp transport_datafiles=/yb_oradata/data_D-TEST_I-2168949517_TS-TEST_FNO-7_3bq349vo,/yb_oradata/data_D-TEST_I-2168949517_TS-TSPITR_FNO-6_3aq349v8

Import: Release 10.2.0.4.0 - 64bit Production on Monday, 30 March, 2015 11:45:48

Copyright (c) 2003, 2007, Oracle.  All rights reserved.

Connected to: Oracle Database 10g Enterprise Edition Release 10.2.0.4.0 - 64bit Production
With the Partitioning, OLAP, Data Mining and Real Application Testing options
Master table "SYSTEM"."SYS_IMPORT_TRANSPORTABLE_01" successfully loaded/unloaded
Starting "SYSTEM"."SYS_IMPORT_TRANSPORTABLE_01":  system/******** directory=test_dump dumpfile=tspitr_test.dmp transport_datafiles=/yb_oradata/transport/data_D-TEST_I-2168949517_TS-TEST_FNO-7_3bq349vo,/yb_oradata/transport/data_D-TEST_I-2168949517_TS-TSPITR_FNO-6_3aq349v8
Processing object type TRANSPORTABLE_EXPORT/PLUGTS_BLK
ORA-39123: Data Pump transportable tablespace job aborted
ORA-00721: changes by release 10.2.0.5.0 cannot be used by release 10.2.0.3.0

Job "SYSTEM"."SYS_IMPORT_TRANSPORTABLE_01" stopped due to fatal error at 11:45:53

出错原因是因为源数据库的compatible=10.2.0.5.0,目标数据库的compatible=10.2.0.3.0这里在导出使用version=10.2.0.3.0导出元数据后再执行导出也是同样会报这个错误,因为这里不是逻辑导出,而是传输表空间,所以version参数不起作用。所以想修改源数据库的compatible参数为10.2.0.3.0,但在10g以后,compatible参数只能增大不能减少。
SQL> show parameter compatible

NAME TYPE VALUE
———————————— ———– ——————————
compatible string 10.2.0.5.0

SQL> alter system set compatible=’10.2.0.3.0′ scope=spfile;

System altered.

SQL> shutdown immediate
Database closed.
Database dismounted.
ORACLE instance shut down.
SQL> startup
ORACLE instance started.

Total System Global Area 167772160 bytes
Fixed Size 1272600 bytes
Variable Size 109053160 bytes
Database Buffers 54525952 bytes
Redo Buffers 2920448 bytes
ORA-00201: control file version 10.2.0.5.0 incompatible with ORACLE version
10.2.0.3.0
ORA-00202: control file: ‘/u01/app/oracle/oradata/test/control01.ctl’

在将源数据库的compatible参数修改为10.2.0.3.0后无法启动数据库。

这里是从10.2.0.5(源数据库的compatible参数为10.2.0.5.0)向10.2.0.4(这里目标数据库中的compatible参数却为10.2.0.3.0,不是10.2.0.4.0)跨平台传输表空间不会成功,也就是从高版本向低版本传输表空间不能成功。但从低版本向高版本传输表空间是可以成功,例如下面的示例:
我们要将Linux平台上的源数据库中的tspitr与test表空间传输到AIX平台上。并在源主机上使用目录/u02/transport来存储被转换的数据文件。操作步骤如下:
1.将要被传输的表空间tspitr与test设置为只读

SQL> alter tablespace tspitr read only;

Tablespace altered.

SQL> alter tablespace test read only;

Tablespace altered.

2.检查源平台与目标平台信息支不支持传输操作
数据库所支持的平台信息:

SQL> select platform_name,endian_format from v$transportable_platform;

PLATFORM_NAME                                                                    ENDIAN_FORMAT
-------------------------------------------------------------------------------- --------------
Solaris[tm] OE (32-bit)                                                          Big
Solaris[tm] OE (64-bit)                                                          Big
Microsoft Windows IA (32-bit)                                                    Little
Linux IA (32-bit)                                                                Little
AIX-Based Systems (64-bit)                                                       Big
HP-UX (64-bit)                                                                   Big
HP Tru64 UNIX                                                                    Little
HP-UX IA (64-bit)                                                                Big
Linux IA (64-bit)                                                                Little
HP Open VMS                                                                      Little
Microsoft Windows IA (64-bit)                                                    Little
IBM zSeries Based Linux                                                          Big
Linux x86 64-bit                                                                 Little
Apple Mac OS                                                                     Big
Microsoft Windows x86 64-bit                                                     Little
Solaris Operating System (x86)                                                   Little
IBM Power Based Linux                                                            Big
Solaris Operating System (x86-64)                                                Little
HP IA Open VMS                                                                   Little

源平台:

SQL> select d.platform_name,endian_format from v$transportable_platform tp,v$database d where tp.platform_name=d.platform_name ;

PLATFORM_NAME                                                                                         ENDIAN_FORMAT
----------------------------------------------------------------------------------------------------- --------------
Linux 64-bit for AMD                                                                                  Little

目标平台


SQL> select d.platform_name,endian_format from v$transportable_platform tp,v$database d where tp.platform_name=d.platform_name ;

PLATFORM_NAME                                                                    ENDIAN_FORMAT
-------------------------------------------------------------------------------- --------------
AIX-Based Systems (64-bit)                                                       Big

3.确认要被传输的表空间是否是自包含表空间(TSPITR,TEST):

SQL> exec sys.dbms_tts.transport_set_check('TSPITR',true);

PL/SQL procedure successfully completed.


SQL> exec sys.dbms_tts.transport_set_check('TEST',true);

PL/SQL procedure successfully completed.

SQL> select * from sys.transport_set_violations;

no rows selected

如果没有行选择,表示该表空间只包含表数据,可以传输。

4.记录表空间传输前表tspitr与test中的记录:


SQL> select count(*) from tspitr.tspitr;

  COUNT(*)
----------
     50315

SQL> select count(*) from test.test;

  COUNT(*)
----------
     50316

5.使用RMAN将源数据库中的表空间tspitr,test转换为目标平台字节序格式,使用format参数来控制被转换后数据文件的文件名和存储目录.

[oracle@weblogic28 ~]$ export NLS_DATE_FORMAT='yyyy-mm-dd hh24:mi:ss'
[oracle@weblogic28 ~]$ rman target/

Recovery Manager: Release 10.2.0.1.0 - Production on Mon Mar 30 15:16:38 2015

Copyright (c) 1982, 2005, Oracle.  All rights reserved.

connected to target database: JYTEST (DBID=3911337604)

RMAN> convert tablespace "TSPITR","TEST"
to platform 'AIX-Based Systems (64-bit)'
2> 3> format ='/u02/transport/%U';

Starting backup at 2015-03-30 15:17:09
using target database control file instead of recovery catalog
allocated channel: ORA_DISK_1
channel ORA_DISK_1: sid=134 devtype=DISK
channel ORA_DISK_1: starting datafile conversion
input datafile fno=00006 name=/u01/app/oracle/oradata/jytest/tspitr01.dbf
converted datafile=/u02/transport/data_D-JYTEST_I-3911337604_TS-TSPITR_FNO-6_01q34qbm
channel ORA_DISK_1: datafile conversion complete, elapsed time: 00:00:01
channel ORA_DISK_1: starting datafile conversion
input datafile fno=00007 name=/u01/app/oracle/oradata/jytest/test01.dbf
converted datafile=/u02/transport/data_D-JYTEST_I-3911337604_TS-TEST_FNO-7_02q34qbn
channel ORA_DISK_1: datafile conversion complete, elapsed time: 00:00:01
Finished backup at 2015-03-30 15:17:12

[root@weblogic28 transport]# ls -lrt
total 102528
-rw-r----- 1 oracle oinstall 52436992 Mar 30 15:17 data_D-JYTEST_I-3911337604_TS-TSPITR_FNO-6_01q34qbm
-rw-r----- 1 oracle oinstall 52436992 Mar 30 15:17 data_D-JYTEST_I-3911337604_TS-TEST_FNO-7_02q34qbn

6.使用导出工具创建传输表空间元数据dump文件

SQL> create or replace directory test_dump as '/u02/transport';

Directory created.

SQL> grant read,write on directory test_dump to public;

Grant succeeded.


[oracle@weblogic28 ~]$ expdp \'sys/system as sysdba\' directory=test_dump dumpfile=tspitr_test.dmp logfile=tspitr_test.log transport_tablespaces=TSPITR,TEST

Export: Release 10.2.0.1.0 - 64bit Production on Monday, 30 March, 2015 15:23:19

Copyright (c) 2003, 2005, Oracle.  All rights reserved.

Connected to: Oracle Database 10g Enterprise Edition Release 10.2.0.1.0 - 64bit Production
With the Partitioning, OLAP and Data Mining options
Starting "SYS"."SYS_EXPORT_TRANSPORTABLE_01":  'sys/******** AS SYSDBA' directory=test_dump dumpfile=tspitr_test.dmp logfile=tspitr_test.log transport_tablespaces=TSPITR,TEST
Processing object type TRANSPORTABLE_EXPORT/PLUGTS_BLK
Processing object type TRANSPORTABLE_EXPORT/TABLE
Processing object type TRANSPORTABLE_EXPORT/POST_INSTANCE/PLUGTS_BLK
Master table "SYS"."SYS_EXPORT_TRANSPORTABLE_01" successfully loaded/unloaded
******************************************************************************
Dump file set for SYS.SYS_EXPORT_TRANSPORTABLE_01 is:
  /u02/transport/tspitr_test.dmp
Job "SYS"."SYS_EXPORT_TRANSPORTABLE_01" successfully completed at 15:23:29


[root@weblogic28 transport]# ls -lrt
total 102624
-rw-r----- 1 oracle oinstall 52436992 Mar 30 15:17 data_D-JYTEST_I-3911337604_TS-TSPITR_FNO-6_01q34qbm
-rw-r----- 1 oracle oinstall 52436992 Mar 30 15:17 data_D-JYTEST_I-3911337604_TS-TEST_FNO-7_02q34qbn
-rw-r----- 1 oracle oinstall      960 Mar 30 15:23 tspitr_test.log
-rw-r----- 1 oracle oinstall    90112 Mar 30 15:23 tspitr_test.dmp

7.将转换后存储在/u02/transport目录中的数据文件与导出的元数据文件tspitr_test.dmp传输到目标主机的目录/yb_oradata/transport中

ftp> get data_D-JYTEST_I-3911337604_TS-TSPITR_FNO-6_01q34qbm
200 PORT command successful.
150 Opening BINARY mode data connection for data_D-JYTEST_I-3911337604_TS-TSPITR_FNO-6_01q34qbm (52436992 bytes).
226 Transfer complete.
52436992 bytes received in 0.4497 seconds (1.139e+05 Kbytes/s)
local: data_D-JYTEST_I-3911337604_TS-TSPITR_FNO-6_01q34qbm remote: data_D-JYTEST_I-3911337604_TS-TSPITR_FNO-6_01q34qbm
ftp> get data_D-JYTEST_I-3911337604_TS-TEST_FNO-7_02q34qbn
200 PORT command successful.
150 Opening BINARY mode data connection for data_D-JYTEST_I-3911337604_TS-TEST_FNO-7_02q34qbn (52436992 bytes).
226 Transfer complete.
52436992 bytes received in 0.4518 seconds (1.133e+05 Kbytes/s)
local: data_D-JYTEST_I-3911337604_TS-TEST_FNO-7_02q34qbn remote: data_D-JYTEST_I-3911337604_TS-TEST_FNO-7_02q34qbn
ftp> get tspitr_test.dmp
200 PORT command successful.
150 Opening BINARY mode data connection for tspitr_test.dmp (90112 bytes).
226 Transfer complete.
90112 bytes received in 0.001825 seconds (4.822e+04 Kbytes/s)
local: tspitr_test.dmp remote: tspitr_test.dmp


[IBMP740-1:oracle:/yb_oradata/transport]$ls -lrt
total 205008
-rwxrwxrwx    1 oracle   dba        52436992 Mar 30 15:06 data_D-JYTEST_I-3911337604_TS-TSPITR_FNO-6_01q34qbm
-rwxrwxrwx    1 oracle   dba        52436992 Mar 30 15:06 data_D-JYTEST_I-3911337604_TS-TEST_FNO-7_02q34qbn
-rwxrwxrwx    1 oracle   dba           90112 Mar 30 15:07 tspitr_test.dmp

8.将要被传输的表空间附加到目标数据库中

[IBMP740-1:oracle:/yb_oradata]$sqlplus / as sysdba

SQL*Plus: Release 10.2.0.4.0 - Production on Mon Mar 30 11:31:47 2015

Copyright (c) 1982, 2007, Oracle.  All Rights Reserved.


Connected to:
Oracle Database 10g Enterprise Edition Release 10.2.0.4.0 - 64bit Production
With the Partitioning, OLAP, Data Mining and Real Application Testing options

SQL> create user tspitr identified by "tspitr";

User created.

SQL> grant dba,connect,resource to tspitr;

Grant succeeded.

SQL> create user test identified by "test";

User created.

SQL> grant dba,connect,resource to test;

Grant succeeded.


SQL> create or replace directory test_dump as '/yb_oradata/transport';

Directory created.

SQL> grant read,write on directory test_dump to public;

Grant succeeded.


IBMP740-1:oracle:/yb_oradata/transport]impdp system/system directory=test_dump dumpfile=tspitr_test.dmp transport_datafiles=/yb_oradata/transport/data_D-JYTEST_I-3911337604_TS-TSPITR_FNO-6_01q34qbm,/yb_oradata/transport/data_D-JYTEST_I-3911337604_TS-TEST_FNO-7_02q34qbn
Import: Release 10.2.0.4.0 - 64bit Production on Monday, 30 March, 2015 15:09:38

Copyright (c) 2003, 2007, Oracle.  All rights reserved.

Connected to: Oracle Database 10g Enterprise Edition Release 10.2.0.4.0 - 64bit Production
With the Partitioning, OLAP, Data Mining and Real Application Testing options
Master table "SYSTEM"."SYS_IMPORT_TRANSPORTABLE_01" successfully loaded/unloaded
Starting "SYSTEM"."SYS_IMPORT_TRANSPORTABLE_01":  system/******** directory=test_dump dumpfile=tspitr_test.dmp transport_datafiles=/yb_oradata/transport/data_D-JYTEST_I-3911337604_TS-TSPITR_FNO-6_01q34qbm,/yb_oradata/transport/data_D-JYTEST_I-3911337604_TS-TEST_FNO-7_02q34qbn
Processing object type TRANSPORTABLE_EXPORT/PLUGTS_BLK
Processing object type TRANSPORTABLE_EXPORT/TABLE
Processing object type TRANSPORTABLE_EXPORT/POST_INSTANCE/PLUGTS_BLK
Job "SYSTEM"."SYS_IMPORT_TRANSPORTABLE_01" successfully completed at 15:09:42


[IBMP740-1:oracle:/yb_oradata/transport]$sqlplus / as sysdba

SQL*Plus: Release 10.2.0.4.0 - Production on Mon Mar 30 16:36:19 2015

Copyright (c) 1982, 2007, Oracle.  All Rights Reserved.


Connected to:
Oracle Database 10g Enterprise Edition Release 10.2.0.4.0 - 64bit Production
With the Partitioning, OLAP, Data Mining and Real Application Testing options

SQL> show parameter compatible

NAME                                 TYPE        VALUE
------------------------------------ ----------- ------------------------------
compatible                           string      10.2.0.3.0
SQL> select count(*) from tspitr.tspitr;

  COUNT(*)
----------
     50315


SQL> select count(*) from test.test;

  COUNT(*)
----------
     50316

可以看到,从10.2.0.1(compatible=10.2.0.1.0)向10.2.0.4(compatible=10.2.0.3.0)跨平台和字节序传输表空间是可以执行成功。

为了从10.2.0.5向10.2.0.4(compatible=10.2.0.3.0)跨平台传输表空间,我这里测试一下将10.2.0.1源数据库升级到 10.2.0.5但compatible设置为10.2.0.1.0或小于目标数据库的compatible=10.2.0.3.0来进行测试。

[oracle@weblogic28 ~]$ sqlplus / as sysdba

SQL*Plus: Release 10.2.0.5.0 - Production on Mon Mar 30 19:17:59 2015

Copyright (c) 1982, 2010, Oracle.  All Rights Reserved.


Connected to:
Oracle Database 10g Enterprise Edition Release 10.2.0.5.0 - 64bit Production
With the Partitioning, OLAP, Data Mining and Real Application Testing options

SQL> select version from v$instance;

VERSION
-----------------
10.2.0.5.0

SQL> show parameter compatible

NAME                                 TYPE        VALUE
------------------------------------ ----------- ------------------------------
compatible                           string      10.2.0.1.0

将源数据库从10.2.0.1升级到10.2.0.5后compatible参数还是为10.2.0.1.0

使用RMAN将源数据库中的表空间tspitr,test转换为目标平台字节序格式,使用format参数来控制被转换后数据文件的文件名和存储目录.

[oracle@weblogic28 ~]$ export NLS_DATE_FORMAT='yyyy-mm-dd hh24:mi:ss'
[oracle@weblogic28 ~]$ rman target/

Recovery Manager: Release 10.2.0.5.0 - Production on Mon Mar 30 19:21:39 2015

Copyright (c) 1982, 2007, Oracle.  All rights reserved.

connected to target database: JYTEST (DBID=3911337604)

RMAN> convert tablespace "TSPITR","TEST"
2> to platform 'AIX-Based Systems (64-bit)'
3> format ='/u02/transport/%U';

Starting backup at 2015-03-30 19:22:01
using target database control file instead of recovery catalog
allocated channel: ORA_DISK_1
channel ORA_DISK_1: sid=148 devtype=DISK
channel ORA_DISK_1: starting datafile conversion
input datafile fno=00006 name=/u01/app/oracle/oradata/jytest/tspitr01.dbf
converted datafile=/u02/transport/data_D-JYTEST_I-3911337604_TS-TSPITR_FNO-6_03q358mq
channel ORA_DISK_1: datafile conversion complete, elapsed time: 00:00:03
channel ORA_DISK_1: starting datafile conversion
input datafile fno=00007 name=/u01/app/oracle/oradata/jytest/test01.dbf
converted datafile=/u02/transport/data_D-JYTEST_I-3911337604_TS-TEST_FNO-7_04q358mt
channel ORA_DISK_1: datafile conversion complete, elapsed time: 00:00:03
Finished backup at 2015-03-30 19:22:08

使用导出工具创建传输表空间元数据dump文件

SQL> create or replace directory test_dump as '/u02/transport';

Directory created.

SQL> grant read,write on directory test_dump to public;

Grant succeeded.


[oracle@weblogic28 ~]$ expdp \'sys/system as sysdba\' directory=test_dump dumpfile=tspitr_test.dmp logfile=tspitr_test.log transport_tablespaces=TSPITR,TEST

Export: Release 10.2.0.5.0 - 64bit Production on Monday, 30 March, 2015 19:23:47

Copyright (c) 2003, 2007, Oracle.  All rights reserved.

Connected to: Oracle Database 10g Enterprise Edition Release 10.2.0.5.0 - 64bit Production
With the Partitioning, OLAP, Data Mining and Real Application Testing options
Starting "SYS"."SYS_EXPORT_TRANSPORTABLE_01":  "sys/******** AS SYSDBA" directory=test_dump dumpfile=tspitr_test.dmp logfile=tspitr_test.log transport_tablespaces=TSPITR,TEST
Processing object type TRANSPORTABLE_EXPORT/PLUGTS_BLK
Processing object type TRANSPORTABLE_EXPORT/TABLE
Processing object type TRANSPORTABLE_EXPORT/POST_INSTANCE/PLUGTS_BLK
Master table "SYS"."SYS_EXPORT_TRANSPORTABLE_01" successfully loaded/unloaded
******************************************************************************
Dump file set for SYS.SYS_EXPORT_TRANSPORTABLE_01 is:
  /u02/transport/tspitr_test.dmp
Job "SYS"."SYS_EXPORT_TRANSPORTABLE_01" successfully completed at 19:24:00

[oracle@weblogic28 transport]$ ls -lrt
total 102624
-rw-r----- 1 oracle oinstall 52436992 Mar 30 19:22 data_D-JYTEST_I-3911337604_TS-TSPITR_FNO-6_03q358mq
-rw-r----- 1 oracle oinstall 52436992 Mar 30 19:22 data_D-JYTEST_I-3911337604_TS-TEST_FNO-7_04q358mt
-rw-r--r-- 1 oracle oinstall      986 Mar 30 19:24 tspitr_test.log
-rw-r----- 1 oracle oinstall    90112 Mar 30 19:24 tspitr_test.dmp

将转换后存储在/u02/transport目录中的数据文件与导出的元数据文件tspitr_test.dmp传输到目标主机的目录/yb_oradata/transport中

ftp> get data_D-JYTEST_I-3911337604_TS-TEST_FNO-7_04q358mt
200 PORT command successful.
150 Opening BINARY mode data connection for data_D-JYTEST_I-3911337604_TS-TEST_FNO-7_04q358mt (52436992 bytes).
226 Transfer complete.
52436992 bytes received in 0.4462 seconds (1.148e+05 Kbytes/s)
local: data_D-JYTEST_I-3911337604_TS-TEST_FNO-7_04q358mt remote: data_D-JYTEST_I-3911337604_TS-TEST_FNO-7_04q358mt
ftp> get data_D-JYTEST_I-3911337604_TS-TSPITR_FNO-6_03q358mq
200 PORT command successful.
150 Opening BINARY mode data connection for data_D-JYTEST_I-3911337604_TS-TSPITR_FNO-6_03q358mq (52436992 bytes).
226 Transfer complete.
52436992 bytes received in 0.4458 seconds (1.149e+05 Kbytes/s)
local: data_D-JYTEST_I-3911337604_TS-TSPITR_FNO-6_03q358mq remote: data_D-JYTEST_I-3911337604_TS-TSPITR_FNO-6_03q358mq
ftp> get tspitr_test.dmp
200 PORT command successful.
150 Opening BINARY mode data connection for tspitr_test.dmp (90112 bytes).
226 Transfer complete.
90112 bytes received in 0.00183 seconds (4.809e+04 Kbytes/s)
local: tspitr_test.dmp remote: tspitr_test.dmp

[IBMP740-1:oracle:/yb_oradata/transport]$rm tspitr_test.log
[IBMP740-1:oracle:/yb_oradata/transport]$ls -lrt
total 205008
-rw-r--r--    1 oracle   dba        52436992 Mar 30 19:08 data_D-JYTEST_I-3911337604_TS-TEST_FNO-7_04q358mt
-rw-r--r--    1 oracle   dba        52436992 Mar 30 19:08 data_D-JYTEST_I-3911337604_TS-TSPITR_FNO-6_03q358mq
-rw-r--r--    1 oracle   dba           90112 Mar 30 19:08 tspitr_test.dmp

将要被传输的表空间附加到目标数据库中

[IBMP740-1:oracle:/yb_oradata]$sqlplus / as sysdba

SQL*Plus: Release 10.2.0.4.0 - Production on Mon Mar 30 11:31:47 2015

Copyright (c) 1982, 2007, Oracle.  All Rights Reserved.


Connected to:
Oracle Database 10g Enterprise Edition Release 10.2.0.4.0 - 64bit Production
With the Partitioning, OLAP, Data Mining and Real Application Testing options

SQL> create user tspitr identified by "tspitr";

User created.

SQL> grant dba,connect,resource to tspitr;

Grant succeeded.

SQL> create user test identified by "test";

User created.

SQL> grant dba,connect,resource to test;

Grant succeeded.


SQL> create or replace directory test_dump as '/yb_oradata/transport';

Directory created.

SQL> grant read,write on directory test_dump to public;

Grant succeeded.


[IBMP740-1:oracle:/yb_oradata/transport]$impdp system/system directory=test_dump dumpfile=tspitr_test.dmp transport_datafiles=/yb_oradata/transport/data_D-JYTEST_I-3911337604_TS-TEST_FNO-7_04q358mt,/yb_oradata/transport/data_D-JYTEST_I-3911337604_TS-TSPITR_FNO-6_03q358mq
Import: Release 10.2.0.4.0 - 64bit Production on Monday, 30 March, 2015 19:12:27

Copyright (c) 2003, 2007, Oracle.  All rights reserved.

Connected to: Oracle Database 10g Enterprise Edition Release 10.2.0.4.0 - 64bit Production
With the Partitioning, OLAP, Data Mining and Real Application Testing options
Master table "SYSTEM"."SYS_IMPORT_TRANSPORTABLE_01" successfully loaded/unloaded
Starting "SYSTEM"."SYS_IMPORT_TRANSPORTABLE_01":  system/******** directory=test_dump dumpfile=tspitr_test.dmp transport_datafiles=/yb_oradata/transport/data_D-JYTEST_I-3911337604_TS-TEST_FNO-7_04q358mt,/yb_oradata/transport/data_D-JYTEST_I-3911337604_TS-TSPITR_FNO-6_03q358mq
Processing object type TRANSPORTABLE_EXPORT/PLUGTS_BLK
Processing object type TRANSPORTABLE_EXPORT/TABLE
Processing object type TRANSPORTABLE_EXPORT/POST_INSTANCE/PLUGTS_BLK
Job "SYSTEM"."SYS_IMPORT_TRANSPORTABLE_01" successfully completed at 19:12:33

SQL> select count(*) from tspitr.tspitr;

  COUNT(*)
----------
     50315

SQL> select count(*) from test.test;

  COUNT(*)
----------
     50316

可以看到执行成功。虽然源数据库是10.2.0.5,但其compatible为10.2.0.1.0,而目标数据库是10.2.0.4,其compatible参数为10.2.0.3.0,传输表空间是能成功执行的。

下面将源数据库的compatible修改为10.2.0.3.0(与目标数据库的compatible一样)

[oracle@weblogic28 dbs]$ vi initjytest.ora
省....
*.compatible='10.2.0.3.0'

SQL> startup pfile='/u01/app/oracle/product/10.2.0/db/dbs/initjytest.ora';
ORACLE instance started.

Total System Global Area 1073741824 bytes
Fixed Size                  2101736 bytes
Variable Size             335547928 bytes
Database Buffers          729808896 bytes
Redo Buffers                6283264 bytes
Database mounted.
Database opened.
SQL> show parameter compatible

NAME                                 TYPE        VALUE
------------------------------------ ----------- ------------------------------
compatible                           string      10.2.0.3.0

使用RMAN将源数据库中的表空间tspitr,test转换为目标平台字节序格式,使用format参数来控制被转换后数据文件的文件名和存储目录.

[oracle@weblogic28 dbs]$ rman target/

Recovery Manager: Release 10.2.0.5.0 - Production on Mon Mar 30 19:47:07 2015

Copyright (c) 1982, 2007, Oracle.  All rights reserved.

connected to target database: JYTEST (DBID=3911337604)


RMAN> convert tablespace "TSPITR","TEST"
2> to platform 'AIX-Based Systems (64-bit)'
3> format ='/u02/transport/%U';

Starting backup at 2015-03-30 19:47:28
using target database control file instead of recovery catalog
allocated channel: ORA_DISK_1
channel ORA_DISK_1: sid=141 devtype=DISK
channel ORA_DISK_1: starting datafile conversion
input datafile fno=00006 name=/u01/app/oracle/oradata/jytest/tspitr01.dbf
converted datafile=/u02/transport/data_D-JYTEST_I-3911337604_TS-TSPITR_FNO-6_05q35a6h
channel ORA_DISK_1: datafile conversion complete, elapsed time: 00:00:01
channel ORA_DISK_1: starting datafile conversion
input datafile fno=00007 name=/u01/app/oracle/oradata/jytest/test01.dbf
converted datafile=/u02/transport/data_D-JYTEST_I-3911337604_TS-TEST_FNO-7_06q35a6i
channel ORA_DISK_1: datafile conversion complete, elapsed time: 00:00:01
Finished backup at 2015-03-30 19:47:31

使用导出工具创建传输表空间元数据dump文件

[oracle@weblogic28 dbs]$ expdp \'sys/system as sysdba\' directory=test_dump dumpfile=tspitr_test.dmp logfile=tspitr_test.log transport_tablespaces=TSPITR,TEST

Export: Release 10.2.0.5.0 - 64bit Production on Monday, 30 March, 2015 19:48:36

Copyright (c) 2003, 2007, Oracle.  All rights reserved.

Connected to: Oracle Database 10g Enterprise Edition Release 10.2.0.5.0 - 64bit Production
With the Partitioning, OLAP, Data Mining and Real Application Testing options
Starting "SYS"."SYS_EXPORT_TRANSPORTABLE_01":  "sys/******** AS SYSDBA" directory=test_dump dumpfile=tspitr_test.dmp logfile=tspitr_test.log transport_tablespaces=TSPITR,TEST
Processing object type TRANSPORTABLE_EXPORT/PLUGTS_BLK
Processing object type TRANSPORTABLE_EXPORT/TABLE
Processing object type TRANSPORTABLE_EXPORT/POST_INSTANCE/PLUGTS_BLK
Master table "SYS"."SYS_EXPORT_TRANSPORTABLE_01" successfully loaded/unloaded
******************************************************************************
Dump file set for SYS.SYS_EXPORT_TRANSPORTABLE_01 is:
  /u02/transport/tspitr_test.dmp
Job "SYS"."SYS_EXPORT_TRANSPORTABLE_01" successfully completed at 19:48:50


[oracle@weblogic28 transport]$ ls -lrt
total 102624
-rw-r----- 1 oracle oinstall 52436992 Mar 30 19:47 data_D-JYTEST_I-3911337604_TS-TSPITR_FNO-6_05q35a6h
-rw-r----- 1 oracle oinstall 52436992 Mar 30 19:47 data_D-JYTEST_I-3911337604_TS-TEST_FNO-7_06q35a6i
-rw-r--r-- 1 oracle oinstall      986 Mar 30 19:48 tspitr_test.log
-rw-r----- 1 oracle oinstall    90112 Mar 30 19:48 tspitr_test.dmp

将转换后存储在/u02/transport目录中的数据文件与导出的元数据文件tspitr_test.dmp传输到目标主机的目录/yb_oradata/transport中

ftp> get data_D-JYTEST_I-3911337604_TS-TSPITR_FNO-6_05q35a6h
200 PORT command successful.
150 Opening BINARY mode data connection for data_D-JYTEST_I-3911337604_TS-TSPITR_FNO-6_05q35a6h (52436992 bytes).
226 Transfer complete.
52436992 bytes received in 0.4461 seconds (1.148e+05 Kbytes/s)
local: data_D-JYTEST_I-3911337604_TS-TSPITR_FNO-6_05q35a6h remote: data_D-JYTEST_I-3911337604_TS-TSPITR_FNO-6_05q35a6h
ftp> get data_D-JYTEST_I-3911337604_TS-TEST_FNO-7_06q35a6i
200 PORT command successful.
150 Opening BINARY mode data connection for data_D-JYTEST_I-3911337604_TS-TEST_FNO-7_06q35a6i (52436992 bytes).
226 Transfer complete.
52436992 bytes received in 0.4481 seconds (1.143e+05 Kbytes/s)
local: data_D-JYTEST_I-3911337604_TS-TEST_FNO-7_06q35a6i remote: data_D-JYTEST_I-3911337604_TS-TEST_FNO-7_06q35a6i
ftp> get tspitr_test.dmp
200 PORT command successful.
150 Opening BINARY mode data connection for tspitr_test.dmp (90112 bytes).
226 Transfer complete.
90112 bytes received in 0.001821 seconds (4.833e+04 Kbytes/s)
local: tspitr_test.dmp remote: tspitr_test.dmp

将要被传输的表空间附加到目标数据库中

[IBMP740-1:oracle:/yb_oradata]$sqlplus / as sysdba

SQL*Plus: Release 10.2.0.4.0 - Production on Mon Mar 30 11:31:47 2015

Copyright (c) 1982, 2007, Oracle.  All Rights Reserved.


Connected to:
Oracle Database 10g Enterprise Edition Release 10.2.0.4.0 - 64bit Production
With the Partitioning, OLAP, Data Mining and Real Application Testing options

SQL> create user tspitr identified by "tspitr";

User created.

SQL> grant dba,connect,resource to tspitr;

Grant succeeded.

SQL> create user test identified by "test";

User created.

SQL> grant dba,connect,resource to test;

Grant succeeded.


SQL> create or replace directory test_dump as '/yb_oradata/transport';

Directory created.

SQL> grant read,write on directory test_dump to public;

Grant succeeded.


[IBMP740-1:oracle:/yb_oradata/transport]$impdp system/system directory=test_dump dumpfile=tspitr_test.dmp transport_datafiles=/yb_oradata/transport/data_D-JYTEST_I-3911337604_TS-TSPITR_FNO-6_05q35a6h,/yb_oradata/transport/data_D-JYTEST_I-3911337604_TS-TEST_FNO-7_06q35a6i


Import: Release 10.2.0.4.0 - 64bit Production on Monday, 30 March, 2015 19:32:30

Copyright (c) 2003, 2007, Oracle.  All rights reserved.

Connected to: Oracle Database 10g Enterprise Edition Release 10.2.0.4.0 - 64bit Production
With the Partitioning, OLAP, Data Mining and Real Application Testing options
Master table "SYSTEM"."SYS_IMPORT_TRANSPORTABLE_01" successfully loaded/unloaded
Starting "SYSTEM"."SYS_IMPORT_TRANSPORTABLE_01":  system/******** directory=test_dump dumpfile=tspitr_test.dmp transport_datafiles=/yb_oradata/transport/data_D-JYTEST_I-3911337604_TS-TSPITR_FNO-6_05q35a6h,/yb_oradata/transport/data_D-JYTEST_I-3911337604_TS-TEST_FNO-7_06q35a6i
Processing object type TRANSPORTABLE_EXPORT/PLUGTS_BLK
Processing object type TRANSPORTABLE_EXPORT/TABLE
Processing object type TRANSPORTABLE_EXPORT/POST_INSTANCE/PLUGTS_BLK
Job "SYSTEM"."SYS_IMPORT_TRANSPORTABLE_01" successfully completed at 19:32:32

可以看到,将源数据库10.2.0.5的compatible设置为10.2.0.3.0与目标数据库10.2.0.4的compatible一样,执行传输表空间是可以执行成功的。

之前使用pfile参数文件参源数据库的compatible参数从10.2.0.1.0修改为10.2.0.3.0了,现在将其修改为10.2.0.1.0,并重新使用pfile文件启动源数据库会报错。

[oracle@weblogic28 dbs]$ vi initjytest.ora
省....
*.compatible='10.2.0.1.0'

SQL> startup pfile='/u01/app/oracle/product/10.2.0/db/dbs/initjytest.ora';
ORACLE instance started.

Total System Global Area 1073741824 bytes
Fixed Size                  2101736 bytes
Variable Size             335547928 bytes
Database Buffers          729808896 bytes
Redo Buffers                6283264 bytes
ORA-00201: control file version 10.2.0.3.0 incompatible with ORACLE version
10.2.0.1.0
ORA-00202: control file: '/u01/app/oracle/oradata/jytest/control01.ctl'

这也就证明从oracle 10g开始,compatible参数只能增大,不能缩小。

总结:
1.跨小版本执行跨平台与字节序的表空间传输时,源数据库的compatible参数必须小于或等于目标数据库的compatible参数
2.当源数据库的compatible参数大于目标数据库的compatible参数时,要执行跨平台与字节序的表空间传输只有将目标数据库升级为与源数据库相同的版本号且compatible参数要大于或等于源数据库的compatible参数。
3.从oracle 10g开始,compatible参数只能增大,不能缩小。

Oracle Linux 7禁用Transparent HugePages

Transparent HugePages内存在Red Hat企业Linux 6,SUSE 11和Oracle Linux 6的Oracle Linux Unbreakable Enterprise Kernel2(UEK2)早期版本中默认是启用的。Transparent HugePages内存在Oracle Linux Unbreakable Enterprise Kernel2(UEK2)内核中默认情况下是禁用的。”tuned.service”在Oracle Linux7中默认是将transparent_hugepage设置为always。即使在grub内核命令行中它是禁用的,在boot时tuned service将被设置为’always’。在UEK3中默认情况下是禁用的。

Transparent HugePages可能会造成内存在运行时的延迟分配。为了避免性能问题,Oracle强烈建议对所有Oracle数据库服务器禁用Transparent HugePages。为了提高性能Oracle建议使用标准HugePages。

Transparent HugePages内存与标准HugePages内存的差异在于内核khugepaged线程在运行时动态分配内存。标准HugePages内存是在启动时预先分配在运行时不会发生改变。
1.检查Transparent HugePage是否被启用

[root@oracle12c ~]# uname -r
3.10.0-123.el7.x86_64
[root@oracle12c ~]# cat /sys/kernel/mm/transparent_hugepage/enabled
[always] madvise never ---这说明Transparent Hugepage被启用

2.有两种禁用Transparent HugePage的模式
2.1对吞吐性能方面全局禁用Transparent HugePage
先对文件/usr/lib/tuned/throughput-performance/tuned.conf进行备份

[root@oracle12c ~]# ls -lrt /usr/lib/tuned/throughput-performance/tuned.conf*
-rw-r--r--. 1 root root 2050 May 7 2014 /usr/lib/tuned/throughput-performance/tuned.conf
-rw-r--r--. 1 root root 2050 Mar 29 11:04 /usr/lib/tuned/throughput-performance/tuned.conf.bkp


[root@oracle12c ~]# more /usr/lib/tuned/throughput-performance/tuned.conf | grep "transparent_hugepages"
transparent_hugepages=always

修改文件/usr/lib/tuned/throughput-performance/tuned.conf,将其中的
[vm]
transparent_hugepages=always
修改为
[vm]
transparent_hugepages=never


[root@oracle12c ~]# more /usr/lib/tuned/throughput-performance/tuned.conf | grep "transparent_hugepages"
transparent_hugepages=never

重启操作系统来验证修改结果


[root@oracle12c ~]# uname -r
3.10.0-123.el7.x86_64
[root@oracle12c ~]# cat /sys/kernel/mm/transparent_hugepage/enabled
always madvise [never]

2.2.对正使用的调整概要文件禁用Transparent HugePage
先识别正使用的调整概要文件

[root@oracle12c ~]# tuned-adm active
Current active profile: virtual-guest --这说明当前正使用的概要文件是Virtual-guest

Virtual-guest profile是使用文件/usr/lib/tuned/virtual-guest/tuned.conf,并且它包含了来自文件/usr/lib/tuned/throughput-performance/tuned.conf中的”throughput-performance”。首先对文件/usr/lib/tuned/virtual-guest/tuned.conf进行备份

[root@oracle12c ~]# cp /usr/lib/tuned/virtual-guest/tuned.conf /usr/lib/tuned/virtual-guest/tuned.conf.bkp
[root@oracle12c ~]# ls -lrt /usr/lib/tuned/virtual-guest/tuned.conf*
-rw-r--r--. 1 root root 697 Nov 6 2013 /usr/lib/tuned/virtual-guest/tuned.conf
-rw-r--r--. 1 root root 697 Mar 29 11:26 /usr/lib/tuned/virtual-guest/tuned.conf.bkp


[root@oracle12c ~]# more /usr/lib/tuned/virtual-guest/tuned.conf
#
# tuned configuration
#

[main]
include=throughput-performance

[sysctl]
# If a workload mostly uses anonymous memory and it hits this limit, the entire
# working set is buffered for I/O, and any more write buffering would require
# swapping, so it's time to throttle writes until I/O can catch up. Workloads
# that mostly use file mappings may be able to use even higher values.
#
# The generator of dirty data starts writeback at this percentage (system default
# is 20%)
vm.dirty_ratio = 30

# Filesystem I/O is usually much more efficient than swapping, so try to keep
# swapping low. It's usually safe to go even lower than this on systems with
# server-grade storage.
vm.swappiness = 30

向文件/usr/lib/tuned/virtual-guest/tuned.conf中增加”transparent_hugepages=never”来禁用
Transparent HugePage


[root@oracle12c ~]# vi /usr/lib/tuned/virtual-guest/tuned.conf
#
# tuned configuration
#

[main]
include=throughput-performance
[vm]
transparent_hugepages=never
[sysctl]
# If a workload mostly uses anonymous memory and it hits this limit, the entire
# working set is buffered for I/O, and any more write buffering would require
# swapping, so it's time to throttle writes until I/O can catch up. Workloads
# that mostly use file mappings may be able to use even higher values.
#
# The generator of dirty data starts writeback at this percentage (system default
# is 20%)
vm.dirty_ratio = 30

# Filesystem I/O is usually much more efficient than swapping, so try to keep
# swapping low. It's usually safe to go even lower than this on systems with
# server-grade storage.
vm.swappiness = 30

重启操作系统来验证结果

[root@oracle12c ~]# uname -r
3.10.0-123.el7.x86_64
[root@oracle12c ~]# cat /sys/kernel/mm/transparent_hugepage/enabled
always madvise [never]

Oracle Linux 7配置vncserver

DBA,在创建Oracle数据库的过程中一般要使用dbca和netca图像化进行建库和创建监听(如果使用脚本建库另说),所以图形化操作工具是必不可少的,在Linux操作系统中个人比较喜欢的图形化操作软件是VNC,今天刚好遇到了Oracle Linux 7的操作环境,就顺手记录一下配置过程。
1.检查系统是否已经安装vncserver软件包

[root@oracle12c ~]# rpm -qa|grep tigervnc
tigervnc-server-minimal-1.2.80-0.30.20130314svn5065.el7.x86_64
tigervnc-license-1.2.80-0.30.20130314svn5065.el7.noarch

没有安装执行以下命令进行安装

[root@oracle12c Packages]# pwd
/run/media/yong/OL-7.0 Server.x86_64/Packages
[root@oracle12c Packages]# yum -y install tigervnc-server-1.2.80-0.30.20130314svn5065.el7.x86_64.rpm
Loaded plugins: langpacks
Examining tigervnc-server-1.2.80-0.30.20130314svn5065.el7.x86_64.rpm: tigervnc-server-1.2.80-0.30.20130314svn5065.el7.x86_64
Marking tigervnc-server-1.2.80-0.30.20130314svn5065.el7.x86_64.rpm to be installed
Resolving Dependencies
--> Running transaction check
---> Package tigervnc-server.x86_64 0:1.2.80-0.30.20130314svn5065.el7 will be installed
--> Finished Dependency Resolution
http://public-yum.oracle.com/repo/OracleLinux/OL7/UEKR3/x86_64/repodata/repomd.xml: [Errno 14] curl#6 - "Could not resolve host: public-yum.oracle.com; Unknown error"
Trying other mirror.
http://public-yum.oracle.com/repo/OracleLinux/OL7/latest/x86_64/repodata/repomd.xml: [Errno 14] curl#6 - "Could not resolve host: public-yum.oracle.com; Unknown error"
Trying other mirror.

Dependencies Resolved

=======================================================================================================================================================================
 Package                     Arch               Version                                      Repository                                                           Size
=======================================================================================================================================================================
Installing:
 tigervnc-server             x86_64             1.2.80-0.30.20130314svn5065.el7              /tigervnc-server-1.2.80-0.30.20130314svn5065.el7.x86_64             488 k

Transaction Summary
=======================================================================================================================================================================
Install  1 Package

Total size: 488 k
Installed size: 488 k
Downloading packages:
Running transaction check
Running transaction test
Transaction test succeeded
Running transaction
  Installing : tigervnc-server-1.2.80-0.30.20130314svn5065.el7.x86_64                                                                                              1/1
  Verifying  : tigervnc-server-1.2.80-0.30.20130314svn5065.el7.x86_64                                                                                              1/1

Installed:
  tigervnc-server.x86_64 0:1.2.80-0.30.20130314svn5065.el7

Complete!

2.配置vncserver,之前的版本,如果安装vnc一般都需要使用vncserver命令来设置口令,然后配置/etc/sysconfig/vncservers文件。在Oracle Linux7中,虽然然还存在这个文件,不过其内容只有如下一行:

[root@oracle12c /]# cat /etc/sysconfig/vncservers
# THIS FILE HAS BEEN REPLACED BY /lib/systemd/system/vncserver@.service

先来看一下该文件/lib/systemd/system/vncserver@.service的内容

[root@oracle12c system]# cat /lib/systemd/system/vncserver@.service
# The vncserver service unit file
#
# Quick HowTo:
# 1. Copy this file to /etc/systemd/system/vncserver@:.service
# 2. Edit  and vncserver parameters appropriately
#   ("runuser -l <USER> -c /usr/bin/vncserver %i -arg1 -arg2")
# 3. Run `systemctl daemon-reload`
# 4. Run `systemctl enable vncserver@:.service`
#
# DO NOT RUN THIS SERVICE if your local area network is
# untrusted!  For a secure way of using VNC, you should
# limit connections to the local host and then tunnel from
# the machine you want to view VNC on (host A) to the machine
# whose VNC output you want to view (host B)
#
# [user@hostA ~]$ ssh -v -C -L 590N:localhost:590M hostB
#
# this will open a connection on port 590N of your hostA to hostB's port 590M
# (in fact, it ssh-connects to hostB and then connects to localhost (on hostB).
# See the ssh man page for details on port forwarding)
#
# You can then point a VNC client on hostA at vncdisplay N of localhost and with
# the help of ssh, you end up seeing what hostB makes available on port 590M
#
# Use "-nolisten tcp" to prevent X connections to your VNC server via TCP.
#
# Use "-localhost" to prevent remote VNC clients connecting except when
# doing so through a secure tunnel.  See the "-via" option in the
# `man vncviewer' manual page.


[Unit]
Description=Remote desktop service (VNC)
After=syslog.target network.target

[Service]
Type=forking
# Clean any existing files in /tmp/.X11-unix environment
ExecStartPre=/bin/sh -c '/usr/bin/vncserver -kill %i > /dev/null 2>&1 || :'
ExecStart=/sbin/runuser -l <USER> -c "/usr/bin/vncserver %i"
PIDFile=/home/<USER>/.vnc/%H%i.pid
ExecStop=/bin/sh -c '/usr/bin/vncserver -kill %i > /dev/null 2>&1 || :'

[Install]
WantedBy=multi-user.target

从上面的可以看到如下信息,这给出了操作步骤。1:是将该文件复制一份到/etc/systemd/system目录下并命名为vncserver@:.service;2:是将<USER>替换成你要开启vncserver的用户名;3:是执行systemctl daemon-reload;4:是执行systemctl enable vncserver@:.service来启动vncserver服务。

# 1. Copy this file to /etc/systemd/system/vncserver@:.service
# 2. Edit  and vncserver parameters appropriately
#   ("runuser -l <USER> -c /usr/bin/vncserver %i -arg1 -arg2")
# 3. Run `systemctl daemon-reload`
# 4. Run `systemctl enable vncserver@:.service`

首先复制文件:

[root@oracle12c system]# cp /lib/systemd/system/vncserver@.service /etc/systemd/system/vncserver@:1.service

[root@oracle12c /]# cd /etc/systemd/system
[root@oracle12c system]# ls -lrt vnc*
-rw-r--r--. 1 root root 1744 Mar 28 10:47 vncserver@:1.service

编辑vncserver@:1.service文件将文件中的用root替换
修改前的内容如下:

[root@oracle12c system]# cat /lib/systemd/system/vncserver@.service
# The vncserver service unit file
#
# Quick HowTo:
# 1. Copy this file to /etc/systemd/system/vncserver@:.service
# 2. Edit  and vncserver parameters appropriately
#   ("runuser -l <USER> -c /usr/bin/vncserver %i -arg1 -arg2")
# 3. Run `systemctl daemon-reload`
# 4. Run `systemctl enable vncserver@:.service`
#
# DO NOT RUN THIS SERVICE if your local area network is
# untrusted!  For a secure way of using VNC, you should
# limit connections to the local host and then tunnel from
# the machine you want to view VNC on (host A) to the machine
# whose VNC output you want to view (host B)
#
# [user@hostA ~]$ ssh -v -C -L 590N:localhost:590M hostB
#
# this will open a connection on port 590N of your hostA to hostB's port 590M
# (in fact, it ssh-connects to hostB and then connects to localhost (on hostB).
# See the ssh man page for details on port forwarding)
#
# You can then point a VNC client on hostA at vncdisplay N of localhost and with
# the help of ssh, you end up seeing what hostB makes available on port 590M
#
# Use "-nolisten tcp" to prevent X connections to your VNC server via TCP.
#
# Use "-localhost" to prevent remote VNC clients connecting except when
# doing so through a secure tunnel.  See the "-via" option in the
# `man vncviewer' manual page.


[Unit]
Description=Remote desktop service (VNC)
After=syslog.target network.target

[Service]
Type=forking
# Clean any existing files in /tmp/.X11-unix environment
ExecStartPre=/bin/sh -c '/usr/bin/vncserver -kill %i > /dev/null 2>&1 || :'
ExecStart=/sbin/runuser -l <USER> -c "/usr/bin/vncserver %i"
PIDFile=/home/<USER>/.vnc/%H%i.pid
ExecStop=/bin/sh -c '/usr/bin/vncserver -kill %i > /dev/null 2>&1 || :'

[Install]
WantedBy=multi-user.target


修改后的内容如下:

[root@oracle12c system]# vi vncserver@:1.service
# The vncserver service unit file
#
# Quick HowTo:
# 1. Copy this file to /etc/systemd/system/vncserver@:.service
# 2. Edit  and vncserver parameters appropriately
#   ("runuser -l <USER> -c /usr/bin/vncserver %i -arg1 -arg2")
# 3. Run `systemctl daemon-reload`
# 4. Run `systemctl enable vncserver@:.service`
#
# DO NOT RUN THIS SERVICE if your local area network is
# untrusted!  For a secure way of using VNC, you should
# limit connections to the local host and then tunnel from
# the machine you want to view VNC on (host A) to the machine
# whose VNC output you want to view (host B)
#
# [user@hostA ~]$ ssh -v -C -L 590N:localhost:590M hostB
#
# this will open a connection on port 590N of your hostA to hostB's port 590M
# (in fact, it ssh-connects to hostB and then connects to localhost (on hostB).
# See the ssh man page for details on port forwarding)
#
# You can then point a VNC client on hostA at vncdisplay N of localhost and with
# the help of ssh, you end up seeing what hostB makes available on port 590M
#
# Use "-nolisten tcp" to prevent X connections to your VNC server via TCP.
#
# Use "-localhost" to prevent remote VNC clients connecting except when
# doing so through a secure tunnel.  See the "-via" option in the
# `man vncviewer' manual page.


[Unit]
Description=Remote desktop service (VNC)
After=syslog.target network.target

[Service]
Type=simple
# Clean any existing files in /tmp/.X11-unix environment
ExecStartPre=/bin/sh -c '/usr/bin/vncserver -kill :1 > /dev/null 2>&1 || :'
ExecStart=/sbin/runuser -l root -c "/usr/bin/vncserver :1"
PIDFile=/root/.vnc/%H:1.pid
ExecStop=/bin/sh -c '/usr/bin/vncserver -kill :1 > /dev/null 2>&1 || :'

[Install]
WantedBy=multi-user.target

这里重点要注意的是Type的值要修改为simple,不能用原来的forking,否则会在执行systemctl start vncserver@:1.service时出现问题,故障信息如下:

[root@oracle12c system]# systemctl start vncserver@:1.service
Job for vncserver@:1.service failed. See 'systemctl status vncserver@:1.service' and 'journalctl -xn' for details.
[root@oracle12c system]# systemctl status vncserver@:1.service
vncserver@:1.service - Remote desktop service (VNC)
   Loaded: loaded (/etc/systemd/system/vncserver@:1.service; enabled)
   Active: failed (Result: resources) since Mon 2016-03-28 10:57:03 CST; 26s ago
  Process: 11898 ExecStart=/sbin/runuser -l root -c /usr/bin/vncserver %i (code=exited, status=0/SUCCESS)
  Process: 11895 ExecStartPre=/bin/sh -c /usr/bin/vncserver -kill %i > /dev/null 2>&1 || : (code=exited, status=0/SUCCESS)

3.设置远程登陆的密码
操作系统登陆,执行vncpasswd,注意这个密码不一定与操作系统登陆的密码一致,需要远程桌面的所有的账号,都需要设置一次。

[root@oracle12c /]# vncpasswd root
Password:
Verify:

4.设置vncserver 为自启动

[root@oracle12c system]# systemctl daemon-reload
[root@oracle12c system]# systemctl enable vncserver@:1.service
[root@oracle12c system]# systemctl start vncserver@:1.service
[root@oracle12c system]# systemctl status vncserver@:1.service
vncserver@:1.service - Remote desktop service (VNC)
   Loaded: loaded (/etc/systemd/system/vncserver@:1.service; enabled)
   Active: active (running) since Mon 2016-03-28 13:14:47 CST; 14min ago
  Process: 7237 ExecStop=/bin/sh -c /usr/bin/vncserver -kill :1 > /dev/null 2>&1 || : (code=exited, status=0/SUCCESS)
  Process: 9030 ExecStartPre=/bin/sh -c /usr/bin/vncserver -kill :1 > /dev/null 2>&1 || : (code=exited, status=0/SUCCESS)
 Main PID: 9080 (Xvnc)
   CGroup: /system.slice/system-vncserver.slice/vncserver@:1.service
           鈥9080 /usr/bin/Xvnc :1 -desktop oracle12c:1 (root) -auth /root/.Xauthority -geometry 1024x768 -rfbwait 30000 -rfbauth /root/.vnc/passwd -rfbport 5901 -f...

Mar 28 13:14:47 oracle12c systemd[1]: Started Remote desktop service (VNC).

[root@oracle12c system]# systemctl stop vncserver@:1.service
[root@oracle12c system]# systemctl status vncserver@:1.service
vncserver@:1.service - Remote desktop service (VNC)
   Loaded: loaded (/etc/systemd/system/vncserver@:1.service; enabled)
   Active: inactive (dead) since Mon 2016-03-28 13:31:08 CST; 12s ago
  Process: 10703 ExecStop=/bin/sh -c /usr/bin/vncserver -kill :1 > /dev/null 2>&1 || : (code=exited, status=0/SUCCESS)
  Process: 9080 ExecStart=/sbin/runuser -l root -c /usr/bin/vncserver :1 (code=exited, status=0/SUCCESS)
  Process: 9030 ExecStartPre=/bin/sh -c /usr/bin/vncserver -kill :1 > /dev/null 2>&1 || : (code=exited, status=0/SUCCESS)
 Main PID: 9080 (code=exited, status=0/SUCCESS)

Mar 28 13:14:47 oracle12c systemd[1]: Started Remote desktop service (VNC).
Mar 28 13:31:08 oracle12c systemd[1]: Stopping Remote desktop service (VNC)...
Mar 28 13:31:08 oracle12c systemd[1]: Stopped Remote desktop service (VNC).
[root@oracle12c system]# systemctl start vncserver@:1.service
[root@oracle12c system]# systemctl status vncserver@:1.service
vncserver@:1.service - Remote desktop service (VNC)
   Loaded: loaded (/etc/systemd/system/vncserver@:1.service; enabled)
   Active: active (running) since Mon 2016-03-28 13:31:29 CST; 7s ago
  Process: 10703 ExecStop=/bin/sh -c /usr/bin/vncserver -kill :1 > /dev/null 2>&1 || : (code=exited, status=0/SUCCESS)
  Process: 10733 ExecStartPre=/bin/sh -c /usr/bin/vncserver -kill :1 > /dev/null 2>&1 || : (code=exited, status=0/SUCCESS)
 Main PID: 10783 (Xvnc)
   CGroup: /system.slice/system-vncserver.slice/vncserver@:1.service
           鈥10783 /usr/bin/Xvnc :1 -desktop oracle12c:1 (root) -auth /root/.Xauthority -geometry 1024x768 -rfbwait 30000 -rfbauth /root/.vnc/passwd -rfbport 5901 -...

Mar 28 13:31:29 oracle12c systemd[1]: Starting Remote desktop service (VNC)...
Mar 28 13:31:29 oracle12c systemd[1]: Started Remote desktop service (VNC).

5.关闭Oracle Linux的防火墙
root用户执行操作
查看防火墙状态。

[root@oracle12c tmp]# systemctl status firewalld
firewalld.service - firewalld - dynamic firewall daemon
   Loaded: loaded (/usr/lib/systemd/system/firewalld.service; enabled)
   Active: active (running) since Mon 2016-03-28 14:51:40 CST; 6s ago
 Main PID: 14827 (firewalld)
   CGroup: /system.slice/firewalld.service
           14827 /usr/bin/python -Es /usr/sbin/firewalld --nofork --nopid

临时关闭防火墙命令。重启电脑后,防火墙自动起来。
[root@oracle12c tmp]# systemctl stop firewalld

永久关闭防火墙命令。重启后,防火墙不会自动启动。
[root@oracle12c tmp]# systemctl disable firewalld
rm ‘/etc/systemd/system/basic.target.wants/firewalld.service’
rm ‘/etc/systemd/system/dbus-org.fedoraproject.FirewallD1.service’

6.使用vnc viewer进行远程连接