MySQL InnoDB的AUTO_INCREMENT处理

InnoDB的AUTO_INCREMENT处理
InnoDB提供了一种可配置的锁机制,可以显著提高将行添加到具有AUTO_INCREMENT列的表中的SQL语句的可伸缩性和性能。要在InnoDB表中使用AUTO_INCREMENT机制,必须将一个AUTO_INCREMENT列定义为索引的一部分,这样就可以在表上执行相当于索引SELECT MAX(ai_col)的查找以获得最大列值。通常,这是通过使某一列成为某些表索引的第一列来实现的。

本节描述AUTO_INCREMENT锁模式的行为,不同AUTO_INCREMENT锁模式设置的使用影响,以及InnoDB如何初始化AUTO_INCREMENT计数器。
.InnoDB AUTO_INCREMENT锁模式
.InnoDB AUTO_INCREMENT锁模式使用影响
.InnoDB AUTO_INCREMENT计数器初始化

InnoDB AUTO_INCREMENT锁模式
用于生成自动增量值的AUTO_INCREMENT锁模式的行为,以及每种锁模式如何影响复制。自动增量锁模式在启动时使用innodb_autoinc_lock_mode配置参数配置。

以下术语用于描述innodb_autoinc_lock_mode设置:
.“INSERT-like”语句

所有在表中生成新行的语句,包括INSERT, INSERT… SELECT,REPLACE,REPLACE… SELECT和LOAD DATA。包括“简单插入”、“批量插入”和“混合模式”插入。

.“简单插入”
可以提前确定要插入的行数的语句(在初始处理语句时)。这包括没有嵌套子查询的单行和多行INSERT和REPLACE语句,但不包括INSERT … ON DUPLICATE KEY UPDATE。

.“混合模式插入”
这些是“简单插入”语句,它们为一些(但不是全部)新行指定自动增量值。下面是一个例子,其中c1是表t1的AUTO_INCREMENT列:

INSERT INTO t1 (c1,c2) VALUES (1,'a'), (NULL,'b'), (5,'c'), (NULL,'d');

另一种“混合模式插入”是INSERT…ON DUPLICATE KEY UPDATE,在最坏的情况下,它实际上是INSERT,然后是UPDATE,其中AUTO_INCREMENT列的分配值可能在更新阶段使用,也可能不使用。

innodb_autoinc_lock_mode配置参数有三种可能的设置。“传统”、“连续”、“交错”锁模式的取值分别为0、1、2。
.innodb_autoinc_lock_mode = 0(“传统”锁模式)

传统的锁模式提供了与MySQL 5.1中引入innodb_autoinc_lock_mode配置参数之前相同的行为。传统的锁模式选项是为了向后兼容、性能测试和解决“混合模式插入”的问题而提供的,因为可能存在语义上的差异。

在这种锁模式下,所有“INSERT-like”语句都获得一个特殊的表级AUTO-INC锁,用于向具有AUTO_INCREMENT列的表中插入数据。该锁通常保持到语句的末尾(而不是事务的末尾),以确保对给定的INSERT语句序列按可预测和可重复的顺序分配自动递增值,并确保任何给定语句分配的自动递增值是连续的。

在基于语句的复制的情况下,这意味着当从服务器上复制SQL语句时,自动递增列的值与主服务器上相同。多个INSERT语句的执行结果是确定的,从服务器复制的数据与主服务器相同。如果多个INSERT语句生成的自动递增值是交错的,则两个并发INSERT语句的结果将是不确定的,并且不能使用基于语句的复制可靠地将其传播到从服务器。

为了更清楚地说明这一点,考虑一个使用这个表的例子:

CREATE TABLE t1 (
  c1 INT(11) NOT NULL AUTO_INCREMENT,
  c2 VARCHAR(10) DEFAULT NULL,
  PRIMARY KEY (c1)
) ENGINE=InnoDB;

假设有两个事务正在运行,每个事务将行插入到表中AUTO_INCREMENT列。一个事务正在使用INSERT…SELECT语句,该语句插入1000行,另一个是使用一个简单的INSERT语句插入一行:

Tx1: INSERT INTO t1 (c2) SELECT 1000 rows from another table ...
Tx2: INSERT INTO t1 (c2) VALUES ('xxx');

InnoDB无法预先告诉Tx1中的INSERT语句从SELECT中检索了多少行,并且它会在语句执行过程中每次分配一个自动递增值。使用一直保持到语句末尾的表级锁,一次只能执行一条引用table t1的INSERT语句,并且不同语句生成的自动递增编号不会交叉。由Tx1 INSERT…SELECT语句生成的自动递增值是连续的,而Tx2中INSERT语句使用的(单个)自动递增值比Tx1中使用的所有自动递增值是小或还是大,这取决于首先执行哪条语句。

只要SQL语句以二进制日志中相同的顺序执行(在使用基于语句的复制时,或在恢复场景中),结果就与Tx1和Tx2第一次运行时相同。因此,表级别的锁一直保持到语句结束,使得使用自动递增的INSERT语句可以安全地与基于语句的复制一起使用。然而,当多个事务同时执行insert语句时,这些表级锁限制了并发性和可伸缩性。

在前面的示例中,如果没有表级锁,那么Tx2中用于插入的自动递增列的值完全取决于语句执行的时间。如果Tx2的插入是在Tx1的插入运行时执行的(而不是在它开始之前或完成之后),那么两个INSERT语句分配的特定的自动递增值是不确定的,并且可能在不同的运行中有所不同。

在连续锁模式下,对于预先知道行数的“simple insert”语句InnoDB可以避免使用表级的AUTO-INC锁来处理,并保持执行的确定性和基于语句的复制的安全性。

如果你不使用二进制日志来重放SQL语句作为恢复或复制的一部分,那么交错锁模式可以用来消除所有表级的AUTO-INC锁,以获得更大的并发性和性能,但代价是允许语句分配的自动递增编号之间有间隙,并且可能通过交错并发执行语句分配编号。

.innodb_autoinc_lock_mode = 1 (“连续”锁模式)

这是默认的锁定模式。在这种模式下,“批量插入”使用特殊的AUTO-INC表级锁,并一直保持到语句结束。这适用于所有的INSERT…SELECT,REPLACE … SELECT和LOAD DATA语句。一次只能执行一个持有AUTO-INC锁的语句。如果批量插入操作的源表与目标表不同,则在源表中选择的第一行获得共享锁之后,在目标表上获得AUTO-INC锁。如果批量插入操作的源和目标是同一个表,那么在对所有选定行使用共享锁之后,会使用AUTO-INC锁。

“简单插入”(需要插入的行数是预先知道的)通过在互斥量(轻量级锁)的控制下获取所需的自动递增值的数量来避免表级的AUTO-INC锁,该互斥量只在分配过程中保持,直到语句完成。除非AUTO-INC锁被另一个事务持有,否则不会使用表级的AUTO-INC锁。如果另一个事务持有AUTO-INC锁,则“简单插入”会等待AUTO-INC锁,就像“批量插入”一样。

这种锁模式确保,如果INSERT语句的行数事先不知道(并且随着语句的执行分配了自动递增号),任何“类INSERT”语句分配的所有自动递增值都是连续的,并且基于语句的复制操作是安全的。

简而言之,这种锁模式显著提高了可伸缩性,同时可以安全地与基于语句的复制一起使用。此外,与“传统”锁模式一样,任何给定语句分配的自动递增数字都是连续的。与“传统”模式相比,任何使用自动递增的语句在语义上都没有变化,但有一个重要的例外。

例外情况是“混合模式插入”,在这种情况下,用户在多行“简单插入”中为某些(但不是全部)行显式地提供AUTO_INCREMENT列的值。对于这样的插入,InnoDB分配的自动增量值比要插入的行数要多。然而,所有自动赋值的值都是连续生成的(因而高于)最近执行的前一个语句自动递增生成的值。“多余”的数字会丢失。

.innodb_autoinc_lock_mode = 2(“交错”锁模式)

在这种锁模式下,没有“INSERT-like”语句使用表级AUTO-INC锁,并且多个语句可以同时执行。这是最快和最具可伸缩性的锁模式,但是当重放来自二进制日志中SQL语句执行基于语句的复制或恢复场景时,它并不安全。

在这种锁模式下,自动增量值保证在所有并发执行的“INSERT-like”语句中是唯一且单调递增的。但是,因为多个语句可以同时生成数字(也就是说,数字的分配是跨语句交叉的),任何给定语句插入的行生成的值都可能不是连续的。

如果唯一执行的语句是“简单插入”,其中要插入的行数是提前知道的,那么除了“混合模式插入”之外,为单个语句生成的行数没有间隔。然而,当执行“批量插入”时,任何给定语句分配的自动增量值可能存在间隙。

InnoDB AUTO_INCREMENT锁模式使用影响
.对复制使用自动增量

如果使用基于语句的复制,请将innodb_autoinc_lock_mode设置为0或1,并在主服务器和从服务器上使用相同的值。如果使用innodb_autoinc_lock_mode = 2 (” interleaved “),或者配置主、从不使用相同的锁模式,则不能确保从上的自动增量值与主上的相同。

如果您使用的是基于行或混合格式的复制,那么所有的自动增量锁模式都是安全的,因为基于行的复制对SQL语句的执行顺序不敏感(对于基于语句的复制来说不安全的任何语句混合格式使用基于行的复制来进行处理)。

.“丢失”自动增量值和序列间隙

在所有锁模式(0、1和2)中,如果生成自动递增值的事务回滚,则这些自动递增值将“丢失”。一旦为自动递增的列生成了值,无论“INSERT-like”语句是否完成,以及包含它的事务是否回滚,它都不能回滚。这些丢失的值不会被重用。因此,存储在表的AUTO_INCREMENT列中的值可能会有差距。

.为AUTO_INCREMENT列指定NULL或0
在所有的锁模式下(0、1和2),如果用户为INSERT语句中的AUTO_INCREMENT列指定了NULL或0,InnoDB将该行视为未指定值,并为其生成一个新值。

.给AUTO_INCREMENT列赋一个负值
在所有锁模式(0、1和2)中,如果给AUTO_INCREMENT列赋一个负值,则不会定义自动递增机制的行为。

.如果AUTO_INCREMENT值大于指定整数类型的最大整数
在所有锁模式(0、1和2)中,如果值大于可以存储在指定整数类型中的最大整数,则不定义自动递增机制的行为。

.“bulk inserts”的自动增量值存在间隔
当innodb_autoinc_lock_mode设置为0(“传统”)或1(“连续”)时,任何给定语句生成的自动增量值都是连续的,没有间隔,因为表级AUTOINC锁一直保持到语句结束,并且一次只能执行一个这样的语句。

当innodb_autoinc_lock_mode设置为2(“交错”)时,“bulk inserts”生成的自动增量值可能会有间隙,但仅当有并发执行“类似插入”语句时才会如此。

对于锁模式1或2,因为对于批量插入,可能不知道每个语句所需的自动增量值的确切数量,并且可能会高估因此连续语句之间可能会出现间隙。

.“混合模式插入”分配的自动增量值

考虑一个“混合模式插入”,其中一个“简单插入”指定了一些结果行(但不是全部)的自动增量值。这样的语句在锁模式0、1和2中的行为不同。例如,假设c1是表t1的AUTO_INCREMENT列,并且最近自动生成的序列号是100。

mysql> CREATE TABLE t1
    -> (
    ->   c1 INT UNSIGNED NOT NULL AUTO_INCREMENT PRIMARY KEY,
    ->   c2 CHAR(1)
    -> ) ENGINE = INNODB;
Query OK, 0 rows affected (0.01 sec)

mysql> insert into t1 values(100,'x');
Query OK, 1 row affected (0.00 sec)

mysql> select * from t1;
+-----+------+
| c1  | c2   |
+-----+------+
| 100 | x    |
+-----+------+
1 row in set (0.00 sec)

现在,考虑下面的“混合模式插入”语句:

mysql> INSERT INTO t1 (c1,c2) VALUES (1,'a'), (NULL,'b'), (5,'c'), (NULL,'d');
Query OK, 4 rows affected (0.00 sec)
Records: 4  Duplicates: 0  Warnings: 0

mysql> SELECT c1, c2 FROM t1 ORDER BY c2;
+-----+------+
| c1  | c2   |
+-----+------+
|   1 | a    |
| 101 | b    |
|   5 | c    |
| 102 | d    |
| 100 | x    |
+-----+------+
5 rows in set (0.00 sec)

下一个可用的自动递增值是103,因为自动递增值是每次分配一个,而不是在语句执行开始时一次性分配的。无论是否有并发执行的“INSERT-like”语句(任何类型),该结果都为true。

当innodb_autoinc_lock_mode设置为1(“连续”)时,这四个新行也是:

mysql> SELECT c1, c2 FROM t1 ORDER BY c2;
+-----+------+
| c1  | c2   |
+-----+------+
|   1 | a    |
| 101 | b    |
|   5 | c    |
| 102 | d    |
| 100 | x    |
+-----+------+
5 rows in set (0.01 sec)

然而,在本例中,下一个可用的自动增量值是105,而不是103,因为在处理语句时分配了四个自动增量值,但只使用了两个。无论是否并发执行“INSERT-like”语句(任何类型),这个结果都为真。

mysql> show create table t1;
+-------+-----------------------------------------------------------------------------------------------------------------------------------------------------------------------------------+
| Table | Create Table                                                                                                                                                                      |
+-------+-----------------------------------------------------------------------------------------------------------------------------------------------------------------------------------+
| t1    | CREATE TABLE `t1` (
  `c1` int(10) unsigned NOT NULL AUTO_INCREMENT,
  `c2` char(1) DEFAULT NULL,
  PRIMARY KEY (`c1`)
) ENGINE=InnoDB AUTO_INCREMENT=105 DEFAULT CHARSET=utf8mb4 |
+-------+-----------------------------------------------------------------------------------------------------------------------------------------------------------------------------------+
1 row in set (0.00 sec)

innodb_autoinc_lock_mode设置为模式2(“交错”),这四个新行是:

mysql> show variables like 'innodb_autoinc_lock_mode';
+--------------------------+-------+
| Variable_name            | Value |
+--------------------------+-------+
| innodb_autoinc_lock_mode | 2     |
+--------------------------+-------+
1 row in set (0.00 sec)

mysql> SELECT c1, c2 FROM t1 ORDER BY c2;
+-----+------+
| c1  | c2   |
+-----+------+
|   1 | a    |
|   x | b    |
|   5 | c    |
|   y | d    |
| 100 | x    |
+-----+------+
5 rows in set (0.00 sec)

x和y的值是唯一的,且大于之前生成的任何行。但是,x和y的具体值取决于并发执行语句生成的自动增量值的数量。

最后,考虑以下语句,当最近生成的序列号为4时发出:

mysql> truncate table t1;
Query OK, 0 rows affected (0.01 sec)

mysql> insert into t1 values(4,'x');
Query OK, 1 row affected (0.00 sec)

mysql> SELECT c1, c2 FROM t1 ORDER BY c2;
+----+------+
| c1 | c2   |
+----+------+
|  4 | x    |
+----+------+
1 row in set (0.00 sec)

mysql> show create table t1;
+-------+---------------------------------------------------------------------------------------------------------------------------------------------------------------------------------+
| Table | Create Table                                                                                                                                                                    |
+-------+---------------------------------------------------------------------------------------------------------------------------------------------------------------------------------+
| t1    | CREATE TABLE `t1` (
  `c1` int(10) unsigned NOT NULL AUTO_INCREMENT,
  `c2` char(1) DEFAULT NULL,
  PRIMARY KEY (`c1`)
) ENGINE=InnoDB AUTO_INCREMENT=5 DEFAULT CHARSET=utf8mb4 |
+-------+---------------------------------------------------------------------------------------------------------------------------------------------------------------------------------+
1 row in set (0.00 sec)

mysql> INSERT INTO t1 (c1,c2) VALUES (1,'a'), (NULL,'b'), (5,'c'), (NULL,'d');
ERROR 1062 (23000): Duplicate entry '5' for key 'PRIMARY'

对于任何innodb_autoinc_lock_mode设置,该语句都会生成一个ERROR 1062 (23000): Duplicate entry ‘5’ for key ‘PRIMARY’,因为5被分配给行(NULL, ‘b’),并且行(5,’c’)的插入失败。

.修改INSERT语句序列中间的AUTO_INCREMENT列值

在所有锁模式(0、1和2)中,在INSERT语句序列的中间修改AUTO_INCREMENT列值可能会导致“重复条目”错误。例如,如果您执行更新操作,将AUTO_INCREMENT列的值更改为大于当前最大自动递增值的值,则后续的插入操作如果没有指定未使用的自动递增值,可能会遇到“重复条目”错误。下面的例子演示了这种行为。

mysql> drop table t1;
Query OK, 0 rows affected (0.02 sec)

mysql> create table t1
    -> (c1 int not null auto_increment,
    -> primary key(c1)
    -> ) engine=innodb;
Query OK, 0 rows affected (0.01 sec)

mysql> INSERT INTO t1 VALUES(0), (0), (3);
Query OK, 3 rows affected (0.01 sec)
Records: 3  Duplicates: 0  Warnings: 0

mysql> SELECT c1 FROM t1;
+----+
| c1 |
+----+
|  1 |
|  2 |
|  3 |
+----+
3 rows in set (0.00 sec)

mysql> UPDATE t1 SET c1 = 4 WHERE c1 = 1;
Query OK, 1 row affected (0.00 sec)
Rows matched: 1  Changed: 1  Warnings: 0

mysql> SELECT c1 FROM t1;
+----+
| c1 |
+----+
|  2 |
|  3 |
|  4 |
+----+
3 rows in set (0.00 sec)

mysql> INSERT INTO t1 VALUES(0);
ERROR 1062 (23000): Duplicate entry '4' for key 'PRIMARY'

< ?pre>
InnoDB AUTO_INCREMENT计数器初始化

如果你为InnoDB表指定了一个AUTO_INCREMENT列,那么InnoDB数据字典中的表句柄中就会包含一个特殊的计数器,叫做自动递增计数器(auto-increment counter),用于为这一列赋值。这个计数器只存储在主内存中,而不是磁盘中。

为了在服务器重启后初始化一个自动递增计数器,InnoDB在第一次向包含AUTO_INCREMENT列的表中插入数据时,执行等价于下面的语句。
SELECT MAX(ai_col) FROM table_name FOR UPDATE;

InnoDB递增语句检索到的值,并将其分配给列和表的autoincrement计数器。缺省情况下,加1。这个默认值可以通过auto_increment_increment配置设置覆盖。

mysql> show variables like 'auto_increment_increment';
+--------------------------+-------+
| Variable_name            | Value |
+--------------------------+-------+
| auto_increment_increment | 1     |
+--------------------------+-------+
1 row in set (0.02 sec)

如果表为空,InnoDB使用值1。这个默认值可以被auto_increment_offset配置设置覆盖。

mysql> show variables like 'auto_increment_offset';
+-----------------------+-------+
| Variable_name         | Value |
+-----------------------+-------+
| auto_increment_offset | 1     |
+-----------------------+-------+
1 row in set (0.00 sec)

如果SHOW TABLE STATUS语句在自动递增计数器初始化之前检查了表,InnoDB会初始化该值,但不会递增。该值被存储起来,供后续插入使用。此初始化使用表上的普通排它锁定读取,锁持续到事务结束。InnoDB为新创建的表初始化自增计数器的过程与此相同。

在自动递增计数器被初始化之后,如果你没有显式地为AUTO_INCREMENT列指定一个值,InnoDB会递增计数器并将新值赋值给列。如果插入显式指定列值的行,且该值大于当前计数器值,则计数器设置为指定的列值。

只要服务器在运行,InnoDB就会使用内存中的自动递增计数器。当服务器停止并重新启动时,InnoDB会在第一次插入表时重新初始化每个表的计数器,如前所述。

服务器重启也会取消CREATE table和ALTER table语句中的AUTO_INCREMENT = N 表选项的影响,你可以在InnoDB表中使用它来设置初始的计数器值或改变当前的计数器值。
MySQL参数名不正确导致启动时报The server quit without updating PID file pre

在MySQL参数文件my.cnf中配置参数innodb_autoinc_lock_mode在,配置后重启服务时出现以下错误:

[root@localhost mysql]# service mysqld restart
Shutting down MySQL.... SUCCESS!
Starting MySQL..... ERROR! The server quit without updating PID file (/mysqldata/mysql/mysqld.pid).

由于查看参数文件my.cnf,发现参数变成了nnodb_autoinc_lock_mode=2,这是由于复制粘贴造成少了一个i字母

[mysql@localhost mysql]$ cat my.cnf
......
nnodb_autoinc_lock_mode=2
......

修改正确

[mysql@localhost mysql]$ vi my.cnf
......
innodb_autoinc_lock_mode=2
......

再重启服务

[root@localhost mysql]# service mysqld restart
 ERROR! MySQL server PID file could not be found!
Starting MySQL... SUCCESS!

Oracle Linux 6.7 安装MySQL 8.0.33

在Oracle Linux 6.7中安装MySQL 8.0.33 mysql安装位置:/mysqlsoft/mysql,数据库文件数据位置:/mysqldata/mysql
1.首先下载安装介质

mysql-8.0.33-linux-glibc2.12-x86_64.tar.xz

2. 在根目录下创建文件夹mysqlsoft和数据库数据文件/mysqldata/mysql

[root@sjbf /]# mkdir -p /mysqlsoft
[root@sjbf /]# mkdir -p /mysqldata/mysql

3.上传介质mysql-8.0.33-linux-glibc2.28-x86_64.tar.gz到/mysqlsoft目录中并解压

[root@sjbf /]# cd /mysqlsoft
[root@sjbf mysqlsoft]# ll
total 527224
-rw-r--r-- 1 root root 539869923 May  5 09:50 mysql-8.0.33-linux-glibc2.12-x86_64.tar.xz

[root@sjbf mysqlsoft]# tar xvJf mysql-8.0.33-linux-glibc2.12-x86_64.tar.xz

[root@sjbf mysqlsoft]# ll
total 600560
drwxr-xr-x 9 root root      4096 May  6 03:49 mysql-8.0.33-linux-glibc2.12-x86_64
-rw-r--r-- 1 root root 614964216 May  5 15:28 mysql-8.0.33-linux-glibc2.12-x86_64.tar.xz

建议一般不要修改默认文件名,通过软连接来完成

[root@sjbf mysqlsoft]# ln -s mysql-8.0.33-linux-glibc2.12-x86_6 mysql
[root@sjbf mysqlsoft]# ll
total 600560
lrwxrwxrwx 1 root root        34 May  6 03:53 mysql -> mysql-8.0.33-linux-glibc2.12-x86_6
drwxr-xr-x 9 root root      4096 May  6 03:49 mysql-8.0.33-linux-glibc2.12-x86_64
-rw-r--r-- 1 root root 614964216 May  5 15:28 mysql-8.0.33-linux-glibc2.12-x86_64.tar.xz


[root@sjbf mysqlsoft]# cd mysql
[root@sjbf mysql]# ll
total 312
drwxr-xr-x  2 7161 31415   4096 Mar 17 02:46 bin
drwxr-xr-x  2 7161 31415   4096 Mar 17 02:46 docs
drwxr-xr-x  3 7161 31415   4096 Mar 17 02:46 include
drwxr-xr-x  6 7161 31415   4096 Mar 17 02:46 lib
-rw-r--r--  1 7161 31415 284945 Mar 17 01:22 LICENSE
drwxr-xr-x  4 7161 31415   4096 Mar 17 02:46 man
-rw-r--r--  1 7161 31415    666 Mar 17 01:22 README
drwxr-xr-x 28 7161 31415   4096 Mar 17 02:46 share
drwxr-xr-x  2 7161 31415   4096 Mar 17 02:46 support-files

4. 创建mysql用户与用户组

[root@sjbf /]# groupadd mysql
[root@sjbf /]# useradd -r -g mysql -s /bin/false mysql
[root@sjbf /]# id mysql
uid=492(mysql) gid=54323(mysql) groups=54323(mysql)

因为用户只用于所有权目的,而不是登录目的,useradd命令使用-r与-s /bin/false选项来创建一个用户没有登录服务器主机的权限。

5.修改/mysqlsoft/mysql与/mysqldata/mysql目录权限

[root@sjbf /]# chown -R mysql:mysql /mysqlsoft/mysql
[root@sjbf /]# chown -R mysql:mysql /mysqldata/mysql
[root@sjbf /]# chmod -R 775 /mysqlsoft/mysql
[root@sjbf /]# chmod -R 775 /mysqldata/mysql

6. MySQL对于libaio库有依赖性。台果这个libaio库没有安装那么数据目录初始化与后续的数据库服务启动将会失败,安装libaio库执行以下操作:
查询是否安装了libaio库

[root@sjbf /]# yum search libaio
Loaded plugins: aliases, changelog, kabi, presto, refresh-packagekit, security, tmprepo, ulninfo, verify, versionlock
Loading support for kernel ABI
=========================================================================================================== N/S Matched: libaio ===========================================================================================================
libaio.i686 : Linux-native asynchronous I/O access library
libaio.x86_64 : Linux-native asynchronous I/O access library
libaio-devel.i686 : Development files for Linux-native asynchronous I/O access
libaio-devel.x86_64 : Development files for Linux-native asynchronous I/O access

  Name and summary matches only, use "search all" for everything.

如果没有安装,可以执行下面的命令来安装

[root@sjbf /]# yum install libaio
Loaded plugins: aliases, changelog, kabi, presto, refresh-packagekit, security, tmprepo, ulninfo, verify, versionlock
Loading support for kernel ABI
Setting up Install Process
Package libaio-0.3.107-10.el6.x86_64 already installed and latest version
Nothing to do

7.配置mysql参数
只是设置几个简单的mysql运行参数

[root@sjbf mysql]# vi my.cnf
[mysqld]
basedir=/mysqlsoft/mysql
datadir=/mysqldata/mysql
bind-address=0.0.0.0
user=mysql
port=3306
mysqlx_port=33060
log-error=/mysqldata/mysql/mysql.err
pid-file=/mysqldata/mysql/mysqld.pid
socket = /mysqlsoft/mysql/mysql.sock
mysqlx_socket=/mysqlsoft/mysql/mysqlx.sock
character-set-server=utf8
default-storage-engine=INNODB

注意:log-error 一定要配置,因为如果mysql启动错误,可以从日志文件中找到错误原因。其次bind-address配置0.0.0.0是为了监听所有的连接。还有就是socket参数所指定的mysql.sock文件的路径最好设置为/tmp/mysql.sock,因为unix socket文件的缺省位置在/tmp目录中。

8.初始化mysql

[root@sjbf bin]# ./mysqld --user=mysql  --defaults-file=/mysqlsoft/mysql/my.cnf --basedir=/mysqlsoft/mysql --datadir=/mysqldata/mysql --initialize
2023-05-05T20:21:18.355164Z 0 [System] [MY-013169] [Server] /mysqlsoft/mysql-8.0.33-linux-glibc2.12-x86_64/bin/mysqld (mysqld 8.0.33) initializing of server in progress as process 26730
2023-05-05T20:21:18.412269Z 1 [System] [MY-013576] [InnoDB] InnoDB initialization has started.
2023-05-05T20:21:25.831475Z 1 [System] [MY-013577] [InnoDB] InnoDB initialization has ended.
2023-05-05T20:21:42.025674Z 0 [ERROR] [MY-000067] [Server] unknown variable 'defaults-file=/mysqlsoft/mysql/my.cnf'.
2023-05-05T20:21:42.025812Z 0 [ERROR] [MY-013236] [Server] The designated data directory /mysqldata/mysql/ is unusable. You can remove all files that the server added to it.
2023-05-05T20:21:42.025914Z 0 [ERROR] [MY-010119] [Server] Aborting
2023-05-05T20:21:53.091946Z 0 [System] [MY-010910] [Server] /mysqlsoft/mysql-8.0.33-linux-glibc2.12-x86_64/bin/mysqld: Shutdown complete (mysqld 8.0.33)  MySQL Community Server - GPL.

调整一下参数顺序

[root@sjbf bin]# ./mysqld --defaults-file=/mysqlsoft/mysql/my.cnf --initialize --user=mysql --basedir=/mysqlsoft/mysql --datadir=/mysqldata/mysql


[root@sjbf mysql]# cat mysql.err
2023-05-05T20:26:01.800998Z 0 [System] [MY-013169] [Server] /mysqlsoft/mysql-8.0.33-linux-glibc2.12-x86_64/bin/mysqld (mysqld 8.0.33) initializing of server in progress as process 27188
2023-05-05T20:26:01.805553Z 0 [Warning] [MY-013242] [Server] --character-set-server: 'utf8' is currently an alias for the character set UTF8MB3, but will be an alias for UTF8MB4 in a future release. Please consider using UTF8MB4 in order to be unambiguous.
2023-05-05T20:26:01.870227Z 1 [System] [MY-013576] [InnoDB] InnoDB initialization has started.
2023-05-05T20:26:09.160682Z 1 [System] [MY-013577] [InnoDB] InnoDB initialization has ended.
2023-05-05T20:26:25.588664Z 6 [Note] [MY-010454] [Server] A temporary password is generated for root@localhost: #uVfq!szm7y/

其中[Note] A temporary password is generated for root@localhost:#uVfq!szm7y/ 的root@localhost: 后面跟的是mysql数据库登录的临时密码,各人安装生成的临时密码不一样。可以看到到日志文件没有报错,而且有了临时密码,表示初始化成功。

9. 如果想服务能够部署自动支持安全连接,使用mysql_ssl_rsa_setup工具来创建缺省SSL与RSA文件

[root@sjbf bin]# ./mysql_ssl_rsa_setup --datadir=/mysqldata/mysql

10.启动mysql服务

[root@sjbf /]# sh /mysqlsoft/mysql/support-files/mysql.server start
/mysqlsoft/mysql/support-files/mysql.server: line 239: my_print_defaults: command not found
/mysqlsoft/mysql/support-files/mysql.server: line 259: cd: /usr/local/mysql: No such file or directory
Starting MySQLCouldn't find MySQL server (/usr/local/mysql/bin/mysqld_safe)[FAILED]

启动mysql服务命令会报错,因为没有修改mysql的配置文件修改Mysql配置文件,修改前为以下内容

if test -z "$basedir"
then
  basedir=/usr/local/mysql
  bindir=/usr/local/mysql/bin
  if test -z "$datadir"
  then
    datadir=/usr/local/mysql/data
  fi
  sbindir=/usr/local/mysql/bin
  libexecdir=/usr/local/mysql/bin
else
  bindir="$basedir/bin"
  if test -z "$datadir"
  then
    datadir="$basedir/data"
  fi
  sbindir="$basedir/sbin"
  libexecdir="$basedir/libexec"
fi

修改后的内容如下

if test -z "$basedir"
then
  basedir=/mysqlsoft/mysql
  bindir=/mysqlsoft/mysql/bin
  if test -z "$datadir"
  then
    datadir=/mysqldata/mysql
  fi
  sbindir=/mysqlsoft/mysql/bin
  libexecdir=/mysqlsoft/mysql/bin
else
  bindir="$basedir/bin"
  if test -z "$datadir"
  then
    datadir="$basedir/data"
  fi
  sbindir="$basedir/sbin"
  libexecdir="$basedir/libexec"
fi

[root@sjbf /]# cp /mysqlsoft/mysql/support-files/mysql.server  /etc/init.d/mysqld
[root@sjbf /]# chmod 755 /etc/init.d/mysqld

启动MySQL

[root@sjbf /]# service mysqld start
Starting MySQL......[  OK  ]

11.配置环境变量

[root@sjbf /]#
# /etc/profile

# System wide environment and startup programs, for login setup
# Functions and aliases go in /etc/bashrc

# It's NOT a good idea to change this file unless you know what you
# are doing. It's much better to create a custom.sh shell script in
# /etc/profile.d/ to make custom changes to your environment, as this
# will prevent the need for merging in future updates.

export MYSQL_HOME=/mysqlsoft/mysql/
export PATH=$PATH:$MYSQL_HOME/bin

12.登录Mysql
初始化成功后,查看初始化密码

[root@sjbf ~]# cat /mysqldata/mysql/mysql.err | grep password
2023-05-05T20:26:25.588664Z 6 [Note] [MY-010454] [Server] A temporary password is generated for root@localhost: #uVfq!szm7y/

并输入刚刚复制的密码,但是 却提示不能通过mysql.sock文件实现连接

[root@sjbf bin]# ./mysqladmin -u root -p password
Enter password:
mysqladmin: connect to server at 'localhost' failed
error: 'Can't connect to local MySQL server through socket '/tmp/mysql.sock' (2)'
Check that mysqld is running and that the socket: '/tmp/mysql.sock' exists!

这里就奇怪了,因为在my.cnf文件中设置的socket文件路径为/mysqlsoft/mysql/mysql.sock,但mysql所使用的文件不是启动服务所生成的。

使用-S选项来指定生成的mysql.sock文件进行登录是可以成功登录的

[root@sjbf ~]# mysql -S /mysqlsoft/mysql/mysql.sock -u root -p
Enter password:
Welcome to the MySQL monitor.  Commands end with ; or \g.
Your MySQL connection id is 8
Server version: 8.0.33

Copyright (c) 2000, 2023, Oracle and/or its affiliates.

Oracle is a registered trademark of Oracle Corporation and/or its
affiliates. Other names may be trademarks of their respective
owners.

Type 'help;' or '\h' for help. Type '\c' to clear the current input statement.

mysql>

为了方便登录不每次指定-S参数可以在my.cnf文件中指定socket参数

[client]
socket = /mysqlsoft/mysql/mysql.sock

[root@sjbf tmp]# mysql -u root -p
Enter password:
Welcome to the MySQL monitor.  Commands end with ; or \g.
Your MySQL connection id is 9
Server version: 8.0.33

Copyright (c) 2000, 2023, Oracle and/or its affiliates.

Oracle is a registered trademark of Oracle Corporation and/or its
affiliates. Other names may be trademarks of their respective
owners.

Type 'help;' or '\h' for help. Type '\c' to clear the current input statement.

mysql>

13.重置root用户密码

[root@sjbf tmp]# mysql -u root -p
Enter password:
Welcome to the MySQL monitor.  Commands end with ; or \g.
Your MySQL connection id is 9
Server version: 8.0.33

Copyright (c) 2000, 2023, Oracle and/or its affiliates.

Oracle is a registered trademark of Oracle Corporation and/or its
affiliates. Other names may be trademarks of their respective
owners.

Type 'help;' or '\h' for help. Type '\c' to clear the current input statement.

mysql> set password=password("123456");
ERROR 1064 (42000): You have an error in your SQL syntax; check the manual that corresponds to your MySQL server version for the right syntax to use near 'password("123456")' at line 1

用5.7的方法修改密码会报错

mysql> ALTER user 'root'@'localhost' IDENTIFIED BY '123456';
Query OK, 0 rows affected (0.14 sec)

mysql> FLUSH PRIVILEGES;
Query OK, 0 rows affected (0.03 sec)

mysql> use mysql
Reading table information for completion of table and column names
You can turn off this feature to get a quicker startup with -A

Database changed

mysql> select host,user from user;
+-----------+------------------+
| host      | user             |
+-----------+------------------+
| localhost | mysql.infoschema |
| localhost | mysql.session    |
| localhost | mysql.sys        |
| localhost | root             |
+-----------+------------------+
4 rows in set (0.00 sec)

14.设置允许远程登录mysql
如果要远程访问数据库,只需要把拥有全部权限的root账号对应的记录的Host字段改为%就可以了

mysql> update user set host='%' where user='root';
Query OK, 1 row affected (0.13 sec)
Rows matched: 1  Changed: 1  Warnings: 0

mysql> flush privileges;
Query OK, 0 rows affected (0.03 sec)

mysql> ALTER USER 'root'@'%' IDENTIFIED BY '123456' PASSWORD EXPIRE NEVER;
Query OK, 0 rows affected (0.09 sec)

mysql> flush privileges;
Query OK, 0 rows affected (0.02 sec)

mysql> grant all privileges on *.* to 'root'@'%';
Query OK, 0 rows affected (0.14 sec)

mysql> flush privileges;
Query OK, 0 rows affected (0.04 sec)

测试远程登录

[root@sjbf tmp]# mysql -h 10.13.10.99 -P 3306 -uroot -p123456
mysql: [Warning] Using a password on the command line interface can be insecure.
Welcome to the MySQL monitor.  Commands end with ; or \g.
Your MySQL connection id is 16
Server version: 8.0.33 MySQL Community Server - GPL

Copyright (c) 2000, 2023, Oracle and/or its affiliates.

Oracle is a registered trademark of Oracle Corporation and/or its
affiliates. Other names may be trademarks of their respective
owners.

Type 'help;' or '\h' for help. Type '\c' to clear the current input statement.


mysql> select host,user,plugin from user;
+-----------+------------------+-----------------------+
| host      | user             | plugin                |
+-----------+------------------+-----------------------+
| %         | root             | caching_sha2_password |
| localhost | mysql.infoschema | caching_sha2_password |
| localhost | mysql.session    | caching_sha2_password |
| localhost | mysql.sys        | caching_sha2_password |
+-----------+------------------+-----------------------+
4 rows in set (0.00 sec)

[root@sjbf tmp]# mysql -h 10.13.10.99 -P 3306 -uroot -p123456 --ssl-cert=/mysqldata/mysql/client-cert.pem --ssl-key=/mysqldata/mysql/client-key.pem
mysql: [Warning] Using a password on the command line interface can be insecure.
Welcome to the MySQL monitor.  Commands end with ; or \g.
Your MySQL connection id is 17
Server version: 8.0.33 MySQL Community Server - GPL

Copyright (c) 2000, 2023, Oracle and/or its affiliates.

Oracle is a registered trademark of Oracle Corporation and/or its
affiliates. Other names may be trademarks of their respective
owners.

Type 'help;' or '\h' for help. Type '\c' to clear the current input statement.

mysql>

在Oracle Linux 6.7操作系统上初始化MySQL 8.0.33时报’unknown variable ‘defaults-file’错误

在Oracle Linux 6.7操作系统上初始化MySQL 8.0.33时报’unknown variable ‘defaults-file’错误

[root@sjbf bin]# ./mysqld --user=mysql  --defaults-file=/mysqlsoft/mysql/my.cnf --basedir=/mysqlsoft/mysql --datadir=/mysqldata/mysql --initialize
2023-05-05T20:21:18.355164Z 0 [System] [MY-013169] [Server] /mysqlsoft/mysql-8.0.33-linux-glibc2.12-x86_64/bin/mysqld (mysqld 8.0.33) initializing of server in progress as process 26730
2023-05-05T20:21:18.412269Z 1 [System] [MY-013576] [InnoDB] InnoDB initialization has started.
2023-05-05T20:21:25.831475Z 1 [System] [MY-013577] [InnoDB] InnoDB initialization has ended.
2023-05-05T20:21:42.025674Z 0 [ERROR] [MY-000067] [Server] =/mysqlsoft/mysql/my.cnf'.
2023-05-05T20:21:42.025812Z 0 [ERROR] [MY-013236] [Server] The designated data directory /mysqldata/mysql/ is unusable. You can remove all files that the server added to it.
2023-05-05T20:21:42.025914Z 0 [ERROR] [MY-010119] [Server] Aborting
2023-05-05T20:21:53.091946Z 0 [System] [MY-010910] [Server] /mysqlsoft/mysql-8.0.33-linux-glibc2.12-x86_64/bin/mysqld: Shutdown complete (mysqld 8.0.33)  MySQL Community Server - GPL.

把defaults-file参数调整为mysqld命令的第一个参数执行成功

[root@sjbf bin]# ./mysqld --defaults-file=/mysqlsoft/mysql/my.cnf --initialize --user=mysql --basedir=/mysqlsoft/mysql --datadir=/mysqldata/mysql

[root@sjbf mysql]# tail -f mysql.err
2023-05-05T20:26:01.800998Z 0 [System] [MY-013169] [Server] /mysqlsoft/mysql-8.0.33-linux-glibc2.12-x86_64/bin/mysqld (mysqld 8.0.33) initializing of server in progress as process 27188
2023-05-05T20:26:01.805553Z 0 [Warning] [MY-013242] [Server] --character-set-server: 'utf8' is currently an alias for the character set UTF8MB3, but will be an alias for UTF8MB4 in a future release. Please consider using UTF8MB4 in order to be unambiguous.
2023-05-05T20:26:01.870227Z 1 [System] [MY-013576] [InnoDB] InnoDB initialization has started.
2023-05-05T20:26:09.160682Z 1 [System] [MY-013577] [InnoDB] InnoDB initialization has ended.
2023-05-05T20:26:25.588664Z 6 [Note] [MY-010454] [Server] A temporary password is generated for root@localhost: #uVfq!szm7y/

Oracle 19c IMP-00058 ORA-03113

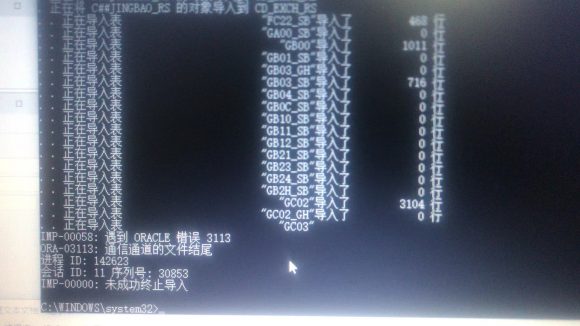
用imp命令向Oracle 19c数据库导入数据时出现IMP-00058 ORA-03113错误

经过排查最后发现是因为执行imp命令的客户端机器内存不足引起的,在关闭无关的程序后再次执行可以正常导入。