Oracle 12.2使用对象数据类型来重定义表

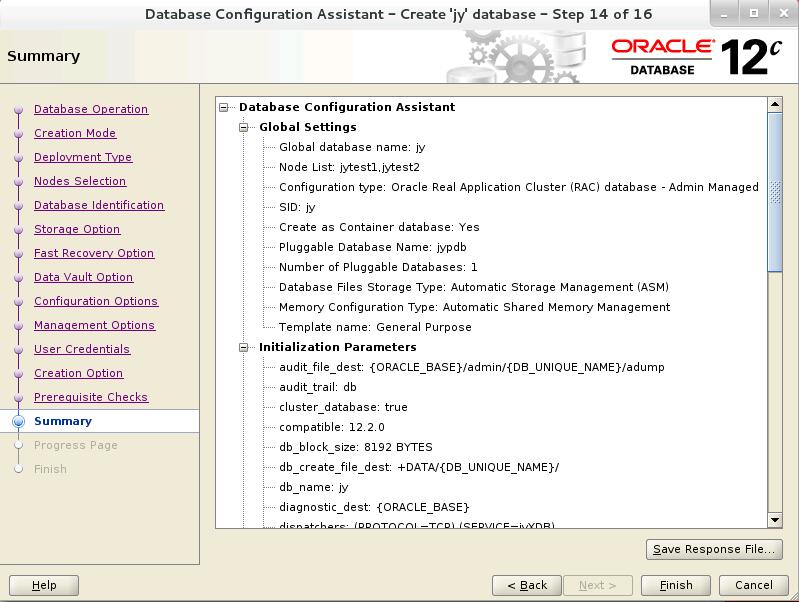
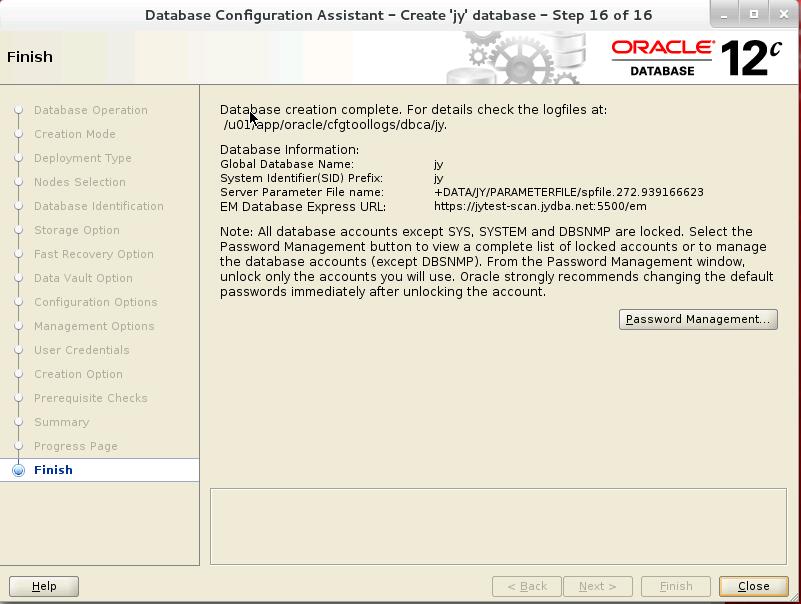
Oracle 12.2使用对象数据类型来重定义表,下面的例子将重定义表将列改变为对象属性,原始表为customer,定义如下:

SQL> create table jy.customer(
  2  cid number not null,
  3  name varchar2(30),
  4  street varchar2(100),
  5  city varchar2(30),
  6  state varchar2(2),
  7  zip number(5)
  8  );
Table created

SQL> alter table jy.customer add constraint customer_pk primary key(cid);
Table altered

创建新的对象类型

SQL> create type jy.addr_t as object
  2  (
  3  street varchar2(100),
  4  city   varchar2(30),
  5  state  varchar2(2),
  6  zip    number(5,0)
  7  );
  8
  9  /
Type created

联机重定义操作如下:
1.用要执行联机重定义操作的用户登录数据库

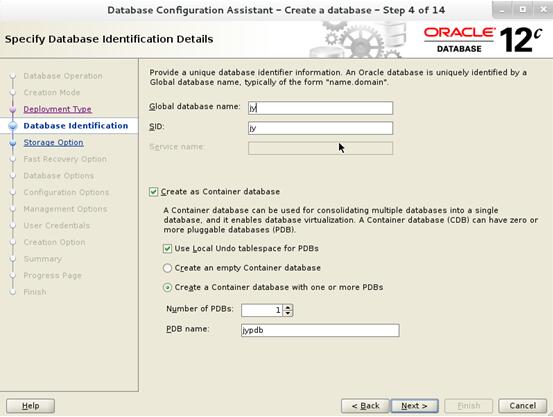
SQL> conn jy/jy@jypdb
Connected.

2.验证表是否可以执行联机重定义,可以使用主键或伪主键来执行验证操作。

SQL> begin
  2  dbms_redefinition.can_redef_table(
  3   uname => 'jy',
  4   tname =>'customer',
  5   options_flag => DBMS_REDEFINITION.CONS_USE_PK);
  6  end;
  7  /
PL/SQL procedure successfully completed

3.创建中间表jy.int_customer

SQL> create table jy.int_customer
  2  (
  3  cid  number,
  4  name varchar2(30),
  5  addr addr_t
  6  );
Table created

4.因为customer是一个非常大的表,为了让下一步操作启用并行执行以下语句:

SQL> alter session force parallel dml parallel 4;
Session altered
SQL> alter session force parallel query parallel 4;
Session altered

5.使用主键来执行重定义操作

SQL> begin
  2  dbms_redefinition.start_redef_table(
  3    uname => 'jy',
  4    orig_table => 'customer',
  5    int_table => 'int_customer',
  6    col_mapping => 'cid cid, name name,
  7    addr_t(street, city, state, zip) addr');
  8  end;
  9  /
PL/SQL procedure successfully completed

6.复制依赖对象

SQL> declare
  2  num_errors pls_integer;
  3  begin
  4  dbms_redefinition.copy_table_dependents(
  5    uname => 'jy',
  6    orig_table => 'customer',
  7    int_table => 'int_customer',
  8    copy_indexes => DBMS_REDEFINITION.CONS_ORIG_PARAMS,
  9    copy_triggers => TRUE,
 10    copy_constraints => TRUE,
 11    copy_privileges => TRUE,
 12    ignore_errors => FALSE,
 13    num_errors => num_errors,
 14    copy_statistics => TRUE);
 15  end;
 16  /
PL/SQL procedure successfully completed

7.可选操作同步中间表

SQL> begin
  2  dbms_redefinition.sync_interim_table(
  3    uname => 'jy',
  4    orig_table => 'customer',
  5    int_table => 'int_customer');
  6  end;
  7  /
PL/SQL procedure successfully completed

8.完成重定义操作

SQL> begin
  2  dbms_redefinition.finish_redef_table(
  3    uname => 'jy',
  4    orig_table => 'customer',
  5    int_table => 'int_customer');
  6  end;
  7  /
PL/SQL procedure successfully completed

SQL> select dbms_metadata.get_ddl(object_type =>'TABLE',name =>'CUSTOMER',schema => 'JY') from dual;

DBMS_METADATA.GET_DDL(OBJECT_TYPE=>'TABLE',NAME=>'CUSTOMER',SCHEMA=>'JY')
--------------------------------------------------------------------------------

  CREATE TABLE "JY"."CUSTOMER"
   (    "CID" NUMBER NOT NULL ENABLE,
        "NAME" VARCHAR2(30),
        "ADDR" "JY"."ADDR_T" ,
         CONSTRAINT "CUSTOMER_PK" PRIMARY KEY ("CID")
  USING INDEX PCTFREE 10 INITRANS 2 MAXTRANS 255 COMPUTE STATISTICS
  STORAGE(INITIAL 65536 NEXT 1048576 MINEXTENTS 1 MAXEXTENTS 2147483645
  PCTINCREASE 0 FREELISTS 1 FREELIST GROUPS 1
  BUFFER_POOL DEFAULT FLASH_CACHE DEFAULT CELL_FLASH_CACHE DEFAULT)
  TABLESPACE "TEST"  ENABLE
   ) SEGMENT CREATION IMMEDIATE
  PCTFREE 10 PCTUSED 40 INITRANS 1 MAXTRANS 255
 NOCOMPRESS LOGGING
  STORAGE(INITIAL 65536 NEXT 1048576 MINEXTENTS 1 MAXEXTENTS 2147483645
  PCTINCREASE 0 FREELISTS 1 FREELIST GROUPS 1
  BUFFER_POOL DEFAULT FLASH_CACHE DEFAULT CELL_FLASH_CACHE DEFAULT)
  TABLESPACE "TEST"


1 row selected.

可以看到表jy.customer已经成功能联机重定义

9.等待任何查询中间表的语句执行完成后将其删除

SQL> desc jy.customer
Name Type         Nullable Default Comments
---- ------------ -------- ------- --------
CID  NUMBER
NAME VARCHAR2(30) Y
ADDR ADDR_T       Y

SQL> drop table jy.customer purge;
Table dropped

到此重定义操作就完成了。

使用dbms_redefinition.redef_table过程来重定义表的存储属性

Oracle 12.2使用dbms_redefinition.redef_table过程来重定义表的存储属性,下面的例子将介绍使用redef_table过程来联机重定义表的存储属性,原始表名为test,存储在pm方案中:

SQL> desc pm.test
Name    Type      Nullable Default Comments
------- --------- -------- ------- --------
AD_ID   NUMBER(6) Y
AD_TEXT CLOB      Y

表test中的LOB数据类型列ad_text使用BasicFile LOB存储,执行下面的语句来创建索引test_idx

SQL> create index pm.test_idx on pm.test(ad_id) tablespace users;
Index created

表test将按以下规则进行联机重定义:
.表使用高级行压缩来进行压缩
.表的存储表空间从users变为example
.索引压缩使用compress 1选项
.索引的存储表空间也从users变为example
.表中的LOB类型列ad_text使用compress high选项进行压缩
.LOB类型列ad_text的存储空间从users变为example
.LOB类型列ad_text变为SecureFiles LOB存储

联机重定义操作如下:
1.用要执行联机重定义操作的用户登录数据库

SQL> conn pm/pm@jypdb
Connected.

2.执行dbms_redefinition.redef_table过程

SQL> exec dbms_redefinition.redef_table(uname =>'PM',tname =>'TEST',table_compression_type =>'ROW STORE COMPRESS ADVANCED',table_part_tablespace =>'EXAMPLE',index_key_compression_type =>'COMPRESS 1',index_tablespace =>'EXAMPLE',lob_compression_type =>'COMPRESS HIGH',lob_tablespace =>'EXAMPLE',lob_store_as =>'SECUREFILE');

PL/SQL procedure successfully completed.

3.查看重定义结果

SQL> set pagesize 0
SQL> set long 900000
SQL> select dbms_metadata.get_ddl(object_type =>'TABLE',name =>'TEST',schema => 'PM') from dual;

  CREATE TABLE "PM"."TEST"
   (    "AD_ID" NUMBER(6,0),
        "AD_TEXT" CLOB
   ) SEGMENT CREATION DEFERRED
  PCTFREE 10 PCTUSED 40 INITRANS 1 MAXTRANS 255
 ROW STORE COMPRESS ADVANCED LOGGING
  TABLESPACE "EXAMPLE"
 LOB ("AD_TEXT") STORE AS SECUREFILE (
  TABLESPACE "EXAMPLE" ENABLE STORAGE IN ROW CHUNK 8192
  NOCACHE LOGGING  COMPRESS HIGH  KEEP_DUPLICATES )


1 row selected.

Oracle 12CR2 dbca -silent -createDatabase

在Oracle Linux 7.1,数据库为Oracle 12cr2中使用dbca静默方式创建数据库的语法如下:

[oracle@jytest1 ~]$ dbca -silent -createDatabase help
help
        -createDatabase - Command to Create a database.
                -responseFile | (-gdbName,-templateName)
                -responseFile - 
                -gdbName 
                -templateName 
                [-characterSet ]
                [-createAsContainerDatabase ]
                        [-numberOfPDBs ]
                        [-pdbAdminPassword ]
                        [-pdbName ]
                        [-pdbOptions ]
                        [-pdbStorageMAXSizeInMB ]
                        [-pdbStorageMAXTempSizeInMB ]
                        [-useLocalUndoForPDBs   Specify false to disable local undo tablespace for PDBs.]
                [-createListener ]
                [-customScripts ]
                [-databaseConfigType ]
                        [-RACOneNodeServiceName ]
                [-databaseType ]
                [-datafileDestination ]
                [-datafileJarLocation ]
                [-dbOptions ]
                [-dvConfiguration  Specify true to configure and enable database vault.]
                        -dvUserName 
                        -dvUserPassword 
                        [-dvAccountManagerName ]
                        [-dvAccountManagerPassword ]
                [-emConfiguration ]
                        [-dbsnmpPassword ]
                        [-emExpressPort ]
                        [-emPassword ]
                        [-emUser ]
                        [-omsHost ]
                        [-omsPort ]
                [-enableArchive  Specify true to enable archive>]
                        [-archiveLogDest ]
                        [-archiveLogMode ]
                [-initParams ]
                        [-initParamsEscapeChar ]
                [-listeners ]
                [-memoryMgmtType ]
                [-memoryPercentage | -totalMemory]
                [-memoryPercentage ]
                [-totalMemory ]
                [-nationalCharacterSet ]
                [-nodelist ]
                [-olsConfiguration  Specify true to configure and enable Oracle Label Security.]
                        [-configureWithOID This flag configures Oracle Label Security with OID.]
                [-oracleHomeUserName ]
                [-oracleHomeUserPassword ]
                [-policyManaged | -adminManaged]
                [-policyManaged ]
                        -serverPoolName 
                        [-createServerPool ]
                                [-cardinality ]
                                [-force ]
                                [-pqCardinality ]
                                [-pqPoolName ]
                        [-pqPoolName ]
                [-adminManaged ]
                [-recoveryAreaDestination ]
                        [-recoveryAreaSize ]
                [-redoLogFileSize ]
                [-registerWithDirService ]
                        -dirServiceUserName 
                        [-databaseCN ]
                        [-dirServicePassword ]
                        [-walletPassword ]
                [-runCVUChecks <specify "true" in order to run Cluster Verification Utility checks periodically for RAC databases.>]
                [-sampleSchema ]
                [-sid ]
                [-storageType < FS | ASM >]
                        -datafileDestination 
                        [-asmsnmpPassword ]
                [-sysPassword ]
                [-systemPassword ]
                [-useOMF  Specify true to use Oracle-Managed Files.]
                [-useWalletForDBCredentials  Specify true to load database credentials from wallet]
                        -dbCredentialsWalletLocation 
                        [-dbCredentialsWalletPassword ]
                [-variables ]
                [-variablesFile ]

使用dbca -silent方式来创建RAC数据库jycs,节点信息为jytest1,jytest2,磁盘组为test

[oracle@jytest1 ~]$ dbca -silent -createDatabase -templateName General_Purpose.dbc -gdbName jycs -sid jycs -createAsContainerDatabase true -numberOfPDBs 1 -pdbName jycspdb -sysPassword xxzx7817600 -systemPassword xxzx7817600 -datafileDestination 'test/' -redoLogFileSize 50 -recoveryAreaDestination 'test/' -storageType -responseFile NO_VALUE  -characterset ZHS16GBK -nationalCharacterSet AL16UTF16 -initParams log_archive_dest_1='location=+test/'  -sampleSchema true -automaticMemoryManagement false -totalMemory 1024 -databaseType MULTIPURPOSE -nodeinfo jytest1,jytest2
[FATAL] [DBT-06007] The specified location (FRA Location) is invalid.
   CAUSE: The specified location is not found on the system or is detected to be a file.

上面报错的原因是因为如果使用ASM磁盘组来存储数据文件时,指定磁盘组名称时,其格式为+diskgroup_name,而在11g中为diskgroup_name

修磁盘组格式后再次执行

[oracle@jytest1 ~]$ dbca -silent -createDatabase -templateName General_Purpose.dbc -gdbName jycs -sid jycs -createAsContainerDatabase true -numberOfPDBs 1 -pdbName jycspdb -sysPassword xxzx7817600 -systemPassword xxzx7817600 -datafileDestination '+test/' -redoLogFileSize 50 -recoveryAreaDestination '+test/' -storageType ASM    -characterset ZHS16GBK -nationalCharacterSet AL16UTF16 -initParams log_archive_dest_1='location=+test/'  -sampleSchema true -automaticMemoryManagement false -totalMemory 1024 -databaseType MULTIPURPOSE -nodeinfo jytest1,jytest2 
Enter PDBADMIN User Password: 

[WARNING] [DBT-06208] The 'SYS' password entered does not conform to the Oracle recommended standards.
   CAUSE: 
a. Oracle recommends that the password entered should be at least 8 characters in length, contain at least 1 uppercase character, 1 lower case character and 1 digit 

[0-9].
b.The password entered is a keyword that Oracle does not recommend to be used as password
   ACTION: Specify a strong password. If required refer Oracle documentation for guidelines.
[WARNING] [DBT-06208] The 'SYSTEM' password entered does not conform to the Oracle recommended standards.
   CAUSE: 
a. Oracle recommends that the password entered should be at least 8 characters in length, contain at least 1 uppercase character, 1 lower case character and 1 digit 

[0-9].
b.The password entered is a keyword that Oracle does not recommend to be used as password
   ACTION: Specify a strong password. If required refer Oracle documentation for guidelines.
[WARNING] [DBT-06208] The 'PDBADMIN' password entered does not conform to the Oracle recommended standards.
   CAUSE: 
a. Oracle recommends that the password entered should be at least 8 characters in length, contain at least 1 uppercase character, 1 lower case character and 1 digit 

[0-9].
b.The password entered is a keyword that Oracle does not recommend to be used as password
   ACTION: Specify a strong password. If required refer Oracle documentation for guidelines.
[WARNING] [DBT-09102] Target environment does not meet some optional requirements.
   CAUSE: Some of the optional prerequisites are not met. See logs for details. /u01/app/oracle/cfgtoollogs/dbca/trace.log_2017-04-26_09-55-10-AM
   ACTION: Find the appropriate configuration from the log file or from the installation guide to meet the prerequisites and fix this manually.
Copying database files
DBCA Operation failed.
Look at the log file "/u01/app/oracle/cfgtoollogs/dbca/jycs/jycs.log" for further details.

查看具体错误原因,说是检查磁盘组test是否注册到集群中

[root@jytest1 ~]# cat /u01/app/oracle/cfgtoollogs/dbca/jycs/jycs0.log
[ 2017-04-26 10:21:55.793 CST ] Copying database files
[ 2017-04-26 10:21:55.942 CST ] PRCR-1070 : Failed to check if resource ora.TEST/.dg is registered
CRS-5161 : The entity name contains invalid characters.

检查集群资源可以看到磁盘组test状态正常,两个节点都为online状态,而由于12c中的语法多了listeners参数,所以猜测是由于没有指定监听程序的原因

[grid@jytest1 ~]$ crsctl stat res -t
--------------------------------------------------------------------------------
Name           Target  State        Server                   State details       
--------------------------------------------------------------------------------
Local Resources
--------------------------------------------------------------------------------
ora.ASMNET1LSNR_ASM.lsnr
               ONLINE  ONLINE       jytest1                  STABLE
               ONLINE  ONLINE       jytest2                  STABLE
ora.CRS.dg
               ONLINE  ONLINE       jytest1                  STABLE
               ONLINE  ONLINE       jytest2                  STABLE
ora.DATA.dg
               ONLINE  ONLINE       jytest1                  STABLE
               ONLINE  ONLINE       jytest2                  STABLE
ora.LISTENER.lsnr
               ONLINE  ONLINE       jytest1                  STABLE
               ONLINE  ONLINE       jytest2                  STABLE
ora.TEST.dg
               ONLINE  ONLINE       jytest1                  STABLE
               ONLINE  ONLINE       jytest2                  STABLE
ora.chad
               ONLINE  ONLINE       jytest1                  STABLE
               ONLINE  ONLINE       jytest2                  STABLE
ora.net1.network
               ONLINE  ONLINE       jytest1                  STABLE
               ONLINE  ONLINE       jytest2                  STABLE
ora.ons
               ONLINE  ONLINE       jytest1                  STABLE
               ONLINE  ONLINE       jytest2                  STABLE
ora.proxy_advm
               OFFLINE OFFLINE      jytest1                  STABLE
               OFFLINE OFFLINE      jytest2                  STABLE
--------------------------------------------------------------------------------
Cluster Resources
--------------------------------------------------------------------------------
ora.LISTENER_SCAN1.lsnr
      1        ONLINE  ONLINE       jytest2                  STABLE
ora.LISTENER_SCAN2.lsnr
      1        ONLINE  ONLINE       jytest1                  STABLE
ora.LISTENER_SCAN3.lsnr
      1        ONLINE  ONLINE       jytest1                  STABLE
ora.MGMTLSNR
      1        ONLINE  ONLINE       jytest1                  169.254.123.145 88.8
                                                             8.88.1,STABLE
ora.asm
      1        ONLINE  ONLINE       jytest1                  Started,STABLE
      2        ONLINE  ONLINE       jytest2                  Started,STABLE
      3        OFFLINE OFFLINE                               STABLE
ora.cvu
      1        ONLINE  ONLINE       jytest1                  STABLE
ora.jy.db
      1        ONLINE  ONLINE       jytest1                  Open,HOME=/u01/app/o
                                                             racle/product/12.2.0
                                                             /db,STABLE
      2        ONLINE  ONLINE       jytest2                  Open,HOME=/u01/app/o
                                                             racle/product/12.2.0
                                                             /db,STABLE
ora.jytest1.vip
      1        ONLINE  ONLINE       jytest1                  STABLE
ora.jytest2.vip
      1        ONLINE  ONLINE       jytest2                  STABLE
ora.mgmtdb
      1        ONLINE  ONLINE       jytest1                  Open,STABLE
ora.orcl.db
      1        ONLINE  ONLINE       jytest1                  Open,HOME=/u01/app/o
                                                             racle/product/12.2.0
                                                             /db/,STABLE
      2        ONLINE  ONLINE       jytest2                  Open,HOME=/u01/app/o
                                                             racle/product/12.2.0
                                                             /db/,STABLE
ora.qosmserver
      1        ONLINE  ONLINE       jytest1                  STABLE
ora.scan1.vip
      1        ONLINE  ONLINE       jytest2                  STABLE
ora.scan2.vip
      1        ONLINE  ONLINE       jytest1                  STABLE
ora.scan3.vip
      1        ONLINE  ONLINE       jytest1                  STABLE
--------------------------------------------------------------------------------

增加listeners参数后再次执行

[oracle@jytest1 ~]$ dbca -silent -createDatabase -templateName General_Purpose.dbc -gdbName jycs -sid jycs -databaseConfigType RAC -createAsContainerDatabase true -numberOfPDBs 1 -pdbName jycspdb -sysPassword xxzx7817600 -systemPassword xxzx7817600  -redoLogFileSize 50   -storageType ASM -datafileDestination '+test/' -
asmsnmpPassword xxzx7817600   -characterset ZHS16GBK -nationalCharacterSet AL16UTF16 -initParams log_archive_dest_1='location=+TEST/',sga_target=1G,sga_max_size=1G  -sampleSchema true  -listeners ASMNET1LSNR_ASM,LISTENER,LISTENER_SCAN1 -automaticMemoryManagement false -totalMemory 2048 -databaseType MULTIPURPOSE -nodeinfo jytest1,jytest2 
Enter PDBADMIN User Password: 

[WARNING] [DBT-06208] The 'SYS' password entered does not conform to the Oracle recommended standards.
   CAUSE: 
a. Oracle recommends that the password entered should be at least 8 characters in length, contain at least 1 uppercase character, 1 lower case character and 1 digit 

[0-9].
b.The password entered is a keyword that Oracle does not recommend to be used as password
   ACTION: Specify a strong password. If required refer Oracle documentation for guidelines.
[WARNING] [DBT-06208] The 'SYSTEM' password entered does not conform to the Oracle recommended standards.
   CAUSE: 
a. Oracle recommends that the password entered should be at least 8 characters in length, contain at least 1 uppercase character, 1 lower case character and 1 digit 

[0-9].
b.The password entered is a keyword that Oracle does not recommend to be used as password
   ACTION: Specify a strong password. If required refer Oracle documentation for guidelines.
[WARNING] [DBT-06208] The 'PDBADMIN' password entered does not conform to the Oracle recommended standards.
   CAUSE: 
a. Oracle recommends that the password entered should be at least 8 characters in length, contain at least 1 uppercase character, 1 lower case character and 1 digit 

[0-9].
b.The password entered is a keyword that Oracle does not recommend to be used as password
   ACTION: Specify a strong password. If required refer Oracle documentation for guidelines.
[WARNING] [DBT-09102] Target environment does not meet some optional requirements.
   CAUSE: Some of the optional prerequisites are not met. See logs for details. /u01/app/oracle/cfgtoollogs/dbca/trace.log_2017-04-26_12-34-00-PM
   ACTION: Find the appropriate configuration from the log file or from the installation guide to meet the prerequisites and fix this manually.
Copying database files
1% complete
11% complete
21% complete
Creating and starting Oracle instance
23% complete
25% complete
26% complete
27% complete
30% complete
33% complete
34% complete
35% complete
Creating cluster database views
37% complete
50% complete
Completing Database Creation
51% complete
53% complete
55% complete
57% complete
Creating Pluggable Databases
61% complete
78% complete
Executing Post Configuration Actions
100% complete
Look at the log file "/u01/app/oracle/cfgtoollogs/dbca/jycs/jycs3.log" for further details.

数据库创建成功,检查是否将数据库jycs注册到集群中,从下面的结果可以看到已经注册了

[grid@jytest1 ~]$ crsctl stat res -t
--------------------------------------------------------------------------------
Name           Target  State        Server                   State details       
--------------------------------------------------------------------------------
Local Resources
--------------------------------------------------------------------------------
ora.ASMNET1LSNR_ASM.lsnr
               ONLINE  ONLINE       jytest1                  STABLE
               ONLINE  ONLINE       jytest2                  STABLE
ora.CRS.dg
               ONLINE  ONLINE       jytest1                  STABLE
               ONLINE  ONLINE       jytest2                  STABLE
ora.DATA.dg
               ONLINE  ONLINE       jytest1                  STABLE
               ONLINE  ONLINE       jytest2                  STABLE
ora.LISTENER.lsnr
               ONLINE  ONLINE       jytest1                  STABLE
               ONLINE  ONLINE       jytest2                  STABLE
ora.TEST.dg
               ONLINE  ONLINE       jytest1                  STABLE
               ONLINE  ONLINE       jytest2                  STABLE
ora.chad
               ONLINE  ONLINE       jytest1                  STABLE
               ONLINE  ONLINE       jytest2                  STABLE
ora.net1.network
               ONLINE  ONLINE       jytest1                  STABLE
               ONLINE  ONLINE       jytest2                  STABLE
ora.ons
               ONLINE  ONLINE       jytest1                  STABLE
               ONLINE  ONLINE       jytest2                  STABLE
ora.proxy_advm
               OFFLINE OFFLINE      jytest1                  STABLE
               OFFLINE OFFLINE      jytest2                  STABLE
--------------------------------------------------------------------------------
Cluster Resources
--------------------------------------------------------------------------------
ora.LISTENER_SCAN1.lsnr
      1        ONLINE  ONLINE       jytest2                  STABLE
ora.LISTENER_SCAN2.lsnr
      1        ONLINE  ONLINE       jytest1                  STABLE
ora.LISTENER_SCAN3.lsnr
      1        ONLINE  ONLINE       jytest1                  STABLE
ora.MGMTLSNR
      1        ONLINE  ONLINE       jytest1                  169.254.123.145 88.8
                                                             8.88.1,STABLE
ora.asm
      1        ONLINE  ONLINE       jytest1                  Started,STABLE
      2        ONLINE  ONLINE       jytest2                  Started,STABLE
      3        OFFLINE OFFLINE                               STABLE
ora.cvu
      1        ONLINE  ONLINE       jytest1                  STABLE
ora.jy.db
      1        ONLINE  ONLINE       jytest1                  Open,HOME=/u01/app/o
                                                             racle/product/12.2.0
                                                             /db,STABLE
      2        ONLINE  ONLINE       jytest2                  Open,HOME=/u01/app/o
                                                             racle/product/12.2.0
                                                             /db,STABLE
ora.jycs.db
      1        ONLINE  ONLINE       jytest1                  Open,HOME=/u01/app/o
                                                             racle/product/12.2.0
                                                             /db,STABLE
      2        ONLINE  ONLINE       jytest2                  Open,HOME=/u01/app/o
                                                             racle/product/12.2.0
                                                             /db,STABLE
ora.jytest1.vip
      1        ONLINE  ONLINE       jytest1                  STABLE
ora.jytest2.vip
      1        ONLINE  ONLINE       jytest2                  STABLE
ora.mgmtdb
      1        ONLINE  ONLINE       jytest1                  Open,STABLE
ora.orcl.db
      1        OFFLINE OFFLINE                               Instance Shutdown,ST
                                                             ABLE
      2        OFFLINE OFFLINE                               Instance Shutdown,ST
                                                             ABLE
ora.qosmserver
      1        ONLINE  ONLINE       jytest1                  STABLE
ora.scan1.vip
      1        ONLINE  ONLINE       jytest2                  STABLE
ora.scan2.vip
      1        ONLINE  ONLINE       jytest1                  STABLE
ora.scan3.vip
      1        ONLINE  ONLINE       jytest1                  STABLE
--------------------------------------------------------------------------------

小结:
12c中使用dbca -silent方式来创建数据库之前的版本相比,增加了listeners参数,减少了指定ASM磁盘组的diskGroupName参数,并且指定磁盘组名称时需要指定+号,之前版本不需要指定+号。当然还增加了许多其它参数,有兴趣的可以测试一下。

Oracle 12Cr2 Using CloneDB to clone a database

这里将介绍如何使用Oracle 12CR2的CloneDB功能来克隆一个数据库,生产库orcl的Oracle home目录为/u01/app/oracle/product/12.2.0/db,数据库的备份文件存储在/u01/app/oracle/backup/目录中,CloneDB库clonedb的oracle home目录也为/u01/app/oracle/product/12.2.0/db

操作步骤如下:
1.对生产库执行备份,因为生产库jy启用了归档所以执行联机备份,使用backup as copy来备份生产库的数据文件,只备份数据文件。

SQL> col name for a50
SQL> select file#,rfile#,name from v$datafile;

     FILE#     RFILE# NAME
---------- ---------- --------------------------------------------------
         1          1 +DATA/ORCL/DATAFILE/system.280.941831569
         2          2 +DATA/ORCL/DATAFILE/sysaux.281.941831647
         3          3 +DATA/ORCL/DATAFILE/undotbs1.282.941831677
         4          4 +DATA/ORCL/DATAFILE/users.284.941831687

SQL> select name from v$tablespace;

NAME
--------------------------------------------------
SYSTEM
SYSAUX
UNDOTBS1
TEMP
USERS


RMAN> backup as copy database format '/u01/app/oracle/backup/%U';

Starting backup at 25-APR-17
using channel ORA_DISK_1
channel ORA_DISK_1: starting datafile copy
input datafile file number=00001 name=+DATA/ORCL/DATAFILE/system.280.941831569
output file name=/u01/app/oracle/backup/data_D-ORCL_I-1469612247_TS-SYSTEM_FNO-1_1vs2jnif tag=TAG20170425T210621 RECID=17 STAMP=942267998
channel ORA_DISK_1: datafile copy complete, elapsed time: 00:00:15
channel ORA_DISK_1: starting datafile copy
input datafile file number=00002 name=+DATA/ORCL/DATAFILE/sysaux.281.941831647
output file name=/u01/app/oracle/backup/data_D-ORCL_I-1469612247_TS-SYSAUX_FNO-2_20s2jnj1 tag=TAG20170425T210621 RECID=18 STAMP=942268013
channel ORA_DISK_1: datafile copy complete, elapsed time: 00:00:15
channel ORA_DISK_1: starting datafile copy
input datafile file number=00004 name=+DATA/ORCL/DATAFILE/users.284.941831687
output file name=/u01/app/oracle/backup/data_D-ORCL_I-1469612247_TS-USERS_FNO-4_21s2jnjj tag=TAG20170425T210621 RECID=19 STAMP=942268023
channel ORA_DISK_1: datafile copy complete, elapsed time: 00:00:07
channel ORA_DISK_1: starting datafile copy
input datafile file number=00003 name=+DATA/ORCL/DATAFILE/undotbs1.282.941831677
output file name=/u01/app/oracle/backup/data_D-ORCL_I-1469612247_TS-UNDOTBS1_FNO-3_22s2jnjs tag=TAG20170425T210621 RECID=20 STAMP=942268033
channel ORA_DISK_1: datafile copy complete, elapsed time: 00:00:08
Finished backup at 25-APR-17

Starting Control File and SPFILE Autobackup at 25-APR-17
piece handle=/u01/app/oracle/product/12.2.0/db/dbs/c-1469612247-20170425-03 comment=NONE
Finished Control File and SPFILE Autobackup at 25-APR-17

2.创建pfile参数文件

SQL> create pfile='/u01/app/oracle/product/12.2.0/db/dbs/initclonedb.ora' from spfile;

File created.

3.创建克隆库clonedb
3.1 手动生成创建CloneDB库的SQL脚本
3.1.1 以sysdba或sysbackup管理权限连接到生产库

[oracle@jytest3 ~]$ export ORACLE_SID=orcl
[oracle@jytest3 ~]$ sqlplus / as sysdba

SQL*Plus: Release 12.2.0.1.0 Production on Mon Apr 24 19:56:40 2017

Copyright (c) 1982, 2016, Oracle.  All rights reserved.


Connected to:
Oracle Database 12c Enterprise Edition Release 12.2.0.1.0 - 64bit Production

3.1.2 执行以下命令来对生产库的控制文件生成备份

SQL> alter database backup controlfile to trace;

Database altered.

SQL> oradebug setmypid
Statement processed.

SQL> oradebug tracefile_name
/u01/app/oracle/diag/rdbms/orcl/orcl/trace/orcl_ora_22801.trc

3.1.3 将生成的跟踪文件中的startup nomount与create controlfile语句复制到一个新创建的脚本中。

[oracle@jytest3 dbs]$ vi create_clonedb.sql
STARTUP NOMOUNT
CREATE CONTROLFILE REUSE DATABASE "ORCL" NORESETLOGS  ARCHIVELOG
    MAXLOGFILES 16
    MAXLOGMEMBERS 2
    MAXDATAFILES 30
    MAXINSTANCES 1
    MAXLOGHISTORY 292
LOGFILE
  GROUP 1 '+DATA/ORCL/ONLINELOG/group_1.278.941831529'  SIZE 100M BLOCKSIZE 512,
  GROUP 2 '+DATA/ORCL/ONLINELOG/group_2.279.941831545'  SIZE 100M BLOCKSIZE 512
-- STANDBY LOGFILE
DATAFILE
  '+DATA/ORCL/DATAFILE/system.280.941831569',
  '+DATA/ORCL/DATAFILE/sysaux.281.941831647',
  '+DATA/ORCL/DATAFILE/undotbs1.282.941831677',
  '+DATA/ORCL/DATAFILE/users.284.941831687'
CHARACTER SET ZHS16GBK
;

3.1.4 统计图脚本create_clonedb.sql,将数据库名从orcl修改为clonedb,将日志文件目录从+data/orcl/onlinelog/修改为+data/clonedb/onlinelog,将数据文件目录从+data/orcl/datafile修改为备份目录/u01/app/oracle/backup/,修改之后的脚本内容如下:

STARTUP NOMOUNT pfile=/u01/app/oracle/product/12.2.0/db/dbs/initclonedb.ora

CREATE CONTROLFILE REUSE SET DATABASE clonedb RESETLOGS  ARCHIVELOG
    MAXLOGFILES 16
    MAXLOGMEMBERS 2
    MAXDATAFILES 30
    MAXINSTANCES 1
    MAXLOGHISTORY 292
LOGFILE
  GROUP 1 '+data/clonedb/onlinelog/redo1.log'  SIZE 100M BLOCKSIZE 512,
  GROUP 2 '+data/clonedb/onlinelog/redo2.log'  SIZE 100M BLOCKSIZE 512
-- STANDBY LOGFILE
DATAFILE
  '/u01/app/oracle/backup/data_D-ORCL_I-1469612247_TS-SYSTEM_FNO-1_1vs2jnif',
  '/u01/app/oracle/backup/data_D-ORCL_I-1469612247_TS-SYSAUX_FNO-2_20s2jnj1',
  '/u01/app/oracle/backup/data_D-ORCL_I-1469612247_TS-USERS_FNO-4_21s2jnjj',
  '/u01/app/oracle/backup/data_D-ORCL_I-1469612247_TS-UNDOTBS1_FNO-3_22s2jnjs'
CHARACTER SET ZHS16GBK
;

3.1.5 将生成的参数文件pfile复制到clonedb库所存储参数文件的位置,因为这里生产库与clonedb库的Oracle home目录相同,所以不用复制,这里需要参数文件修改为clonedb库所使用的相关参数,并且要增加CLONEDB=TRUE这个参数

[oracle@jytest3 dbs]$ vi initclonedb.ora
orcl.__data_transfer_cache_size=0
orcl.__db_cache_size=427819008
orcl.__inmemory_ext_roarea=0
orcl.__inmemory_ext_rwarea=0
orcl.__java_pool_size=4194304
orcl.__large_pool_size=20971520
orcl.__oracle_base='/u01/app/oracle'#ORACLE_BASE set from environment
orcl.__pga_aggregate_target=432013312
orcl.__sga_target=641728512
orcl.__shared_io_pool_size=0
orcl.__shared_pool_size=171966464
orcl.__streams_pool_size=0
*.control_files='+data/clonedb/controlfile/control01.ctl','+data/clonedb/controlfile/control02.ctl'
*.db_create_file_dest='+DATA'
*.db_name=clonedb
*.log_archive_dest_1='location=+data/arch/clonedb/'
*.memory_target=1G
clonedb=true

3.1.6 使用SQL*PLUS并以sysdba管理权限连接到clonedb库

[oracle@jytest3 ~]$ export ORACLE_SID=clonedb
[oracle@jytest3 ~]$ sqlplus / as sysdba

SQL*Plus: Release 12.2.0.1.0 Production on Mon Apr 24 20:24:52 2017

Copyright (c) 1982, 2016, Oracle.  All rights reserved.

Connected to an idle instance.

3.1.7 运行之前创建的create_clonedb.sql脚本

SQL> @/u01/app/oracle/product/12.2.0/db/dbs/create_clonedb.sql
ORACLE instance started.

Total System Global Area 1073741824 bytes
Fixed Size                  8628936 bytes
Variable Size             629146936 bytes
Database Buffers          427819008 bytes
Redo Buffers                8146944 bytes

Control file created.

3.1.8 对于在备份目录中的每个数据文件,执行dbms_dnfs.clonedb_renamefile过程,srcfile指定备份文件,destfile指定目标文件

SQL> BEGIN
  2  DBMS_DNFS.CLONEDB_RENAMEFILE(srcfile => '/u01/app/oracle/backup/data_D-ORCL_I-1469612247_TS-SYSTEM_FNO-1_1vs2jnif',destfile => 

'+DATA/clonedb/datafile/system.dbf');
  3  DBMS_DNFS.CLONEDB_RENAMEFILE(srcfile => '/u01/app/oracle/backup/data_D-ORCL_I-1469612247_TS-SYSAUX_FNO-2_20s2jnj1',destfile => 

'+DATA/clonedb/datafile/sysaux.dbf');
  4  DBMS_DNFS.CLONEDB_RENAMEFILE(srcfile => '/u01/app/oracle/backup/data_D-ORCL_I-1469612247_TS-USERS_FNO-4_21s2jnjj',destfile => '+DATA/clonedb/datafile/users.dbf');
  5  DBMS_DNFS.CLONEDB_RENAMEFILE(srcfile => '/u01/app/oracle/backup/data_D-ORCL_I-1469612247_TS-UNDOTBS1_FNO-3_22s2jnjs',destfile => 

'+DATA/clonedb/datafile/undotbs1.dbf');
  6  END;
  7  /

PL/SQL procedure successfully completed.

4.如果使用联机备份创建clonedb库,那么需要对clonedb执行恢复操作。如果是使用的完全脱机备份或使用的是backup as copy备份,则不需要执行恢复操作,因为我这是使用的backup as copy备份。需要执行恢复,执行以下命令:

SQL> recover database using backup controlfile until cancel;
ORA-00279: change 630593 generated at 04/25/2017 21:06:24 needed for thread 1
ORA-00289: suggestion : +DATA/arch/clonedb/1_22_941831511.dbf
ORA-00280: change 630593 for thread 1 is in sequence #22


Specify log: {=suggested | filename | AUTO | CANCEL}

这里需要查询生产库当前正在使用的联机重做日志文件

SQL> set long 300
SQL> set linesize 300
SQL> select * from v$log;

    GROUP#    THREAD#  SEQUENCE#      BYTES  BLOCKSIZE    MEMBERS ARC STATUS           FIRST_CHANGE# FIRST_TIME   NEXT_CHANGE# NEXT_TIME        CON_ID
---------- ---------- ---------- ---------- ---------- ---------- --- ---------------- ------------- ------------ ------------ ------------ ----------
         1          1         21  104857600        512          1 YES INACTIVE                627446 25-APR-17          630528 25-APR-17             0
         2          1         22  104857600        512          1 NO  CURRENT                 630528 25-APR-17      1.8447E+19                       0

SQL> col member for a50
SQL> select * from v$logfile;

    GROUP# STATUS  TYPE    MEMBER                                             IS_     CON_ID
---------- ------- ------- -------------------------------------------------- --- ----------
         1         ONLINE  +DATA/ORCL/ONLINELOG/group_1.278.941831529         NO           0
         2         ONLINE  +DATA/ORCL/ONLINELOG/group_2.279.941831545         NO           0


+DATA/ORCL/ONLINELOG/group_2.279.941831545
Log applied.
Media recovery complete.
SQL> 

5.执行以下命令open数据库

SQL> alter database open resetlogs;

Database altered.

到此克隆数据库的所要操作完成。

Oracle使用联机重定义来给表增加新列与分区

因为需要将一张上亿我们要记录的表修改为分区表,所以尝试使用联机重定义来给表增加新列与分区的方法来实现,下面是一个测试的例子,操作系统是Oracle Linux 7.1,数据库为12.2.0.1,原始表为emp_redef,该表存储在hr方案中:

SQL> desc hr.emp_redef
Name          Type         Nullable Default Comments
------------- ------------ -------- ------- --------
EMPLOYEE_ID   NUMBER(6)
FIRST_NAME    VARCHAR2(20) Y
LAST_NAME     VARCHAR2(25)
JOB_ID        VARCHAR2(10)
DEPARTMENT_ID NUMBER(4)    Y

表emp_redef将按以下规则来进行联机重定义:
.增加新列mgr,hiredate,sal与bonus
.新列bonus被初始化为0
.列department_id的值由10开始增加
.表将被重定义为范围分区表,分区键为employee_id。

联机重定义操作如下:
1.用要执行联机重定义操作的用户登录数据库

SQL> conn pm/pm@jypdb
Connected.

2.验证表emp_redef是否可以执行联机重定义。在这种情况下,可以使用主键或伪主键来来进行验证。

SQL> exec dbms_redefinition.can_redef_table(uname=>'HR',tname=>'EMP_REDEF',options_flag=>dbms_redefinition.cons_use_pk);

PL/SQL procedure successfully completed.

3.创建一个中间表hr.int_emp_redef

SQL> create table hr.int_emp_redef
  2  (
  3    employee_id   NUMBER(6) not null,
  4    first_name    VARCHAR2(20),
  5    last_name     VARCHAR2(25) not null,
  6    job_id        VARCHAR2(10) not null,
  7    department_id NUMBER(4) not null,
  8    mgr           NUMBER(5),
  9    hiredate      DATE DEFAULT(sysdate),
 10    sal           NUMBER(7,2),
 11    bonus         NUMBER(7,2) DEFAULT(0)
 12  )
 13  partition by range(employee_id)
 14  (
 15  partition emp200 values less than(200) tablespace users,
 16  partition emp400 values less than(400) tablespace users
 17  );
Table created

4.开始重定义操作

SQL> begin
  2  dbms_redefinition.start_redef_table(
  3    uname => 'hr',
  4    orig_table => 'emp_redef',
  5    int_table => 'int_emp_redef',
  6    col_mapping => 'employee_id employee_id, first_name first_name,last_name last_name, job_id job_id, department_id+10 department_id,0 bonus',
  7    options_flag => DBMS_REDEFINITION.CONS_USE_PK);
  8  end;
  9  /

PL/SQL procedure successfully completed.

5.复制依赖对象(自动对表hr.int_emp_redef创建任何触发器,索引,物化视图日志,授权与约束)

SQL> declare
  2  num_errors pls_integer;
  3  begin
  4  dbms_redefinition.copy_table_dependents(
  5    uname => 'hr',
  6    orig_table => 'emp_redef',
  7    int_table => 'int_emp_redef',
  8    copy_indexes => DBMS_REDEFINITION.CONS_ORIG_PARAMS,
  9    copy_triggers => TRUE,
 10    copy_constraints => TRUE,
 11    copy_privileges => TRUE,
 12    ignore_errors => TRUE,
 13    num_errors => num_errors);
 14  end;
 15  /

PL/SQL procedure successfully completed.

注意,在调用这个过程时ignore_errors参数需要设置为TRUE。原因是中间表创建了主键约束,并且当执行copye_table_dependents过程来试图从原始表复制主键约束与索引时会发生错误。可以忽略这些错误,但必须执行下一步操作中的查询来查看是否还存在其它错误。

6.查询dba_redefinition_errors视图来查看错误信息

SQL> set long 8000
SQL> set pages 8000
SQL> column object_name heading 'object name' format a20
SQL> column base_table_name heading 'base table name' format a10
SQL> column ddl_txt heading 'ddl that caused error' format a40
SQL> select object_name, base_table_name, ddl_txt from dba_redefinition_errors;

object name          base table ddl that caused error
-------------------- ---------- ----------------------------------------
SYS_C0023200         EMP_REDEF  ALTER TABLE "HR"."INT_EMP_REDEF" MODIFY
                                ("LAST_NAME" CONSTRAINT "TMP$$_SYS_C0023
                                2000" NOT NULL ENABLE NOVALIDATE)

SYS_C0023201         EMP_REDEF  ALTER TABLE "HR"."INT_EMP_REDEF" MODIFY
                                ("JOB_ID" CONSTRAINT "TMP$$_SYS_C0023201
                                0" NOT NULL ENABLE NOVALIDATE)


2 rows selected.

上面的错误信息是说中间表的last_name与job_id列为not null,而原因表为null,这种错误可以忽略。

7.同步中间表hr.int_emp_redef

SQL> begin
  2  dbms_redefinition.sync_interim_table(
  3    uname => 'hr',
  4    orig_table => 'emp_redef',
  5    int_table => 'int_emp_redef');
  6  end;
  7  /

PL/SQL procedure successfully completed.

8.完成重定义操作

SQL> begin
  2  dbms_redefinition.finish_redef_table(
  3   uname => 'hr',
  4   orig_table => 'emp_redef',
  5   int_table => 'int_emp_redef');
  6  end;
  7  /

PL/SQL procedure successfully completed.

表hr.emp_redef只会以排他模式被锁定很短的时间来结束重定义操作。在操作完成后,表hr.emp_redef将使用hr.int_emp_redef表的所有属性来重定义。

SQL> desc hr.emp_redef
Name          Type         Nullable Default   Comments
------------- ------------ -------- --------- --------
EMPLOYEE_ID   NUMBER(6)
FIRST_NAME    VARCHAR2(20) Y
LAST_NAME     VARCHAR2(25)
JOB_ID        VARCHAR2(10)
DEPARTMENT_ID NUMBER(4)
MGR           NUMBER(5)    Y
HIREDATE      DATE         Y        (sysdate)
SAL           NUMBER(7,2)  Y
BONUS         NUMBER(7,2)  Y        (0)

SQL> select dbms_metadata.get_ddl(object_type =>'TABLE',name =>'EMP_REDEF',schema => 'HR') from dual;

DBMS_METADATA.GET_DDL(OBJECT_TYPE=>'TABLE',NAME=>'EMP_REDEF',SCHEMA=>'HR')
--------------------------------------------------------------------------------

  CREATE TABLE "HR"."EMP_REDEF"
   (    "EMPLOYEE_ID" NUMBER(6,0) NOT NULL ENABLE,
        "FIRST_NAME" VARCHAR2(20),
        "LAST_NAME" VARCHAR2(25) NOT NULL ENABLE,
        "JOB_ID" VARCHAR2(10) NOT NULL ENABLE,
        "DEPARTMENT_ID" NUMBER(4,0) NOT NULL ENABLE,
        "MGR" NUMBER(5,0),
        "HIREDATE" DATE DEFAULT (sysdate),
        "SAL" NUMBER(7,2),
        "BONUS" NUMBER(7,2) DEFAULT (0),
         CONSTRAINT "EMP_REDEF_EMP_ID_PK" PRIMARY KEY ("EMPLOYEE_ID")
  USING INDEX PCTFREE 10 INITRANS 2 MAXTRANS 255 COMPUTE STATISTICS
  STORAGE(INITIAL 65536 NEXT 1048576 MINEXTENTS 1 MAXEXTENTS 2147483645
  PCTINCREASE 0 FREELISTS 1 FREELIST GROUPS 1
  BUFFER_POOL DEFAULT FLASH_CACHE DEFAULT CELL_FLASH_CACHE DEFAULT)
  TABLESPACE "USERS"  ENABLE
   ) PCTFREE 10 PCTUSED 40 INITRANS 1 MAXTRANS 255
  STORAGE(
  BUFFER_POOL DEFAULT FLASH_CACHE DEFAULT CELL_FLASH_CACHE DEFAULT)
  TABLESPACE "USERS"
  PARTITION BY RANGE ("EMPLOYEE_ID")
 (PARTITION "EMP200"  VALUES LESS THAN (200) SEGMENT CREATION IMMEDIATE
  PCTFREE 10 PCTUSED 40 INITRANS 1 MAXTRANS 255
 NOCOMPRESS LOGGING
  STORAGE(INITIAL 8388608 NEXT 1048576 MINEXTENTS 1 MAXEXTENTS 2147483645
  PCTINCREASE 0 FREELISTS 1 FREELIST GROUPS 1
  BUFFER_POOL DEFAULT FLASH_CACHE DEFAULT CELL_FLASH_CACHE DEFAULT)
  TABLESPACE "USERS" ,
 PARTITION "EMP400"  VALUES LESS THAN (400) SEGMENT CREATION IMMEDIATE
  PCTFREE 10 PCTUSED 40 INITRANS 1 MAXTRANS 255
 NOCOMPRESS LOGGING
  STORAGE(INITIAL 8388608 NEXT 1048576 MINEXTENTS 1 MAXEXTENTS 2147483645
  PCTINCREASE 0 FREELISTS 1 FREELIST GROUPS 1
  BUFFER_POOL DEFAULT FLASH_CACHE DEFAULT CELL_FLASH_CACHE DEFAULT)
  TABLESPACE "USERS" )


1 row selected.

可以看到表hr.emp_redef已经成功能联机重定义

9.等任何查询中间表的语句执行完成后将其删除,而且中间表在重定义后其结构就变成了原始表的表结构

SQL> desc hr.int_emp_redef
Name          Type         Nullable Default Comments
------------- ------------ -------- ------- --------
EMPLOYEE_ID   NUMBER(6)    Y
FIRST_NAME    VARCHAR2(20) Y
LAST_NAME     VARCHAR2(25)
JOB_ID        VARCHAR2(10)
DEPARTMENT_ID NUMBER(4)    Y

SQL> drop table hr.int_emp_redef purge;
Table dropped

到此,联机重定义表hr.emp_redef就操作完成。

Oracle Database 12c Release 2 (12.2) RAC On Oracle Linux 7 Using VMware

安装环境为Oracle Linux 7.1,Oracle版本为12.2.0.1,下面是RAC环境的IP配置

ip地址          主机名                   类型     解析方式 
10.10.10.171  jytest1 .jydba.net      public   DNS或etc/hosts 
10.10.10.172  jytest2 .jydba.net      public   DNS或etc/hosts 
88.88.88.1    jytest1 .jydba.net      private  DNS或etc/hosts 
88.88.88.2    jytest2 .jydba.net      private  DNS或etc/hosts 
10.10.10.175  jytest1 .jydba.net      virtual  DNS或etc/hosts 
10.10.10.176  jytest2 .jydba.net      virtual  DNS或etc/hosts
10.10.10.177  jytest-scan.jydba.net   scan     DNS或etc/hosts
10.10.10.178  jytest-scan.jydba.net   scan     DNS或etc/hosts
10.10.10.179  jytest-scan.jydba.net   scan     DNS或etc/hosts

[root@jytest1 soft]# cat /etc/hosts

127.0.0.1    localhost.jydba.net localhost
10.10.10.171 jytest1.jydba.net jytest1
10.10.10.172 jytest2.jydba.net jytest2

10.10.10.175 jytest1-vip.jydba.net jytest1-vip
10.10.10.176 jytest2-vip.jydba.net jytest2-vip

88.88.88.1   jytest1-priv.jydba.net jytest1-priv
88.88.88.2   jytest2-priv.jydba.net jytest2-priv

10.10.10.177 jytest-scan.jydba.net  jytest-scan
10.10.10.178 jytest-scan.jydba.net  jytest-scan
10.10.10.179 jytest-scan.jydba.net  jytest-scan 
[root@jytest2 ~]# cat /etc/hosts

127.0.0.1    localhost.jydba.net localhost
10.10.10.171 jytest1.jydba.net jytest1
10.10.10.172 jytest2.jydba.net jytest2

10.10.10.175 jytest1-vip.jydba.net jytest1-vip
10.10.10.176 jytest2-vip.jydba.net jytest2-vip

88.88.88.1   jytest1-priv.jydba.net jytest1-priv
88.88.88.2   jytest2-priv.jydba.net jytest2-priv

10.10.10.177 jytest-scan.jydba.net  jytest-scan
10.10.10.178 jytest-scan.jydba.net  jytest-scan
10.10.10.179 jytest-scan.jydba.net  jytest-scan 

开启ftp

[root@jytest1 vsftpd]# service vsftpd start
Redirecting to /bin/systemctl start  vsftpd.service

[root@jytest2 vsftpd]# service vsftpd start
Redirecting to /bin/systemctl start  vsftpd.service

下面这幅图显示的是/etc/vsftpd/ftpusers的内容,我们需要做的是在“root”字样前面添加注释符,通过这种手段来打开root用户对ftp功能的使用。同理,需要编辑的文件还有user_list:

[root@jytest1 ~]# vi ftpusers
# Users that are not allowed to login via ftp
#root
bin
daemon
adm
lp
sync
shutdown
halt
mail
news
uucp
operator
games
nobody

[root@jytest1 ~]## vi user_list
# vsftpd userlist
# If userlist_deny=NO, only allow users in this file
# If userlist_deny=YES (default), never allow users in this file, and
# do not even prompt for a password.
# Note that the default vsftpd pam config also checks /etc/vsftpd/ftpusers
# for users that are denied.
#root
bin
daemon
adm
lp
sync
shutdown
halt
mail
news
uucp
operator
games
nobody

通过编辑这两个文件,我们就可以在windows下以root用户登陆到虚拟机里同一网段的linux系统下

创建用户组

[root@jytest1 ~]# groupadd -g 1006 asmadmin
[root@jytest1 ~]# groupadd -g 1007 asmdba
[root@jytest1 ~]# groupadd -g 1008 asmoper
[root@jytest1 ~]# groupadd -g 1009 dba
[root@jytest1 ~]# groupadd -g 1010 oper
[root@jytest1 ~]# groupadd -g 1011 oinstall
[root@jytest1 ~]# groupadd -g 1012 backupdba
[root@jytest1 ~]# groupadd -g 1013 dgdba
[root@jytest1 ~]# groupadd -g 1014 kmdba
[root@jytest1 ~]# groupadd -g 1015 racdba


[root@jytest2 ~]# groupadd -g 1006 asmadmin
[root@jytest2 ~]# groupadd -g 1007 asmdba
[root@jytest2 ~]# groupadd -g 1008 asmoper
[root@jytest2 ~]# groupadd -g 1009 dba
[root@jytest2 ~]# groupadd -g 1010 oper
[root@jytest2 ~]# groupadd -g 1011 oinstall
[root@jytest2 ~]# groupadd -g 1012 backupdba
[root@jytest2 ~]# groupadd -g 1013 dgdba
[root@jytest2 ~]# groupadd -g 1014 kmdba
[root@jytest2 ~]# groupadd -g 1015 racdba

创建用户

[root@jytest1 ~]#useradd  -u 1001 -g oinstall -G dba,asmdba,backupdba,dgdba,kmdba,racdba,oper oracle
[root@jytest1 ~]#useradd  -u 1002 -g oinstall -G asmadmin,asmdba,asmoper,dba grid

[root@jytest2 ~]#useradd  -u 1001 -g oinstall -G dba,asmdba,backupdba,dgdba,kmdba,racdba,oper oracle
[root@jytest2 ~]#useradd  -u 1002 -g oinstall -G asmadmin,asmdba,asmoper,dba grid


[root@jytest1 /]# passwd grid
Changing password for user grid.
New password: 
BAD PASSWORD: The password is shorter than 8 characters
Retype new password: 
passwd: all authentication tokens updated successfully.
You have new mail in /var/spool/mail/root
[root@jytest1 /]# passwd oracle
Changing password for user oracle.
New password: 
BAD PASSWORD: The password is shorter than 8 characters
Retype new password: 
passwd: all authentication tokens updated successfully.

[root@jytest2 /]# passwd grid
Changing password for user grid.
New password: 
BAD PASSWORD: The password is shorter than 8 characters
Retype new password: 
passwd: all authentication tokens updated successfully.
[root@jytest2 /]# passwd oracle
Changing password for user oracle.
New password: 
BAD PASSWORD: The password is shorter than 8 characters
Retype new password: 
passwd: all authentication tokens updated successfully.

配置ASM所需磁盘,编辑/etc/udev/rules.d/99-my-asmdevices.rules配置文件

[root@jytest1 ~]# vi /etc/udev/rules.d/99-my-asmdevices.rules

KERNEL=="sd*[!0-9]", ENV{DEVTYPE}=="disk", SUBSYSTEM=="block",  PROGRAM=="/usr/lib/udev/scsi_id -g -u -d $devnode",  RESULT=="36000c293af84fb49683bbfd9a0b377ec", RUN+="/bin/sh -c 'mknod /dev/asmdisk01 b  $major $minor; chown grid:asmadmin /dev/asmdisk01; chmod 0660 /dev/asmdisk01'"

KERNEL=="sd*[!0-9]", ENV{DEVTYPE}=="disk", SUBSYSTEM=="block",  PROGRAM=="/usr/lib/udev/scsi_id -g -u -d $devnode",  RESULT=="36000c290196d69c481a2cf191d33868c", RUN+="/bin/sh -c 'mknod /dev/asmdisk02 b  $major $minor; chown grid:oinstall /dev/asmdisk02; chmod 0660 /dev/asmdisk02'"

KERNEL=="sd*[!0-9]", ENV{DEVTYPE}=="disk", SUBSYSTEM=="block",  PROGRAM=="/usr/lib/udev/scsi_id -g -u -d $devnode",  RESULT=="36000c2903ffae4d3865722d108fadc96", RUN+="/bin/sh -c 'mknod /dev/asmdisk03 b  $major $minor; chown grid:oinstall /dev/asmdisk03; chmod 0660 /dev/asmdisk03'"

KERNEL=="sd*[!0-9]", ENV{DEVTYPE}=="disk", SUBSYSTEM=="block",  PROGRAM=="/usr/lib/udev/scsi_id -g -u -d $devnode",  RESULT=="36000c29e1b47900ecad6f1458a3585ed", RUN+="/bin/sh -c 'mknod /dev/asmdisk04 b  $major $minor; chown grid:oinstall /dev/asmdisk04; chmod 0660 /dev/asmdisk04'"

KERNEL=="sd*[!0-9]", ENV{DEVTYPE}=="disk", SUBSYSTEM=="block",  PROGRAM=="/usr/lib/udev/scsi_id -g -u -d $devnode",  RESULT=="36000c29748d41fffbdddafdea6eb64bb", RUN+="/bin/sh -c 'mknod /dev/asmdisk05 b  $major $minor; chown grid:oinstall /dev/asmdisk05; chmod 0660 /dev/asmdisk05'"

KERNEL=="sd*[!0-9]", ENV{DEVTYPE}=="disk", SUBSYSTEM=="block",  PROGRAM=="/usr/lib/udev/scsi_id -g -u -d $devnode",  RESULT=="36000c2985afa13536000f5887b9acb92", RUN+="/bin/sh -c 'mknod /dev/asmdisk06 b  $major $minor; chown grid:oinstall /dev/asmdisk06; chmod 0660 /dev/asmdisk06'"

[root@jytest2 ~]# vi /etc/udev/rules.d/99-my-asmdevices.rules

KERNEL=="sd*[!0-9]", ENV{DEVTYPE}=="disk", SUBSYSTEM=="block",  PROGRAM=="/usr/lib/udev/scsi_id -g -u -d $devnode",  RESULT=="36000c293af84fb49683bbfd9a0b377ec", RUN+="/bin/sh -c 'mknod /dev/asmdisk01 b  $major $minor; chown grid:asmadmin /dev/asmdisk01; chmod 0660 /dev/asmdisk01'"

KERNEL=="sd*[!0-9]", ENV{DEVTYPE}=="disk", SUBSYSTEM=="block",  PROGRAM=="/usr/lib/udev/scsi_id -g -u -d $devnode",  RESULT=="36000c290196d69c481a2cf191d33868c", RUN+="/bin/sh -c 'mknod /dev/asmdisk02 b  $major $minor; chown grid:oinstall /dev/asmdisk02; chmod 0660 /dev/asmdisk02'"

KERNEL=="sd*[!0-9]", ENV{DEVTYPE}=="disk", SUBSYSTEM=="block",  PROGRAM=="/usr/lib/udev/scsi_id -g -u -d $devnode",  RESULT=="36000c2903ffae4d3865722d108fadc96", RUN+="/bin/sh -c 'mknod /dev/asmdisk03 b  $major $minor; chown grid:oinstall /dev/asmdisk03; chmod 0660 /dev/asmdisk03'"

KERNEL=="sd*[!0-9]", ENV{DEVTYPE}=="disk", SUBSYSTEM=="block",  PROGRAM=="/usr/lib/udev/scsi_id -g -u -d $devnode",  RESULT=="36000c29e1b47900ecad6f1458a3585ed", RUN+="/bin/sh -c 'mknod /dev/asmdisk04 b  $major $minor; chown grid:oinstall /dev/asmdisk04; chmod 0660 /dev/asmdisk04'"

KERNEL=="sd*[!0-9]", ENV{DEVTYPE}=="disk", SUBSYSTEM=="block",  PROGRAM=="/usr/lib/udev/scsi_id -g -u -d $devnode",  RESULT=="36000c29748d41fffbdddafdea6eb64bb", RUN+="/bin/sh -c 'mknod /dev/asmdisk05 b  $major $minor; chown grid:oinstall /dev/asmdisk05; chmod 0660 /dev/asmdisk05'"

KERNEL=="sd*[!0-9]", ENV{DEVTYPE}=="disk", SUBSYSTEM=="block",  PROGRAM=="/usr/lib/udev/scsi_id -g -u -d $devnode",  RESULT=="36000c2985afa13536000f5887b9acb92", RUN+="/bin/sh -c 'mknod /dev/asmdisk06 b  $major $minor; chown grid:oinstall /dev/asmdisk06; chmod 0660 /dev/asmdisk06'"

[root@jytest1 /]# /sbin/udevadm trigger --type=devices --action=change

[root@jytest2 /]# /sbin/udevadm trigger --type=devices --action=change

[root@jytest1 ~]# ls -lrt /dev/asm*
brw-rw---- 1 grid oinstall 8, 32 Mar 20 18:14 /dev/asmdisk02
brw-rw---- 1 grid asmadmin 8, 16 Mar 20 18:14 /dev/asmdisk01
brw-rw---- 1 grid oinstall 8, 48 Mar 20 23:01 /dev/asmdisk03
brw-rw---- 1 grid oinstall 8, 64 Mar 20 23:01 /dev/asmdisk04
brw-rw---- 1 grid oinstall 8, 80 Mar 20 23:02 /dev/asmdisk05
brw-rw---- 1 grid oinstall 8, 96 Mar 20 23:03 /dev/asmdisk06 

[root@jytest2 ~]# ls -lrt /dev/asm*
brw-rw---- 1 grid oinstall 8, 96 Mar 21 03:55 /dev/asmdisk06
brw-rw---- 1 grid oinstall 8, 80 Mar 21 03:55 /dev/asmdisk05
brw-rw---- 1 grid oinstall 8, 48 Mar 21 03:55 /dev/asmdisk03
brw-rw---- 1 grid oinstall 8, 64 Mar 21 03:55 /dev/asmdisk04
brw-rw---- 1 grid asmadmin 8, 16 Mar 21 03:55 /dev/asmdisk01
brw-rw---- 1 grid oinstall 8, 32 Mar 21 03:55 /dev/asmdisk02

以root用户创建“Oracle inventory 目录”

[root@jytest1 /]# mkdir -p /u01/app/oraInventory
[root@jytest1 /]# chown -R grid:oinstall /u01/app/oraInventory
[root@jytest1 /]# chmod -R 775 /u01/app/oraInventory

[root@jytest2 /]# mkdir -p /u01/app/oraInventory
[root@jytest2 /]# chown -R grid:oinstall /u01/app/oraInventory
[root@jytest2 /]# chmod -R 775 /u01/app/oraInventory

以root用户创建“Grid Infrastructure BASE 目录”

[root@jytest1 /]# mkdir -p /u01/app/grid
[root@jytest1 /]# chown -R grid:oinstall /u01/app/grid
[root@jytest1 /]# chmod -R 775 /u01/app/grid

[root@jytest2 /]# mkdir -p /u01/app/grid
[root@jytest2 /]# chown -R grid:oinstall /u01/app/grid
[root@jytest2 /]# chmod -R 775 /u01/app/grid

以root用户创建“Grid Infrastructure Home 目录”

[root@jytest1 /]# mkdir -p /u01/app/product/12.2.0/crs/
[root@jytest1 /]# chown -R grid:oinstall /u01/app/product/12.2.0/crs/
[root@jytest1 /]# chmod -R 775 /u01/app/product/12.2.0/crs/

[root@jytest2 /]# mkdir -p /u01/app/product/12.2.0/crs
[root@jytest2 /]# chown -R grid:oinstall /u01/app/product/12.2.0/crs
[root@jytest2 /]# chmod -R 775 /u01/app/product/12.2.0/crs

以root用户创建“Oracle Base 目录”

[root@jytest1 /]# mkdir -p /u01/app/oracle
[root@jytest1 /]# chown -R oracle:oinstall /u01/app/oracle
[root@jytest1 /]# chmod -R 775 /u01/app/oracle

[root@jytest2 /]# mkdir -p /u01/app/oracle
[root@jytest2 /]# chown -R oracle:oinstall /u01/app/oracle
[root@jytest2 /]# chmod -R 775 /u01/app/oracle

以root用户创建“Oracle RDBMS Home 目录”

[root@jytest1 /]# mkdir -p /u01/app/oracle/product/12.2.0/db
[root@jytest1 /]# chown -R oracle:oinstall /u01/app/oracle/product/12.2.0/db
[root@jytest1 /]# chmod -R 775 /u01/app/oracle/product/12.2.0/db

[root@jytest2 /]# mkdir -p /u01/app/oracle/product/12.2.0/db
[root@jytest2 /]# chown -R oracle:oinstall /u01/app/oracle/product/12.2.0/db
[root@jytest2 /]# chmod -R 775 /u01/app/oracle/product/12.2.0/db

创建一个tmp目录

[root@jytest1 /]# mkdir /u01/tmp
[root@jytest1 /]# chmod a+wr /u01/tmp

[root@jytest2 /]# mkdir /u01/tmp
[root@jytest2 /]# chmod a+wr /u01/tmp

设置环境变量

[root@jytest1 ~]# su - grid
[grid@jytest1 ~]$ vi .bash_profile
# .bash_profile

# Get the aliases and functions
if [ -f ~/.bashrc ]; then
        . ~/.bashrc
fi

# User specific environment and startup programs

PATH=$PATH:$HOME/.local/bin:$HOME/bin

export PATH

TEMP=/u01/tmp
TMPDIR=/u01/tmp
export TEMP TMPDIR
export LD_ASSUME_KERNEL=3.8.13
export ORACLE_BASE=/u01/app/grid
export ORACLE_HOME=/u01/app/product/12.2.0/crs/
export ORACLE_SID=+ASM1
export NLS_LANG=AMERICAN_AMERICA.ZHS16GBK
export ORA_NLS33=$ORACLE_HOME/ocommon/nls/admin/data
LD_LIBRARY_PATH=$ORACLE_HOME/lib:/lib:/usr/lib
LD_LIBRARY_PATH=$LD_LIBRARY_PATH:/usr/local/lib
export LD_LIBRARY_PATH
export PATH=$PATH:$ORACLE_HOME/bin
CLASSPATH=$ORACLE_HOME/JRE:$ORACLE_HOME/jlib:$ORACLE_HOME/rdbms/jlib
CLASSPATH=$CLASSPATH:$ORACLE_HOME/network/jlib
export CLASSPATH
umask=022

[root@jytest2 ~]# su - grid
[grid@jytest2 ~]$ vi .bash_profile
# .bash_profile

# Get the aliases and functions
if [ -f ~/.bashrc ]; then
        . ~/.bashrc
fi

# User specific environment and startup programs

PATH=$PATH:$HOME/.local/bin:$HOME/bin

export PATH

TEMP=/u01/tmp
TMPDIR=/u01/tmp
export TEMP TMPDIR
export LD_ASSUME_KERNEL=3.8.13
export ORACLE_BASE=/u01/app/grid
export ORACLE_HOME=/u01/app/product/12.2.0/crs
export ORACLE_SID=+ASM2
export NLS_LANG=AMERICAN_AMERICA.ZHS16GBK
export ORA_NLS33=$ORACLE_HOME/ocommon/nls/admin/data
LD_LIBRARY_PATH=$ORACLE_HOME/lib:/lib:/usr/lib
LD_LIBRARY_PATH=$LD_LIBRARY_PATH:/usr/local/lib
export LD_LIBRARY_PATH
export PATH=$PATH:$ORACLE_HOME/bin
CLASSPATH=$ORACLE_HOME/JRE:$ORACLE_HOME/jlib:$ORACLE_HOME/rdbms/jlib
CLASSPATH=$CLASSPATH:$ORACLE_HOME/network/jlib
export CLASSPATH
umask=022

[root@jytest1 ~]# su – oracle
[oracle@jytest1 ~]$ vi .bash_profile
# .bash_profile

# Get the aliases and functions
if [ -f ~/.bashrc ]; then
        . ~/.bashrc
fi

# User specific environment and startup programs

PATH=$PATH:$HOME/.local/bin:$HOME/bin

export PATH

TEMP=/u01/tmp
TMPDIR=/u01/tmp
export TEMP TMPDIR
export LD_ASSUME_KERNEL=3.8.13
export ORACLE_BASE=/u01/app/oracle
export ORACLE_HOME=/u01/app/oracle/product/12.2.0/db
export ORACLE_SID=jytest1
export ORACLE_UNQNAME=jytest
export NLS_LANG=AMERICAN_AMERICA.ZHS16GBK
export ORA_NLS33=$ORACLE_HOME/ocommon/nls/admin/data
LD_LIBRARY_PATH=$ORACLE_HOME/lib:/lib:/usr/lib
LD_LIBRARY_PATH=$LD_LIBRARY_PATH:/usr/local/lib
export LD_LIBRARY_PATH
export PATH=$PATH:$ORACLE_HOME/bin
CLASSPATH=$ORACLE_HOME/JRE:$ORACLE_HOME/jlib:$ORACLE_HOME/rdbms/jlib
CLASSPATH=$CLASSPATH:$ORACLE_HOME/network/jlib
export CLASSPATH
umask=022

[root@jytest2 ~]# su - oracle
[oracle@jytest2 ~]$ vi .bash_profile
# .bash_profile

# Get the aliases and functions
if [ -f ~/.bashrc ]; then
        . ~/.bashrc
fi

# User specific environment and startup programs

PATH=$PATH:$HOME/.local/bin:$HOME/bin

export PATH
TEMP=/u01/tmp
TMPDIR=/u01/tmp
export TEMP TMPDIR
export LD_ASSUME_KERNEL=3.8.13
export ORACLE_BASE=/u01/app/oracle
export ORACLE_HOME=/u01/app/oracle/product/12.2.0/db
export ORACLE_SID=jytest2
export ORACLE_UNQNAME=jytest
export NLS_LANG=AMERICAN_AMERICA.ZHS16GBK
export ORA_NLS33=$ORACLE_HOME/ocommon/nls/admin/data
LD_LIBRARY_PATH=$ORACLE_HOME/lib:/lib:/usr/lib
LD_LIBRARY_PATH=$LD_LIBRARY_PATH:/usr/local/lib
export LD_LIBRARY_PATH
export PATH=$PATH:$ORACLE_HOME/bin
CLASSPATH=$ORACLE_HOME/JRE:$ORACLE_HOME/jlib:$ORACLE_HOME/rdbms/jlib
CLASSPATH=$CLASSPATH:$ORACLE_HOME/network/jlib
export CLASSPATH
umask=022

修改内核参数编辑/etc/sysctl.conf文件

[root@jytest1 ~]# vi /etc/sysctl.conf
# System default settings live in /usr/lib/sysctl.d/00-system.conf.
# To override those settings, enter new settings here, or in an /etc/sysctl.d/.conf file
#
# For more information, see sysctl.conf(5) and sysctl.d(5).
fs.aio-max-nr = 1048576
fs.file-max = 6815744
kernel.shmall = 2097152
kernel.shmmax = 4294967295
kernel.shmmni = 4096
kernel.sem = 250 32000 100 128
net.ipv4.ip_local_port_range = 9000 65500
net.core.rmem_default = 262144
net.core.rmem_max = 4194304
net.core.wmem_default = 262144
net.core.wmem_max = 1048576

[root@jytest1 ~]# sysctl -p
fs.aio-max-nr = 1048576
fs.file-max = 6815744
kernel.shmall = 2097152
kernel.shmmax = 4294967295
kernel.shmmni = 4096
kernel.sem = 250 32000 100 128
net.ipv4.ip_local_port_range = 9000 65500
net.core.rmem_default = 262144
net.core.rmem_max = 4194304
net.core.wmem_default = 262144
net.core.wmem_max = 1048576

[root@jytest2 ~]# vi /etc/sysctl.conf
# System default settings live in /usr/lib/sysctl.d/00-system.conf.
# To override those settings, enter new settings here, or in an /etc/sysctl.d/.conf file
#
# For more information, see sysctl.conf(5) and sysctl.d(5).

fs.aio-max-nr = 1048576
fs.file-max = 6815744
kernel.shmall = 2097152
kernel.shmmax = 4294967295
kernel.shmmni = 4096
kernel.sem = 250 32000 100 128
net.ipv4.ip_local_port_range = 9000 65500
net.core.rmem_default = 262144
net.core.rmem_max = 4194304
net.core.wmem_default = 262144
net.core.wmem_max = 1048576
~
[root@jytest2 ~]# sysctl -p
fs.aio-max-nr = 1048576
fs.file-max = 6815744
kernel.shmall = 2097152
kernel.shmmax = 4294967295
kernel.shmmni = 4096
kernel.sem = 250 32000 100 128
net.ipv4.ip_local_port_range = 9000 65500
net.core.rmem_default = 262144
net.core.rmem_max = 4194304
net.core.wmem_default = 262144
net.core.wmem_max = 1048576

修改oarcle参数的shell限制,在所有节点的/etc/security/limits.conf文件中添加以下参数

grid soft nproc 2047
grid hard nproc 16384
grid soft nofile 1024
grid hard nofile 65536
grid soft stack 10240
grid hard stack 32768
grid soft memlock 3145728
grid hard memlock 3145728

oracle soft nproc 2047
oracle hard nproc 16384
oracle soft nofile 1024
oracle hard nofile 65536
oracle soft stack 10240
oracle hard stack 32768
oracle soft memlock 3145728
oracle hard memlock 3145728

修改shell的默认参数文件,在所有节点的/etc/profile文件中添加以下内容:

if [ $USER = "oracle" ]; then
if [ $SHELL = "/bin/ksh" ]; then
ulimit -p 16384
ulimit -n 65536
else
ulimit -u 16384 -n 65536
fi
fi


if [ $USER = "grid" ]; then
if [ $SHELL = "/bin/ksh" ]; then
ulimit -p 16384
ulimit -n 65536
else
ulimit -u 16384 -n 65536
fi
fi

对C shell(csh or tcsh) 在所有节点的/etc/csh.login文件中增加以下代码

if ( $USER == "oracle" ) then
limit maxproc 16384
limit descriptors 65536
endif

if ( $USER == "grid" ) then
limit maxproc 16384
limit descriptors 65536
endif

解压GI安装压缩包:

[grid@jytest1 soft]cd /u01/app/product/12.2.0/crs/
[grid@jytest1 soft]# unzip -p linuxx64_12201_grid_home.zip

配置vnc

[root@jytest1 system]# rpm -qa|grep tigervnc
tigervnc-server-minimal-1.2.80-0.30.20130314svn5065.el7.x86_64
tigervnc-license-1.2.80-0.30.20130314svn5065.el7.noarch
[root@jytest1 system]# cd /
[root@jytest1 /]# rpm -e tigervnc-server-1.2.80-0.30.20130314svn5065.el7.x86_64
[root@jytest1 /]# cd soft
[root@jytest1 soft]# yum -y install tigervnc-server-1.2.80-0.30.20130314svn5065.el7.x86_64.rpm
Loaded plugins: langpacks
Examining tigervnc-server-1.2.80-0.30.20130314svn5065.el7.x86_64.rpm: tigervnc-server-1.2.80-0.30.20130314svn5065.el7.x86_64
Marking tigervnc-server-1.2.80-0.30.20130314svn5065.el7.x86_64.rpm to be installed
Resolving Dependencies
--> Running transaction check
---> Package tigervnc-server.x86_64 0:1.2.80-0.30.20130314svn5065.el7 will be installed
--> Finished Dependency Resolution
http://public-yum.oracle.com/repo/OracleLinux/OL7/UEKR3/x86_64/repodata/repomd.xml: [Errno 14] curl#6 - "Could not resolve host: public-yum.oracle.com; Unknown error"
Trying other mirror.
http://public-yum.oracle.com/repo/OracleLinux/OL7/latest/x86_64/repodata/repomd.xml: [Errno 14] curl#6 - "Could not resolve host: public-yum.oracle.com; Unknown error"
Trying other mirror.

Dependencies Resolved

=======================================================================================================================================================================
 Package                     Arch               Version                                      Repository                                                           Size
=======================================================================================================================================================================
Installing:
 tigervnc-server             x86_64             1.2.80-0.30.20130314svn5065.el7              /tigervnc-server-1.2.80-0.30.20130314svn5065.el7.x86_64             488 k

Transaction Summary
=======================================================================================================================================================================
Install  1 Package

Total size: 488 k
Installed size: 488 k
Downloading packages:
Running transaction check
Running transaction test
Transaction test succeeded
Running transaction
Warning: RPMDB altered outside of yum.
  Installing : tigervnc-server-1.2.80-0.30.20130314svn5065.el7.x86_64                                                                                              1/1 
  Verifying  : tigervnc-server-1.2.80-0.30.20130314svn5065.el7.x86_64                                                                                              1/1 

Installed:
  tigervnc-server.x86_64 0:1.2.80-0.30.20130314svn5065.el7                                                                                                             

Complete!

使用模板创建配置文件

[root@jytest1 soft]# cp /lib/systemd/system/vncserver@.service /etc/systemd/system/vncserver_root@:2.service
[root@jytest1 soft]# cd /etc/systemd/system/
[root@jytest1 system]# vi vncserver_root@:2.service
# The vncserver service unit file
#
# Quick HowTo:
# 1. Copy this file to /etc/systemd/system/vncserver@:.service
# 2. Edit  and vncserver parameters appropriately
#   ("runuser -l  -c /usr/bin/vncserver %i -arg1 -arg2")
# 3. Run `systemctl daemon-reload`
# 4. Run `systemctl enable vncserver@:.service`
#
# DO NOT RUN THIS SERVICE if your local area network is
# untrusted!  For a secure way of using VNC, you should
# limit connections to the local host and then tunnel from
# the machine you want to view VNC on (host A) to the machine
# whose VNC output you want to view (host B)
#
# [user@hostA ~]$ ssh -v -C -L 590N:localhost:590M hostB
#
# this will open a connection on port 590N of your hostA to hostB's port 590M
# (in fact, it ssh-connects to hostB and then connects to localhost (on hostB).
# See the ssh man page for details on port forwarding)
#
# You can then point a VNC client on hostA at vncdisplay N of localhost and with
# the help of ssh, you end up seeing what hostB makes available on port 590M
#
# Use "-nolisten tcp" to prevent X connections to your VNC server via TCP.
#
# Use "-localhost" to prevent remote VNC clients connecting except when
# doing so through a secure tunnel.  See the "-via" option in the
# `man vncviewer' manual page.


[Unit]
Description=Remote desktop service (VNC)
After=syslog.target network.target

[Service]
Type=simple --修改为simple
# Clean any existing files in /tmp/.X11-unix environment
ExecStartPre=/bin/sh -c '/usr/bin/vncserver -kill %i > /dev/null 2>&1 || :'
ExecStart=/sbin/runuser -l root -c "/usr/bin/vncserver %i" --修改为用户root
PIDFile=/home/root/.vnc/%H%i.pid --修改为用户root
ExecStop=/bin/sh -c '/usr/bin/vncserver -kill %i > /dev/null 2>&1 || :'

[Install]
"vncserver_root@:2.service" 45L, 1739C written

设置分辨率

[root@jytest1 system]# sed -i 's/i"/i -geometry 800x800"/g' /etc/systemd/system/vncserver_root@:2.service

启用配置文件

[root@jytest1 system]# systemctl enable vncserver_root@:2.service
ln -s '/etc/systemd/system/vncserver_root@:2.service' '/etc/systemd/system/multi-user.target.wants/vncserver_root@:2.service'

启动vncserver服务

[root@jytest1 system]# vncserver

You will require a password to access your desktops.

Password:
Verify:
xauth:  file /root/.Xauthority does not exist

New 'jytest3:1 (root)' desktop is jytest3:1

Creating default startup script /root/.vnc/xstartup
Starting applications specified in /root/.vnc/xstartup
Log file is /root/.vnc/jytest3:1.log

关闭防火墙

[root@jytest1 system]# systemctl stop firewalld
[root@jytest1 system]# systemctl disable firewalld
rm '/etc/systemd/system/dbus-org.fedoraproject.FirewallD1.service'
rm '/etc/systemd/system/basic.target.wants/firewalld.service'


[root@jytest2 system]# systemctl stop firewalld
[root@jytest2 system]# systemctl disable firewalld
rm '/etc/systemd/system/dbus-org.fedoraproject.FirewallD1.service'
rm '/etc/systemd/system/basic.target.wants/firewalld.service'

禁用selinux,修改所有节点的/etc/selinux/config文件,编辑文本中的SELINUX=enforcing 为SELINUX=disabled

[root@jytest1 ~]# vi /etc/selinux/config

# This file controls the state of SELinux on the system.
# SELINUX= can take one of these three values:
#     enforcing - SELinux security policy is enforced.
#     permissive - SELinux prints warnings instead of enforcing.
#     disabled - No SELinux policy is loaded.
SELINUX=disabled
# SELINUXTYPE= can take one of three two values:
#     targeted - Targeted processes are protected,
#     minimum - Modification of targeted policy. Only selected processes are protected. 
#     mls - Multi Level Security protection.
SELINUXTYPE=targeted 
[root@jytest2 ~]# vi /etc/selinux/config

# This file controls the state of SELinux on the system.
# SELINUX= can take one of these three values:
#     enforcing - SELinux security policy is enforced.
#     permissive - SELinux prints warnings instead of enforcing.
#     disabled - No SELinux policy is loaded.
SELINUX=disabled
# SELINUXTYPE= can take one of three two values:
#     targeted - Targeted processes are protected,
#     minimum - Modification of targeted policy. Only selected processes are protected. 
#     mls - Multi Level Security protection.
SELINUXTYPE=targeted 

开启nscd

[root@jytest1 /]# rpm -qa | grep nscd
nscd-2.17-78.0.1.el7.x86_64
[root@jytest1 /]# chkconfig nscd on
Note: Forwarding request to 'systemctl enable nscd.service'.
ln -s '/usr/lib/systemd/system/nscd.service' '/etc/systemd/system/multi-user.target.wants/nscd.service'
ln -s '/usr/lib/systemd/system/nscd.socket' '/etc/systemd/system/sockets.target.wants/nscd.socket'
[root@jytest1 /]# chkconfig --level 35 nscd on
Note: Forwarding request to 'systemctl enable nscd.service'.
[root@jytest1 /]# service nscd start
Redirecting to /bin/systemctl start  nscd.service

[root@jytest2 /]# rpm -qa | grep nscd
nscd-2.17-78.0.1.el7.x86_64
[root@jytest2 /]# chkconfig nscd on
Note: Forwarding request to 'systemctl enable nscd.service'.
ln -s '/usr/lib/systemd/system/nscd.service' '/etc/systemd/system/multi-user.target.wants/nscd.service'
ln -s '/usr/lib/systemd/system/nscd.socket' '/etc/systemd/system/sockets.target.wants/nscd.socket'
[root@jytest2 /]# chkconfig --level 35 nscd on
Note: Forwarding request to 'systemctl enable nscd.service'.
[root@jytest2 /]# service nscd start
Redirecting to /bin/systemctl start  nscd.service

修改时间同步方式

[root@jytest1 /]# vi /etc/ntp.conf
# For more information about this file, see the man pages
# ntp.conf(5), ntp_acc(5), ntp_auth(5), ntp_clock(5), ntp_misc(5), ntp_mon(5).

driftfile /var/lib/ntp/drift

# Permit time synchronization with our time source, but do not
# permit the source to query or modify the service on this system.
restrict default nomodify notrap nopeer noquery

# Permit all access over the loopback interface.  This could
# be tightened as well, but to do so would effect some of
# the administrative functions.
restrict 127.0.0.1
restrict ::1

# Hosts on local network are less restricted.
#restrict 192.168.1.0 mask 255.255.255.0 nomodify notrap

# Use public servers from the pool.ntp.org project.
# Please consider joining the pool (http://www.pool.ntp.org/join.html).
#server 0.rhel.pool.ntp.org iburst
#server 1.rhel.pool.ntp.org iburst
#server 2.rhel.pool.ntp.org iburst
#server 3.rhel.pool.ntp.org iburst
server 10.138.130.170 --同步服务器

#server 127.127.1.0
#fudge 127.127.1.0 stratum 10

#broadcast 192.168.1.255 autokey        # broadcast server
#broadcastclient                        # broadcast client
#broadcast 224.0.1.1 autokey            # multicast server
#multicastclient 224.0.1.1              # multicast client
#manycastserver 239.255.254.254         # manycast server
#manycastclient 239.255.254.254 autokey # manycast client

# Enable public key cryptography.
#crypto

includefile /etc/ntp/crypto/pw

# Key file containing the keys and key identifiers used when operating
# with symmetric key cryptography.
keys /etc/ntp/keys
"/etc/ntp.conf" 63L, 2118C written


[root@jytest2 /]# vi /etc/ntp.conf
# For more information about this file, see the man pages
# ntp.conf(5), ntp_acc(5), ntp_auth(5), ntp_clock(5), ntp_misc(5), ntp_mon(5).

driftfile /var/lib/ntp/drift

# Permit time synchronization with our time source, but do not
# permit the source to query or modify the service on this system.
restrict default nomodify notrap nopeer noquery

# Permit all access over the loopback interface.  This could
# be tightened as well, but to do so would effect some of
# the administrative functions.
restrict 127.0.0.1
restrict ::1

# Hosts on local network are less restricted.
#restrict 192.168.1.0 mask 255.255.255.0 nomodify notrap

# Use public servers from the pool.ntp.org project.
# Please consider joining the pool (http://www.pool.ntp.org/join.html).
#server 0.rhel.pool.ntp.org iburst
#server 1.rhel.pool.ntp.org iburst
#server 2.rhel.pool.ntp.org iburst
#server 3.rhel.pool.ntp.org iburst
server 10.138.130.170 --同步服务器

#server 127.127.1.0
#fudge 127.127.1.0 stratum 10

#broadcast 192.168.1.255 autokey        # broadcast server
#broadcastclient                        # broadcast client
#broadcast 224.0.1.1 autokey            # multicast server
#multicastclient 224.0.1.1              # multicast client
#manycastserver 239.255.254.254         # manycast server
#manycastclient 239.255.254.254 autokey # manycast client

# Enable public key cryptography.
#crypto

includefile /etc/ntp/crypto/pw

# Key file containing the keys and key identifiers used when operating
# with symmetric key cryptography.
keys /etc/ntp/keys
"/etc/ntp.conf" 63L, 2118C written


[root@jytest1 /]# vi /etc/sysconfig/ntpd
# Command line options for ntpd
OPTIONS="-x -u ntp:ntp -p /var/run/ntpd.pid -g"

[root@jytest2 /]# vi /etc/sysconfig/ntpd
# Command line options for ntpd
OPTIONS="-x -u ntp:ntp -p /var/run/ntpd.pid -g"


[root@jytest1 /]# chkconfig ntpd on
Note: Forwarding request to 'systemctl enable ntpd.service'.

[root@jytest2 /]# chkconfig ntpd on
Note: Forwarding request to 'systemctl enable ntpd.service'.

[root@jytest1 /]# service ntpd restart
Redirecting to /bin/systemctl restart  ntpd.service

[root@jytest2 /]# service ntpd restart
Redirecting to /bin/systemctl restart  ntpd.service

修改nsswitch.conf,nsswitch.conf 保存的是域名检索顺序。在一些系统配置中,NIS(Network Information System)可能会引起SCAN 域名解析异常。为了避免这种问题的发生,对nsswitch.conf 做如下调整。

[root@jytest1 /]# vi /etc/nsswitch.conf
#
# /etc/nsswitch.conf
#
# An example Name Service Switch config file. This file should be
# sorted with the most-used services at the beginning.
#
# The entry '[NOTFOUND=return]' means that the search for an
# entry should stop if the search in the previous entry turned
# up nothing. Note that if the search failed due to some other reason
# (like no NIS server responding) then the search continues with the
# next entry.
#
# Valid entries include:
#
#       nisplus                 Use NIS+ (NIS version 3)
#       nis                     Use NIS (NIS version 2), also called YP
#       dns                     Use DNS (Domain Name Service)
#       files                   Use the local files
#       db                      Use the local database (.db) files
#       compat                  Use NIS on compat mode
#       hesiod                  Use Hesiod for user lookups
#       [NOTFOUND=return]       Stop searching if not found so far
#

# To use db, put the "db" in front of "files" for entries you want to be
# looked up first in the databases
#
# Example:
#passwd:    db files nisplus nis
#shadow:    db files nisplus nis
#group:     db files nisplus nis

passwd:     files sss
shadow:     files sss
group:      files sss
#initgroups: files

#hosts:     db files nisplus nis dns
hosts:      files dns nis --增加nis参数

# Example - obey only what nisplus tells us...
#services:   nisplus [NOTFOUND=return] files
#networks:   nisplus [NOTFOUND=return] files
#protocols:  nisplus [NOTFOUND=return] files
#rpc:        nisplus [NOTFOUND=return] files
#ethers:     nisplus [NOTFOUND=return] files
#netmasks:   nisplus [NOTFOUND=return] files

bootparams: nisplus [NOTFOUND=return] files

ethers:     files
netmasks:   files
networks:   files
protocols:  files
rpc:        files
services:   files sss

netgroup:   files sss

publickey:  nisplus

automount:  files sss
aliases:    files nisplus


[root@jytest2 /]# vi /etc/nsswitch.conf
#
# /etc/nsswitch.conf
#
# An example Name Service Switch config file. This file should be
# sorted with the most-used services at the beginning.
#
# The entry '[NOTFOUND=return]' means that the search for an
# entry should stop if the search in the previous entry turned
# up nothing. Note that if the search failed due to some other reason
# (like no NIS server responding) then the search continues with the
# next entry.
#
# Valid entries include:
#
#       nisplus                 Use NIS+ (NIS version 3)
#       nis                     Use NIS (NIS version 2), also called YP
#       dns                     Use DNS (Domain Name Service)
#       files                   Use the local files
#       db                      Use the local database (.db) files
#       compat                  Use NIS on compat mode
#       hesiod                  Use Hesiod for user lookups
#       [NOTFOUND=return]       Stop searching if not found so far
#

# To use db, put the "db" in front of "files" for entries you want to be
# looked up first in the databases
#
# Example:
#passwd:    db files nisplus nis
#shadow:    db files nisplus nis
#group:     db files nisplus nis

passwd:     files sss
shadow:     files sss
group:      files sss
#initgroups: files

#hosts:     db files nisplus nis dns
hosts:      files dns nis --增加nis参数


# Example - obey only what nisplus tells us...
#services:   nisplus [NOTFOUND=return] files
#networks:   nisplus [NOTFOUND=return] files
#protocols:  nisplus [NOTFOUND=return] files
#rpc:        nisplus [NOTFOUND=return] files
#ethers:     nisplus [NOTFOUND=return] files
#netmasks:   nisplus [NOTFOUND=return] files

bootparams: nisplus [NOTFOUND=return] files

ethers:     files
netmasks:   files
networks:   files
protocols:  files
rpc:        files
services:   files sss

netgroup:   files sss

publickey:  nisplus

automount:  files sss
aliases:    files nisplus

配置NOZEROCONF

[root@jytest1 /]# vi /etc/sysconfig/network
# Created by anaconda
# Recommended value for NOZEROCONF
NOZEROCONF=yes

[root@jytest2 /]# vi /etc/sysconfig/network
# Created by anaconda
# Recommended value for NOZEROCONF
NOZEROCONF=yes

用vnc远程登录执行安装

[root@jytest1 Desktop]# xhost +
access control disabled, clients can connect from any host
[root@jytest1 Desktop]# xdpyinfo
name of display:    :3
version number:    11.0
vendor string:    The X.Org Foundation
vendor release number:    11500000
X.Org version: 1.15.0
maximum request size:  16777212 bytes
motion buffer size:  256
bitmap unit, bit order, padding:    32, LSBFirst, 32
image byte order:    LSBFirst
number of supported pixmap formats:    6
...省略...只需要记录name of display:的值
[root@jytest1 Desktop]# su - grid
Last login: Wed Mar 15 19:01:47 CST 2017 on pts/1
[grid@jytest1 ~]$ export DISPLAY=:3
[grid@jytest1 ~]$ cd $ORACLE_HOME
[grid@jytest1 crs]$ ./gridSetup.sh

以root用户分别在两个节点上执行以下脚本,先在主节点执行。

root@jytest1 /]# ./u01/app/oraInventory/orainstRoot.sh
Changing permissions of /u01/app/oraInventory.
Adding read,write permissions for group.
Removing read,write,execute permissions for world.

Changing groupname of /u01/app/oraInventory to oinstall.
The execution of the script is complete.

[root@jytest2 /]# ./u01/app/oraInventory/orainstRoot.sh
Changing permissions of /u01/app/oraInventory.
Adding read,write permissions for group.
Removing read,write,execute permissions for world.

Changing groupname of /u01/app/oraInventory to oinstall.
The execution of the script is complete.

[root@jytest1 /]# ./u01/app/product/12.2.0/crs/root.sh
Performing root user operation.

The following environment variables are set as:
ORACLE_OWNER= grid
ORACLE_HOME= /u01/app/product/12.2.0/crs

Enter the full pathname of the local bin directory: [/usr/local/bin]:
Copying dbhome to /usr/local/bin ...
Copying oraenv to /usr/local/bin ...
Copying coraenv to /usr/local/bin ...

Creating /etc/oratab file...
Entries will be added to the /etc/oratab file as needed by
Database Configuration Assistant when a database is created
Finished running generic part of root script.
Now product-specific root actions will be performed.
Relinking oracle with rac_on option
Using configuration parameter file: /u01/app/product/12.2.0/crs/crs/install/crsconfig_params
The log of current session can be found at:
/u01/app/grid/crsdata/jytest1/crsconfig/rootcrs_jytest1_2017-03-20_06-07-00PM.log
2017/03/20 18:07:22 CLSRSC-594: Executing installation step 1 of 19: 'SetupTFA'.
2017/03/20 18:07:22 CLSRSC-4001: Installing Oracle Trace File Analyzer (TFA) Collector.
2017/03/20 18:08:15 CLSRSC-4002: Successfully installed Oracle Trace File Analyzer (TFA) Collector.
2017/03/20 18:08:15 CLSRSC-594: Executing installation step 2 of 19: 'ValidateEnv'.
2017/03/20 18:08:21 CLSRSC-363: User ignored prerequisites during installation
2017/03/20 18:08:22 CLSRSC-594: Executing installation step 3 of 19: 'CheckFirstNode'.
2017/03/20 18:08:24 CLSRSC-594: Executing installation step 4 of 19: 'GenSiteGUIDs'.
2017/03/20 18:08:26 CLSRSC-594: Executing installation step 5 of 19: 'SaveParamFile'.
2017/03/20 18:08:36 CLSRSC-594: Executing installation step 6 of 19: 'SetupOSD'.
2017/03/20 18:08:38 CLSRSC-594: Executing installation step 7 of 19: 'CheckCRSConfig'.
2017/03/20 18:08:38 CLSRSC-594: Executing installation step 8 of 19: 'SetupLocalGPNP'.
2017/03/20 18:09:12 CLSRSC-594: Executing installation step 9 of 19: 'ConfigOLR'.
2017/03/20 18:09:26 CLSRSC-594: Executing installation step 10 of 19: 'ConfigCHMOS'.
2017/03/20 18:09:26 CLSRSC-594: Executing installation step 11 of 19: 'CreateOHASD'.
2017/03/20 18:09:34 CLSRSC-594: Executing installation step 12 of 19: 'ConfigOHASD'.
2017/03/20 18:09:49 CLSRSC-330: Adding Clusterware entries to file 'oracle-ohasd.service'
2017/03/20 18:10:46 CLSRSC-594: Executing installation step 13 of 19: 'InstallAFD'.
2017/03/20 18:11:55 CLSRSC-594: Executing installation step 14 of 19: 'InstallACFS'.
CRS-2791: Starting shutdown of Oracle High Availability Services-managed resources on 'jytest1'
CRS-2793: Shutdown of Oracle High Availability Services-managed resources on 'jytest1' has completed
CRS-4133: Oracle High Availability Services has been stopped.
CRS-4123: Oracle High Availability Services has been started.
2017/03/20 18:12:30 CLSRSC-594: Executing installation step 15 of 19: 'InstallKA'.
2017/03/20 18:12:38 CLSRSC-594: Executing installation step 16 of 19: 'InitConfig'.
CRS-2791: Starting shutdown of Oracle High Availability Services-managed resources on 'jytest1'
CRS-2793: Shutdown of Oracle High Availability Services-managed resources on 'jytest1' has completed
CRS-4133: Oracle High Availability Services has been stopped.
CRS-4123: Oracle High Availability Services has been started.
CRS-2672: Attempting to start 'ora.driver.afd' on 'jytest1'
CRS-2672: Attempting to start 'ora.evmd' on 'jytest1'
CRS-2672: Attempting to start 'ora.mdnsd' on 'jytest1'
CRS-2676: Start of 'ora.driver.afd' on 'jytest1' succeeded
CRS-2672: Attempting to start 'ora.cssdmonitor' on 'jytest1'
CRS-2676: Start of 'ora.mdnsd' on 'jytest1' succeeded
CRS-2676: Start of 'ora.evmd' on 'jytest1' succeeded
CRS-2672: Attempting to start 'ora.gpnpd' on 'jytest1'
CRS-2676: Start of 'ora.cssdmonitor' on 'jytest1' succeeded
CRS-2676: Start of 'ora.gpnpd' on 'jytest1' succeeded
CRS-2672: Attempting to start 'ora.gipcd' on 'jytest1'
CRS-2676: Start of 'ora.gipcd' on 'jytest1' succeeded
CRS-2672: Attempting to start 'ora.cssd' on 'jytest1'
CRS-2672: Attempting to start 'ora.diskmon' on 'jytest1'
CRS-2676: Start of 'ora.diskmon' on 'jytest1' succeeded
CRS-2676: Start of 'ora.cssd' on 'jytest1' succeeded

Disk label(s) created successfully. Check /u01/app/grid/cfgtoollogs/asmca/asmca-170320PM061328.log for details.
Disk groups created successfully. Check /u01/app/grid/cfgtoollogs/asmca/asmca-170320PM061328.log for details.

2017/03/20 18:15:29 CLSRSC-482: Running command: '/u01/app/product/12.2.0/crs/bin/ocrconfig -upgrade grid oinstall'
CRS-2672: Attempting to start 'ora.crf' on 'jytest1'
CRS-2672: Attempting to start 'ora.storage' on 'jytest1'
CRS-2676: Start of 'ora.storage' on 'jytest1' succeeded
CRS-2676: Start of 'ora.crf' on 'jytest1' succeeded
CRS-2672: Attempting to start 'ora.crsd' on 'jytest1'
CRS-2676: Start of 'ora.crsd' on 'jytest1' succeeded
CRS-4256: Updating the profile
Successful addition of voting disk b62d970610de4fa2bf2194b4ef533c34.
Successfully replaced voting disk group with +CRS.
CRS-4256: Updating the profile
CRS-4266: Voting file(s) successfully replaced
## STATE File Universal Id File Name Disk group
-- ----- ----------------- --------- ---------
1. ONLINE b62d970610de4fa2bf2194b4ef533c34 (AFD:CRS1) [CRS]
Located 1 voting disk(s).
CRS-2791: Starting shutdown of Oracle High Availability Services-managed resources on 'jytest1'
CRS-2673: Attempting to stop 'ora.crsd' on 'jytest1'
CRS-2677: Stop of 'ora.crsd' on 'jytest1' succeeded
CRS-2673: Attempting to stop 'ora.storage' on 'jytest1'
CRS-2673: Attempting to stop 'ora.crf' on 'jytest1'
CRS-2673: Attempting to stop 'ora.drivers.acfs' on 'jytest1'
CRS-2673: Attempting to stop 'ora.gpnpd' on 'jytest1'
CRS-2673: Attempting to stop 'ora.mdnsd' on 'jytest1'
CRS-2677: Stop of 'ora.drivers.acfs' on 'jytest1' succeeded
CRS-2677: Stop of 'ora.crf' on 'jytest1' succeeded
CRS-2677: Stop of 'ora.gpnpd' on 'jytest1' succeeded
CRS-2677: Stop of 'ora.storage' on 'jytest1' succeeded
CRS-2673: Attempting to stop 'ora.asm' on 'jytest1'
CRS-2677: Stop of 'ora.mdnsd' on 'jytest1' succeeded
CRS-2677: Stop of 'ora.asm' on 'jytest1' succeeded
CRS-2673: Attempting to stop 'ora.cluster_interconnect.haip' on 'jytest1'
CRS-2677: Stop of 'ora.cluster_interconnect.haip' on 'jytest1' succeeded
CRS-2673: Attempting to stop 'ora.ctssd' on 'jytest1'
CRS-2673: Attempting to stop 'ora.evmd' on 'jytest1'
CRS-2677: Stop of 'ora.ctssd' on 'jytest1' succeeded
CRS-2677: Stop of 'ora.evmd' on 'jytest1' succeeded
CRS-2673: Attempting to stop 'ora.cssd' on 'jytest1'
CRS-2677: Stop of 'ora.cssd' on 'jytest1' succeeded
CRS-2673: Attempting to stop 'ora.driver.afd' on 'jytest1'
CRS-2673: Attempting to stop 'ora.gipcd' on 'jytest1'
CRS-2677: Stop of 'ora.driver.afd' on 'jytest1' succeeded
CRS-2677: Stop of 'ora.gipcd' on 'jytest1' succeeded
CRS-2793: Shutdown of Oracle High Availability Services-managed resources on 'jytest1' has completed
CRS-4133: Oracle High Availability Services has been stopped.
2017/03/20 18:16:55 CLSRSC-594: Executing installation step 17 of 19: 'StartCluster'.
CRS-4123: Starting Oracle High Availability Services-managed resources
CRS-2672: Attempting to start 'ora.mdnsd' on 'jytest1'
CRS-2672: Attempting to start 'ora.evmd' on 'jytest1'
CRS-2676: Start of 'ora.mdnsd' on 'jytest1' succeeded
CRS-2676: Start of 'ora.evmd' on 'jytest1' succeeded
CRS-2672: Attempting to start 'ora.gpnpd' on 'jytest1'
CRS-2676: Start of 'ora.gpnpd' on 'jytest1' succeeded
CRS-2672: Attempting to start 'ora.gipcd' on 'jytest1'
CRS-2676: Start of 'ora.gipcd' on 'jytest1' succeeded
CRS-2672: Attempting to start 'ora.cssdmonitor' on 'jytest1'
CRS-2676: Start of 'ora.cssdmonitor' on 'jytest1' succeeded
CRS-2672: Attempting to start 'ora.cssd' on 'jytest1'
CRS-2672: Attempting to start 'ora.diskmon' on 'jytest1'
CRS-2676: Start of 'ora.diskmon' on 'jytest1' succeeded
CRS-2676: Start of 'ora.cssd' on 'jytest1' succeeded
CRS-2672: Attempting to start 'ora.cluster_interconnect.haip' on 'jytest1'
CRS-2672: Attempting to start 'ora.ctssd' on 'jytest1'
CRS-2676: Start of 'ora.ctssd' on 'jytest1' succeeded
CRS-2676: Start of 'ora.cluster_interconnect.haip' on 'jytest1' succeeded
CRS-2672: Attempting to start 'ora.asm' on 'jytest1'
CRS-2676: Start of 'ora.asm' on 'jytest1' succeeded
CRS-2672: Attempting to start 'ora.storage' on 'jytest1'
CRS-2676: Start of 'ora.storage' on 'jytest1' succeeded
CRS-2672: Attempting to start 'ora.crf' on 'jytest1'
CRS-2676: Start of 'ora.crf' on 'jytest1' succeeded
CRS-2672: Attempting to start 'ora.crsd' on 'jytest1'
CRS-2676: Start of 'ora.crsd' on 'jytest1' succeeded
CRS-6023: Starting Oracle Cluster Ready Services-managed resources
CRS-6017: Processing resource auto-start for servers: jytest1
CRS-6016: Resource auto-start has completed for server jytest1
CRS-6024: Completed start of Oracle Cluster Ready Services-managed resources
CRS-4123: Oracle High Availability Services has been started.
2017/03/20 18:18:43 CLSRSC-343: Successfully started Oracle Clusterware stack
2017/03/20 18:18:43 CLSRSC-594: Executing installation step 18 of 19: 'ConfigNode'.
CRS-2672: Attempting to start 'ora.ASMNET1LSNR_ASM.lsnr' on 'jytest1'
CRS-2676: Start of 'ora.ASMNET1LSNR_ASM.lsnr' on 'jytest1' succeeded
CRS-2672: Attempting to start 'ora.asm' on 'jytest1'
CRS-2676: Start of 'ora.asm' on 'jytest1' succeeded
CRS-2672: Attempting to start 'ora.CRS.dg' on 'jytest1'
CRS-2676: Start of 'ora.CRS.dg' on 'jytest1' succeeded
2017/03/20 18:21:45 CLSRSC-594: Executing installation step 19 of 19: 'PostConfig'.
2017/03/20 18:22:19 CLSRSC-325: Configure Oracle Grid Infrastructure for a Cluster ... succeeded
[root@jytest2 /]# ./u01/app/product/12.2.0/crs/root.sh
Performing root user operation.

The following environment variables are set as:
ORACLE_OWNER= grid
ORACLE_HOME= /u01/app/product/12.2.0/crs

Enter the full pathname of the local bin directory: [/usr/local/bin]:
Copying dbhome to /usr/local/bin ...
Copying oraenv to /usr/local/bin ...
Copying coraenv to /usr/local/bin ...

Creating /etc/oratab file...
Entries will be added to the /etc/oratab file as needed by
Database Configuration Assistant when a database is created
Finished running generic part of root script.
Now product-specific root actions will be performed.
Relinking oracle with rac_on option
Using configuration parameter file: /u01/app/product/12.2.0/crs/crs/install/crsconfig_params
The log of current session can be found at:
/u01/app/grid/crsdata/jytest2/crsconfig/rootcrs_jytest2_2017-03-20_06-28-04PM.log
2017/03/20 18:28:30 CLSRSC-594: Executing installation step 1 of 19: 'SetupTFA'.
2017/03/20 18:28:31 CLSRSC-4001: Installing Oracle Trace File Analyzer (TFA) Collector.
2017/03/20 18:29:23 CLSRSC-4002: Successfully installed Oracle Trace File Analyzer (TFA) Collector.
2017/03/20 18:29:23 CLSRSC-594: Executing installation step 2 of 19: 'ValidateEnv'.
2017/03/20 18:29:25 CLSRSC-363: User ignored prerequisites during installation
2017/03/20 18:29:25 CLSRSC-594: Executing installation step 3 of 19: 'CheckFirstNode'.
2017/03/20 18:29:27 CLSRSC-594: Executing installation step 4 of 19: 'GenSiteGUIDs'.
2017/03/20 18:29:27 CLSRSC-594: Executing installation step 5 of 19: 'SaveParamFile'.
2017/03/20 18:29:30 CLSRSC-594: Executing installation step 6 of 19: 'SetupOSD'.
2017/03/20 18:29:33 CLSRSC-594: Executing installation step 7 of 19: 'CheckCRSConfig'.
2017/03/20 18:29:33 CLSRSC-594: Executing installation step 8 of 19: 'SetupLocalGPNP'.
2017/03/20 18:29:35 CLSRSC-594: Executing installation step 9 of 19: 'ConfigOLR'.
2017/03/20 18:29:42 CLSRSC-594: Executing installation step 10 of 19: 'ConfigCHMOS'.
2017/03/20 18:29:42 CLSRSC-594: Executing installation step 11 of 19: 'CreateOHASD'.
2017/03/20 18:29:44 CLSRSC-594: Executing installation step 12 of 19: 'ConfigOHASD'.
2017/03/20 18:30:00 CLSRSC-330: Adding Clusterware entries to file 'oracle-ohasd.service'
2017/03/20 18:30:51 CLSRSC-594: Executing installation step 13 of 19: 'InstallAFD'.
2017/03/20 18:32:00 CLSRSC-594: Executing installation step 14 of 19: 'InstallACFS'.
CRS-2791: Starting shutdown of Oracle High Availability Services-managed resources on 'jytest2'
CRS-2793: Shutdown of Oracle High Availability Services-managed resources on 'jytest2' has completed
CRS-4133: Oracle High Availability Services has been stopped.
CRS-4123: Oracle High Availability Services has been started.
2017/03/20 18:32:29 CLSRSC-594: Executing installation step 15 of 19: 'InstallKA'.
2017/03/20 18:32:31 CLSRSC-594: Executing installation step 16 of 19: 'InitConfig'.
CRS-2791: Starting shutdown of Oracle High Availability Services-managed resources on 'jytest2'
CRS-2793: Shutdown of Oracle High Availability Services-managed resources on 'jytest2' has completed
CRS-4133: Oracle High Availability Services has been stopped.
CRS-4123: Oracle High Availability Services has been started.
CRS-2791: Starting shutdown of Oracle High Availability Services-managed resources on 'jytest2'
CRS-2673: Attempting to stop 'ora.drivers.acfs' on 'jytest2'
CRS-2677: Stop of 'ora.drivers.acfs' on 'jytest2' succeeded
CRS-2793: Shutdown of Oracle High Availability Services-managed resources on 'jytest2' has completed
CRS-4133: Oracle High Availability Services has been stopped.
2017/03/20 18:32:59 CLSRSC-594: Executing installation step 17 of 19: 'StartCluster'.
CRS-4123: Starting Oracle High Availability Services-managed resources
CRS-2672: Attempting to start 'ora.mdnsd' on 'jytest2'
CRS-2672: Attempting to start 'ora.evmd' on 'jytest2'
CRS-2676: Start of 'ora.mdnsd' on 'jytest2' succeeded
CRS-2676: Start of 'ora.evmd' on 'jytest2' succeeded
CRS-2672: Attempting to start 'ora.gpnpd' on 'jytest2'
CRS-2676: Start of 'ora.gpnpd' on 'jytest2' succeeded
CRS-2672: Attempting to start 'ora.gipcd' on 'jytest2'
CRS-2676: Start of 'ora.gipcd' on 'jytest2' succeeded
CRS-2672: Attempting to start 'ora.cssdmonitor' on 'jytest2'
CRS-2676: Start of 'ora.cssdmonitor' on 'jytest2' succeeded
CRS-2672: Attempting to start 'ora.cssd' on 'jytest2'
CRS-2672: Attempting to start 'ora.diskmon' on 'jytest2'
CRS-2676: Start of 'ora.diskmon' on 'jytest2' succeeded
CRS-2676: Start of 'ora.cssd' on 'jytest2' succeeded
CRS-2672: Attempting to start 'ora.cluster_interconnect.haip' on 'jytest2'
CRS-2672: Attempting to start 'ora.ctssd' on 'jytest2'
CRS-2676: Start of 'ora.ctssd' on 'jytest2' succeeded
CRS-2676: Start of 'ora.cluster_interconnect.haip' on 'jytest2' succeeded
CRS-2672: Attempting to start 'ora.asm' on 'jytest2'
CRS-2676: Start of 'ora.asm' on 'jytest2' succeeded
CRS-2672: Attempting to start 'ora.storage' on 'jytest2'
CRS-2676: Start of 'ora.storage' on 'jytest2' succeeded
CRS-2672: Attempting to start 'ora.crf' on 'jytest2'
CRS-2676: Start of 'ora.crf' on 'jytest2' succeeded
CRS-2672: Attempting to start 'ora.crsd' on 'jytest2'
CRS-2676: Start of 'ora.crsd' on 'jytest2' succeeded
CRS-6017: Processing resource auto-start for servers: jytest2
CRS-2673: Attempting to stop 'ora.LISTENER_SCAN1.lsnr' on 'jytest1'
CRS-2672: Attempting to start 'ora.net1.network' on 'jytest2'
CRS-2672: Attempting to start 'ora.ASMNET1LSNR_ASM.lsnr' on 'jytest2'
CRS-2677: Stop of 'ora.LISTENER_SCAN1.lsnr' on 'jytest1' succeeded
CRS-2676: Start of 'ora.net1.network' on 'jytest2' succeeded
CRS-2673: Attempting to stop 'ora.scan1.vip' on 'jytest1'
CRS-2672: Attempting to start 'ora.ons' on 'jytest2'
CRS-2677: Stop of 'ora.scan1.vip' on 'jytest1' succeeded
CRS-2672: Attempting to start 'ora.scan1.vip' on 'jytest2'
CRS-2676: Start of 'ora.scan1.vip' on 'jytest2' succeeded
CRS-2672: Attempting to start 'ora.LISTENER_SCAN1.lsnr' on 'jytest2'
CRS-2676: Start of 'ora.ons' on 'jytest2' succeeded
CRS-2676: Start of 'ora.ASMNET1LSNR_ASM.lsnr' on 'jytest2' succeeded
CRS-2672: Attempting to start 'ora.asm' on 'jytest2'
CRS-2676: Start of 'ora.LISTENER_SCAN1.lsnr' on 'jytest2' succeeded
CRS-2676: Start of 'ora.asm' on 'jytest2' succeeded
CRS-6016: Resource auto-start has completed for server jytest2
CRS-6024: Completed start of Oracle Cluster Ready Services-managed resources
CRS-4123: Oracle High Availability Services has been started.
2017/03/20 18:36:14 CLSRSC-343: Successfully started Oracle Clusterware stack
2017/03/20 18:36:14 CLSRSC-594: Executing installation step 18 of 19: 'ConfigNode'.
2017/03/20 18:36:32 CLSRSC-594: Executing installation step 19 of 19: 'PostConfig'.
2017/03/20 18:37:14 CLSRSC-325: Configure Oracle Grid Infrastructure for a Cluster ... succeeded

检查集群信息

[grid@jytest1 ~]$ crsctl stat res -t
--------------------------------------------------------------------------------
Name           Target  State        Server                   State details       
--------------------------------------------------------------------------------
Local Resources
--------------------------------------------------------------------------------
ora.ASMNET1LSNR_ASM.lsnr
               ONLINE  ONLINE       jytest1                  STABLE
               ONLINE  ONLINE       jytest2                  STABLE
ora.CRS.dg
               ONLINE  ONLINE       jytest1                  STABLE
               ONLINE  ONLINE       jytest2                  STABLE
ora.LISTENER.lsnr
               ONLINE  ONLINE       jytest1                  STABLE
               ONLINE  ONLINE       jytest2                  STABLE
ora.chad
               ONLINE  ONLINE       jytest1                  STABLE
               ONLINE  ONLINE       jytest2                  STABLE
ora.net1.network
               ONLINE  ONLINE       jytest1                  STABLE
               ONLINE  ONLINE       jytest2                  STABLE
ora.ons
               ONLINE  ONLINE       jytest1                  STABLE
               ONLINE  ONLINE       jytest2                  STABLE
ora.proxy_advm
               OFFLINE OFFLINE      jytest1                  STABLE
               OFFLINE OFFLINE      jytest2                  STABLE
--------------------------------------------------------------------------------
Cluster Resources
--------------------------------------------------------------------------------
ora.LISTENER_SCAN1.lsnr
      1        ONLINE  ONLINE       jytest2                  STABLE
ora.LISTENER_SCAN2.lsnr
      1        ONLINE  ONLINE       jytest1                  STABLE
ora.LISTENER_SCAN3.lsnr
      1        ONLINE  ONLINE       jytest1                  STABLE
ora.MGMTLSNR
      1        ONLINE  ONLINE       jytest1                  169.254.123.145 88.8
                                                             8.88.1,STABLE
ora.asm
      1        ONLINE  ONLINE       jytest1                  Started,STABLE
      2        ONLINE  ONLINE       jytest2                  Started,STABLE
      3        OFFLINE OFFLINE                               STABLE
ora.cvu
      1        ONLINE  ONLINE       jytest1                  STABLE
ora.jytest1.vip
      1        ONLINE  ONLINE       jytest1                  STABLE
ora.jytest2.vip
      1        ONLINE  ONLINE       jytest2                  STABLE
ora.mgmtdb
      1        ONLINE  ONLINE       jytest1                  Open,STABLE
ora.qosmserver
      1        ONLINE  ONLINE       jytest1                  STABLE
ora.scan1.vip
      1        ONLINE  ONLINE       jytest2                  STABLE
ora.scan2.vip
      1        ONLINE  ONLINE       jytest1                  STABLE
ora.scan3.vip
      1        ONLINE  ONLINE       jytest1                  STABLE
--------------------------------------------------------------------------------

安装数据库软件

[root@jytest1 Desktop]# su - oracle
Last login: Mon Mar 20 12:13:17 CST 2017 on pts/0
[oracle@jytest1 ~]$ cd /soft/database
[oracle@jytest1 database]$ export DISPLAY=:1

[oracle@jytest1 database]$ ./runInstaller

以 root用户在所有节点上执行以下脚本,先在主节点执行

[root@jytest1 /]# ./u01/app/oracle/product/12.2.0/db/root.sh
Performing root user operation.

The following environment variables are set as:
ORACLE_OWNER= oracle
ORACLE_HOME= /u01/app/oracle/product/12.2.0/db

Enter the full pathname of the local bin directory: [/usr/local/bin]:
The contents of "dbhome" have not changed. No need to overwrite.
The contents of "oraenv" have not changed. No need to overwrite.
The contents of "coraenv" have not changed. No need to overwrite.

Entries will be added to the /etc/oratab file as needed by
Database Configuration Assistant when a database is created
Finished running generic part of root script.
Now product-specific root actions will be performed.

[root@jytest2 /]# ./u01/app/oracle/product/12.2.0/db/root.sh
Performing root user operation.

The following environment variables are set as:
ORACLE_OWNER= oracle
ORACLE_HOME= /u01/app/oracle/product/12.2.0/db

Enter the full pathname of the local bin directory: [/usr/local/bin]:
The contents of "dbhome" have not changed. No need to overwrite.
The contents of "oraenv" have not changed. No need to overwrite.
The contents of "coraenv" have not changed. No need to overwrite.

Entries will be added to the /etc/oratab file as needed by
Database Configuration Assistant when a database is created
Finished running generic part of root script.
Now product-specific root actions will be performed.

创建磁盘组

[grid@jytest1 ~]$ export DISPLAY=:1
[grid@jytest1 ~]$ asmca

创建存储数据库文件的磁盘组DATA,TEST


创建数据库jy

[oracle@jytest1 database]$ dbca

检查数据库配置信息

[grid@jytest1 ~]$ srvctl config database -d jy
Database unique name: jy
Database name: jy
Oracle home: /u01/app/oracle/product/12.2.0/db
Oracle user: oracle
Spfile: +DATA/JY/PARAMETERFILE/spfile.272.939166623
Password file: +DATA/JY/PASSWORD/pwdjy.256.939165949
Domain:
Start options: open
Stop options: immediate
Database role: PRIMARY
Management policy: AUTOMATIC
Server pools:
Disk Groups: DATA
Mount point paths:
Services:
Type: RAC
Start concurrency:
Stop concurrency:
OSDBA group: dba
OSOPER group: oper
Database instances: jy1,jy2
Configured nodes: jytest1,jytest2
CSS critical: no
CPU count: 0
Memory target: 0
Maximum memory: 0
Default network number for database services:
Database is administrator managed
[grid@jytest1 ~]$ srvctl status database -d jy
Instance jy1 is running on node jytest1
Instance jy2 is running on node jytest2

检查集群信息

[grid@jytest1 ~]$ crsctl stat res -t
--------------------------------------------------------------------------------
Name           Target  State        Server                   State details       
--------------------------------------------------------------------------------
Local Resources
--------------------------------------------------------------------------------
ora.ASMNET1LSNR_ASM.lsnr
               ONLINE  ONLINE       jytest1                  STABLE
               ONLINE  ONLINE       jytest2                  STABLE
ora.CRS.dg
               ONLINE  ONLINE       jytest1                  STABLE
               ONLINE  ONLINE       jytest2                  STABLE
ora.DATA.dg
               ONLINE  ONLINE       jytest1                  STABLE
               ONLINE  ONLINE       jytest2                  STABLE
ora.LISTENER.lsnr
               ONLINE  ONLINE       jytest1                  STABLE
               ONLINE  ONLINE       jytest2                  STABLE
ora.TEST.dg
               ONLINE  ONLINE       jytest1                  STABLE
               ONLINE  ONLINE       jytest2                  STABLE
ora.chad
               ONLINE  ONLINE       jytest1                  STABLE
               ONLINE  ONLINE       jytest2                  STABLE
ora.net1.network
               ONLINE  ONLINE       jytest1                  STABLE
               ONLINE  ONLINE       jytest2                  STABLE
ora.ons
               ONLINE  ONLINE       jytest1                  STABLE
               ONLINE  ONLINE       jytest2                  STABLE
ora.proxy_advm
               OFFLINE OFFLINE      jytest1                  STABLE
               OFFLINE OFFLINE      jytest2                  STABLE
--------------------------------------------------------------------------------
Cluster Resources
--------------------------------------------------------------------------------
ora.LISTENER_SCAN1.lsnr
      1        ONLINE  ONLINE       jytest2                  STABLE
ora.LISTENER_SCAN2.lsnr
      1        ONLINE  ONLINE       jytest1                  STABLE
ora.LISTENER_SCAN3.lsnr
      1        ONLINE  ONLINE       jytest1                  STABLE
ora.MGMTLSNR
      1        ONLINE  ONLINE       jytest1                  169.254.123.145 88.8
                                                             8.88.1,STABLE
ora.asm
      1        ONLINE  ONLINE       jytest1                  Started,STABLE
      2        ONLINE  ONLINE       jytest2                  Started,STABLE
      3        OFFLINE OFFLINE                               STABLE
ora.cvu
      1        ONLINE  ONLINE       jytest1                  STABLE
ora.jy.db
      1        ONLINE  ONLINE       jytest1                  Open,HOME=/u01/app/o
                                                             racle/product/12.2.0
                                                             /db,STABLE
      2        ONLINE  ONLINE       jytest2                  Open,HOME=/u01/app/o
                                                             racle/product/12.2.0
                                                             /db,STABLE
ora.jytest1.vip
      1        ONLINE  ONLINE       jytest1                  STABLE
ora.jytest2.vip
      1        ONLINE  ONLINE       jytest2                  STABLE
ora.mgmtdb
      1        ONLINE  ONLINE       jytest1                  Open,STABLE
ora.qosmserver
      1        ONLINE  ONLINE       jytest1                  STABLE
ora.scan1.vip
      1        ONLINE  ONLINE       jytest2                  STABLE
ora.scan2.vip
      1        ONLINE  ONLINE       jytest1                  STABLE
ora.scan3.vip
      1        ONLINE  ONLINE       jytest1                  STABLE
--------------------------------------------------------------------------------

到此12CR2 RAC for Oracle Linux 7.1的安装完成!

In-Memory Column Store

使用In-Memory Column Store
从Oracle 12.1.0.2开始可以使用In-Memory Column Store。In-Memory Column Store对于SGA是一个可选部分用来存储表,表分区与其它数据库对象副本。在In-Memory Column Store中,数据是以列式被加载而不是像SGA中其它部分的数据是以行式被加载,并且数据被优化用于快速扫描。

In-Memory Column Store在SGA中是一个新的静态内存池。在In-Memory Column Store中所存储的数据不是使用传统行格式而是使用列式。每个列作为单独的结构进行存储。In-Memory Column Store不会替代buffer cache,是对buffer cache的一种补充,因此数据在内存中可以以行与列的形式进行存储。为了启用In-Memory Column Store,必须将inmemory_size参数设置为非零值。

可以在以下级别启用In-Memory Column Store
.列
.表
.物化视图
.表空间
.分区

如果在表空间级别启用In-Memory Column Store,那么所有存储在该表空间中的所有表与物化视图将抽默认启用In-Memory Column Store。可以将一个数据库对象的所有列或者将一个数据库对象的部分列加载到In-Memory Column Store中。类似地,对于分区表或物化视图,可以将所有分区或部分分区加载到In-Memory Column Store中。

在In-Memory Column Store中存储数据库对象可以显然提高对数据库对象执行以下类型操作的性能:
.查询扫描大量数据并且使用=,< ,>与in操作来进行过滤
.查询从表中或者从有大量列的物化视图中选择少量列,比如从有100列的表中选择5列
.查询对小表与大表进行关联
.查询将聚集数据

通常情况下,创建多列索引可以提高分析与报告查询的性能。这些索引可能影响DML语句的性能。当数据库对象被加载到In-Memory Column Store中,用于分析或报告查询的索引可以被减少或消除而不会影响查询的性能。消除这些索引可以提高事务和数据加载操作的性能。

可以通过对以下语句增加inmemory子句的方式来对数据库对象启用In-Memory Column Store:
.create table
.alter table
.create tablespace
.alter tablespace
.create materialized view
.alter materialized view

为了判断那个数据库对象被加载到In-Memory Column Store中,可以查询v$in_segments视图:

SQL> alter table jy inmemory;
Table altered

SQL> 
SQL> SELECT OWNER, SEGMENT_NAME, INMEMORY_PRIORITY, INMEMORY_COMPRESSION   FROM V$IM_SEGMENTS;
OWNER                                                                            SEGMENT_NAME                                                                     INMEMORY_PRIORITY INMEMORY_COMPRESSION
-------------------------------------------------------------------------------- -------------------------------------------------------------------------------- ----------------- --------------------

SQL> select count(*) from jy;
  COUNT(*)
----------
     72736

SQL> 
SQL> SELECT OWNER, SEGMENT_NAME, INMEMORY_PRIORITY, INMEMORY_COMPRESSION  FROM V$IM_SEGMENTS;
OWNER                                                                            SEGMENT_NAME                                                                     INMEMORY_PRIORITY INMEMORY_COMPRESSION
-------------------------------------------------------------------------------- -------------------------------------------------------------------------------- ----------------- --------------------
JY                                                                               JY                                                                               NONE              FOR QUERY LOW

In-Memory Column Store不能对以下操作类型提高性能:
.有复杂谓词的查询
.选择大量列的查询
.返回大量数据行的查询
.使用大表联接的查询

SYS用户的对象并且存储在system或sysaux表空间中,那么这种对象不能被加载到In-Memory Column Store中。

In-Memory Column Store压缩方法
在In-Memory Column Store中,数据是可以被压缩的,并且SQL查询可以直接对压缩数据进行查询。In-Memory Column Store压缩方法有:
no memcompress 数据不会被压缩

memcompress for dml 这种方法只对DML操作的数据进行优化与压缩

memcompress for query low 这种方法将提供最佳的查询性能。这种压缩方法比memcompress for dml所压缩的数据要多但比
memcompress for query high压缩方法所压缩的数据要少。当在create或alter语句中指定inmemory子句但没指定压缩方法时或者当指定memcompress for query而没指定low或high时所使用的缺省值

memcompress for query high 这种方法会提供杰出的查询性能。这种压缩方法所压缩的数据量要比memcompress for query low方法多,但比memcompress for capacity low方法所压缩的数据量少

memcompress for capacity low 这种方法会提供很好的查询性能。这种压缩方法所压缩的数据量要比memcompress for query high方法所压缩的数据量多,但比memcompress for capacity high方法所压缩的数据量少。当指定memcompress for capacity而没有指定low或high时所使用的缺省值

memcompress for capacity high 这种方法提供的查询性能一般,但它的所压缩的数据量最多

SQL> alter table jy inmemory;
Table altered

SQL> 
SQL> SELECT OWNER, SEGMENT_NAME, INMEMORY_PRIORITY, INMEMORY_COMPRESSION
  2  FROM V$IM_SEGMENTS;
OWNER                                                                            SEGMENT_NAME                                                                     INMEMORY_PRIORITY INMEMORY_COMPRESSION
-------------------------------------------------------------------------------- -------------------------------------------------------------------------------- ----------------- --------------------

SQL> select count(*) from jy;
  COUNT(*)
----------
     72736

SQL> 
SQL> SELECT OWNER, SEGMENT_NAME, INMEMORY_PRIORITY, INMEMORY_COMPRESSION
  2  FROM V$IM_SEGMENTS;
OWNER                                                                            SEGMENT_NAME                                                                     INMEMORY_PRIORITY INMEMORY_COMPRESSION
-------------------------------------------------------------------------------- -------------------------------------------------------------------------------- ----------------- --------------------
JY                                                                               JY                                                                               NONE              FOR QUERY LOW

关键字memcompres必须要出现在inmemory后面

SQL> alter table jy  inmemory memcompress for query high;
Table altered

SQL> SELECT OWNER, SEGMENT_NAME, INMEMORY_PRIORITY, INMEMORY_COMPRESSION FROM V$IM_SEGMENTS;
OWNER                                                                            SEGMENT_NAME                                                                     INMEMORY_PRIORITY INMEMORY_COMPRESSION
-------------------------------------------------------------------------------- -------------------------------------------------------------------------------- ----------------- --------------------

SQL> select count(*) from jy;
  COUNT(*)
----------
     72736


SQL> SELECT OWNER, SEGMENT_NAME, INMEMORY_PRIORITY, INMEMORY_COMPRESSION FROM V$IM_SEGMENTS;
OWNER                                                                            SEGMENT_NAME                                                                     INMEMORY_PRIORITY INMEMORY_COMPRESSION
-------------------------------------------------------------------------------- -------------------------------------------------------------------------------- ----------------- --------------------
JY                                                                               JY                                                                               NONE              FOR QUERY HIGH

In-Memory Column Store Data Population Options
当对数据库对象雇用In-Memory Column Store时,可以让数据库来控制数据库对象何时被加载到In-Memory Column Store中,或者可以指定一个优先级别来决定加载队列中数据库对象的优先级。Oracle SQL包含一个inmemory priority子句来对于加载队列提供更多的控制。例如,它可以在加载其它数据库对象的数据之前将更重要或不重要的数据库对象的数据进行加载。

在In-Memory Column Store中对于加载数据库对象提供了以下优先级:
priority none Oracle数据库控制何时将数据库对象的数据加载到In-Memory Column Store中。对这个数据库对象进行扫描会触发将这个对象加载到In-Memory Column Store中。当priority在inmemory子句中没有指定时这是它的缺省级别。例如当对表jy修改In-Memory Column Store的压缩方法后,立即查询这个对象是否被加载到In-Memory Column Store中会发现并没有加载

SQL> alter table jy  inmemory memcompress for query low;
Table altered

SQL> SELECT OWNER, SEGMENT_NAME, INMEMORY_PRIORITY, INMEMORY_COMPRESSION FROM V$IM_SEGMENTS;
OWNER                                                                            SEGMENT_NAME                                                                     INMEMORY_PRIORITY INMEMORY_COMPRESSION
-------------------------------------------------------------------------------- -------------------------------------------------------------------------------- ----------------- --------------------

因为没有指定加载数据库对象的优先级,所以需要执行查询进行扫描来触发将其加载到In-Memory Column Store中

SQL> select count(*) from jy;
  COUNT(*)
----------
     72736

SQL> SELECT OWNER, SEGMENT_NAME, INMEMORY_PRIORITY, INMEMORY_COMPRESSION FROM V$IM_SEGMENTS;
OWNER                                                                            SEGMENT_NAME                                                                     INMEMORY_PRIORITY INMEMORY_COMPRESSION
-------------------------------------------------------------------------------- -------------------------------------------------------------------------------- ----------------- --------------------
JY                                                                               JY                                                                               NONE              FOR QUERY LOW

现在可以看到表jy已经被加载到In-Memory Column Store中了,可以看到inmemory_priority为none

priority low 在优先级为none的数据库对象之前将优先级为low的对象加载到In-Memory Column Store中,但在优先级为medium,high或critical的数据库对象被加载到In-Memory Column Store中之后才会将优先级为low的对象加载到In-Memory Column Store中

priority medium 在优先级为none或low的数据库对象之前将优先级为medium的对象加载到In-Memory Column Store中,但在优先级为high或critical的数据库对象被加载到In-Memory Column Store中之后才会将优先级为medium的对象加载到In-Memory ColumnStore中。

priority high 在优先级为none,low或medium的数据库对象之前将优先级为high的对象加载到In-Memory Column Store中,但在优先级为critical的数据库对象被加载到In-Memory Column Store中之后才会将优先级为medium的对象加载到In-Memory ColumnStore中。

priority critical 在优先级为none,low,medium或high的数据库对象之前将优先级为critical的对象加载到In-Memory Column Store中

当多个数据库对象设置了优先级而不为none时,Oracle数据库将对象的所有数据基于它们的优先级别进行排队来将它们加载到In-Memory Column Store中。优先为critical的对象将会最先被加载,接下来就是优先级为high的对象会被加载,依此类推。如果在In-Memory Column Store中没有足够的空间,那么额外要被加载的对象直到有足够空间之前是不会被加载的。当数据库被重启时,优先级不为none的对象会在数据库启动时被加载到In-Memory Column Store中。对于优先级不为none的数据库对象来说,alter table或alter materialized view DDL语句在DDL语句被记录在In-Memory Column Store之前不会返回执行结果。

下面的例子,创建表t1,在没有设置inmemory属性时,表t1是没有被加载到In-Memory Column Store中的

SQL> create table t1 as select * from jy;
Table created

SQL> select owner, segment_name, inmemory_priority, inmemory_compression from v$im_segments;
OWNER                                                                            SEGMENT_NAME                                                                     INMEMORY_PRIORITY INMEMORY_COMPRESSION
-------------------------------------------------------------------------------- -------------------------------------------------------------------------------- ----------------- --------------------
JY                                                                               JY                                                                               NONE              FOR QUERY LOW

修改表的inmemory属性,并且设置了加载优先级为high,数据压缩为memcompress for query high,在修改完成后,表t1就已经被加载到In-Memory Column Store中了

SQL> alter table t1 inmemory priority high memcompress for query high;
Table altered


SQL> select owner, segment_name, inmemory_priority, inmemory_compression from v$im_segments;
OWNER                                                                            SEGMENT_NAME                                                                     INMEMORY_PRIORITY INMEMORY_COMPRESSION
-------------------------------------------------------------------------------- -------------------------------------------------------------------------------- ----------------- --------------------
JY                                                                               JY                                                                               NONE              FOR QUERY LOW
JY                                                                               T1                                                                               HIGH              FOR QUERY HIGH

优先级的设置必须应用给整个表或一个表分区。对表中的不同列集合指定不同的In-Memory Column Store加载优先级别是不允许的。如果一个段在磁盘上的大小为64KB或者更小,那么这个对象不会被加载到In-Memory Column Store中。因此对于一些较小的对象虽然启用了In-Memory Column Store,但可能并不会被加载到In-Memory Column Store中。

In-Memory Column Store相关的初始化参数
inmemory_size:这个参数设置实例中的In-Memory Column Store的大小,它的缺省值为0,这意味着没有雇用In-Memory Column Store。为了雇用In-Memory Column Store这个参数必须设置为非0值。如果这个参数设置为非0值,那么它的最小值为100M。

在多租户环境中,在root容器中设置这个参数是对整个CDB生效的。这个参数也可以对每个PDB进行设置来限制每个PDB中的In-Memory Column Store的大小。PDB的In-Memory Column Store的总大小可以小于,等于或大于CDB的值。然而CDB所设置的In-Memory Column Store的大小是整个CDB中,包含root与所有PDB的In-Memory Column Store可以使用的最大内存,这意味着PDB可以CDB中所有可以使用的In-Memory Column Store的内存。

inmemory_force:这个参数可以对表与物化视图启用In-Memory Column Store或者对表与物化视图禁用In-Memory Column Store,设置这个参数为default,这是它的缺省值,它将允许通过单个对象的inmemory或no inmemory属性来决定是否将对象加载到In-Memory Column Store中。将这个参数设置为off来指定所有表与物化视图将禁用In-Memory Column Store.

inmemory_clause_default:这个参数能让你对新表与物化视图指定一个缺省的In-Memory Column Store子句。不设置这个参数或者设置为一个空字符串来指定对于新表与物化视图不存在缺省的In-Memory Column Store子句。将这个参数设置为no inmemory与它的缺省值(空字符串)有相同的作用。将这个参数设置为有效的inmemory子句来指定它为所有新表与物化视图的In-Memory Column Store的缺省值。这个子句可以包含In-Memory Column Store压缩方法与数据加载选项。如果子句以inmemory开头,那么所有新表与物化视图,包含那些没有inmemory子句的对象,将会被加载到In-Memory Column Store中。如果子句忽略了inmemory,那么它只会对在创建时指定了inmemory子句的新表与物化视图雇用In-Memory Column Store。

inmemory_query:这个参数指定是否允许in-memory查询。将这个参数设置为enable,它是缺省值,允许查询所访问的对象被加载到In-Memory Column Store中,将这个参数设置为disable来禁止将查询所访问的对象加载到In-Memory Column Store中。

inmemory_max_populate_servers:这个参数指定执行In-Memory Column Store加载操作的后台加载服务器进程的最大数量,因此这些服务器进程不能超过系统所能承受的负载。基于系统中的CPU内核数来设置一个合理值。

inmemory_trickle_repopulate_servers_percent:这个参数用来限制用于In-Memory Column Store重新加载的后台加载服务器进程的最大数量,trickle repopulation被设计只占加载服务器进程总数量的很小百分比。这个参数的值为
inmemory_max_populate_servers参数值的一个百分比。例如,如果这个参数设置为10,并且inmemory_max_populate_servers被设置为10,那么将会有一个cpu内核用于tricle repopulation操作。

optimizer_inmemory_aware:这个参数用来启用或禁用优化器成本模型来增强In-Memory Column Store。将这个参数设置为false,将造成优化器在优化SQL语句时忽略有in-memory属性的表。

对数据库启用In-Memory Column Store
在表,表空间或物化视图被启用In-Memory Column Store之前,必须对数据库启用In-Memory Column Store。对数据库启用In-Memory Column Store需要执行以下步骤:
1.确保数据库的兼容性参数设置为12.1.0或更高版本。
2.将inmemory_size参数设置为非零值。当对spfile参数文件设置这个参数时,可以使用alter system语句,并且必须指定scope=spfile,它的最小值为100M。
3.重启数据库,为了在SGA中初始化In-Memory Column Store必须要重启数据库。
4.可选操作,可以执行下面的语句来检查当前为In-Memory Column Store所分配的内存大小。

SQL> show parameter inmemory_size

NAME                                 TYPE        VALUE
------------------------------------ ----------- ------------------------------
inmemory_size                        big integer 1G

对表启用与禁用In-Memory Column Store
通过对create table或alter table语句指定inmemory子句来对表启用In-Memory Column Store。通过对create table或alter table语句指定no inmemory子句对表禁用In-Memory Column Store。

为了对表启用与禁用In-Memory Column Store,需要执行以下步骤:
1.确保数据库已经启用了In-Memory Column Store
2.使用有合适权限的用户连接到数据库并创建或修改表
3.执行create table或alter table并指定inmemory或no inmmeory子句

创建表并启用In-Memory Column Store
下面的例子将创建一个名叫test_inmem的表并启用In-Memory Column Store

SQL> create table test_inmem(id number(5) primary key,test_col varchar2(15)) inmemory;

Table created.

这个例子对inmemory子句使用缺省值。因此将使用memcompress for query与priority none

对表启用In-Memory Column Store
下面的例子将对表oe.product_information表启用In-Memory Column Store:

SQL> alter table oe.product_information inmemory;

Table altered.

这个例子对inmemory子句使用缺省值。因此将使用memcompress for query与priority none

对表启用In-Memory Column Store并且指定压缩方法为for capacity low
下面的例子对表oe.product_information启用In-Memory Column Store并且指定压缩方法为for capacity low:

SQL> alter table oe.product_information inmemory memcompress for capacity low;

Table altered.

这个例子对priority子句使用缺省值,因此优先级为priority none。

对表启用In-Memory Column Store并且指定数据加载优先级为high
下面的例子对表oe.product_information启用In-Memory Column Store并且指定数据加载优先级为priority high

SQL> alter table oe.product_information inmemory priority high;

Table altered.

这个例子对memcompress子句使用缺省值,因此压缩方法为memcompress for query

对表启用In-Memory Column Store并且指定压缩方法为for capacity high,数据加载优先级为low
下面的例子对表oe.product_information启用In-Memory Column Store并且指定压缩方法为for capacity high,数据加载优先级为priority low

SQL> alter table oe.product_information inmemory  memcompress for capacity high priority low;

Table altered.

对表中的列启用In-Memory Column Store
下面的例子对表oe.product_information表中的一些列启用In-Memory Column Store而剩余的列不雇用。并且对不同的列子集启用不同的In-Memory Column Store压缩方法。

SQL> alter table oe.product_information
  2  inmemory memcompress for query (product_id, product_name, category_id, supplier_id, min_price)
  3  inmemory memcompress for capacity high (product_description, warranty_period, product_status, list_price)
  4  no inmemory (weight_class, catalog_url);

Table altered.

在这个例子中定义如下
以product_id开始至min_price结束的字段列表启用了In-Memory Column Store并且指定压缩方法为memcompress for query.

以product_description开始至list_price结束的字段列表启用了In-Memory Column Store并且指定压缩方法为memcompress for
capacity high

字段weight_class与catalog_url没有启用In-Memory Column Store。

在这个例子中对于priority子句使用了缺省值。因此将使用priority none。可以查询v$in_column_level视图,注意优先级的设置
必须应用给整个表或表分区。对不同字段列表指定不同的优先级是不允许的。

对表禁用In-Memory Column Store
为了对表禁用In-Memory Column Store,只需使用no inmemory子句。下面将对表oe.product_information禁用In-Memory Column Store:

SQL> alter table oe.product_information no inmemory;

Table altered.

对表空间启用与禁用In-Memory Column Store
在使用create tablespace语句来创建表空间时可以通过指定inmemory子句来让表空间启用In-Memory Column Store。也可以使用包含inmemory子句的alter tablespace语句来修改表空间让其启用In-Memory Column Store。

通过执行包含no inmemory子句的create tablespace或alter tablespace语句来对表空间禁用In-Memory Column Store。

当表空间启用In-Memory Column Store之后,存储在该表空间中的所有表与物化视图会默认启用In-Memory Column Store。对于表,物化视图与表空间inmemory子句是相同的。当对表空间启用In-Memory Column Store时在inmemory子句之前,并且当对表空间禁用In-Memory Column Store时在no inmemory子句之前需要使用default存储子句。

当表空间启用In-Memory Column Store后,存储在表空间中的单个表与物化视图可以有不同的in-memory设置,并且单个对象的设置会覆盖表空间级别的设置。例如,如果表空间对于数据加载优先级设置为priority low,但在表空间中的表的数据加载优先级设置为priority high,那么表将使用priority high。

为了对表空间启用或禁用In-Memory Column Store,执行以下操作:
1.确保对数据库启用了In-Memory Column Store。
2.使用有合适权限的用户连接到数据库来创建或修改表空间。
3.执行有inmemory或no inmemory子句的create tablespace或alter tablespace语句

下面的例子将创建一个表空间tbs1并对它启用In-Memory Column Store

SQL> create tablespace tbs1 datafile 'tbs1.dbf' size 40m online default inmemory;

Tablespace created.

这个例子对inmemory子句使用了缺省值,因此压缩方法为memcompress for query,数据加载优先级为priority none。

下面的例子将修改表空间tbs1让其启用In-Memory Column Store并且指定数据压缩方法为memcompress for capacity high,数据加载优先级为priority low

SQL> alter tablespace tbs1 default inmemory memcompress for capacity high priority low;

Tablespace altered.

对物化视图启用与禁用In-Memory Column Store
通过执行包含inmemory子句的create materialized view或alter materialized view语句来对物化视图启用In-Memory Column Store。通过执行包含no inmemory子句的ceate materialized view或alter materialized view语句来对物化视图禁用In-Memory Column Store。

为了对物化视图雇用与禁用In-Memory Column Store,需要执行以下操作:
1.确保对数据库启用了In-Memory Column Store。
2.使用有合适权限的用户连接到数据库来创建或修改物化视图。
3.执行包含inmemory或no inmemory子句的create materialized view或alter materialized语句

下面的例子创建一个名叫oe.prod_info_mv的物化视图并且启用In-Memory Column Store:

SQL> create materialized view oe.prod_info_mv inmemory as select * from oe.product_information;

Materialized view created.

这个例子对inmemory子句使用缺省值。因此将使用memcompress for query与priority none

下面的例子将让物化视图oe.prod_info_mv启用In-Memory Column Store并且指定数据加载优先级为priority high

SQL> alter materialized view oe.prod_info_mv inmemory priority high;

Materialized view altered.

Data Pump与In-Memory Column Store
在impdp命令中通过使用transform=inmemory:y选项来导入启用了In-Memory Column Store的数据库对象。使用这个选项,Data Pump将对所有对象保留In-Memory Column Store子句。当transform=inmemory:n时,Data Pump将对对象删除In-Memory Column Store子句。

也可以使用transform=inmemory_clause:string选项来覆盖在dump文件中数据库对象所设置的In-Memory Column Store子句。例如可以使用这个选项来修改被导入对象的In-Memory Column Store的数据压缩方法。

Connecting To 12CR2 RAC Pluggable Database With ORA-1033

操作系统为Oracle Linux 7.1 数据库为Oracle 12.2.0.1,今天在登录pdb时使用sysdba权限登录正常,使用非sysdba权限登录出现ora-01033错误,错误信息如下:

[root@jytest1 ~]# su - oracle
Last login: Tue May 16 18:32:29 CST 2017
[oracle@jytest1 ~]$ sqlplus /nolog

SQL*Plus: Release 12.2.0.1.0 Production on Tue May 16 18:39:42 2017

Copyright (c) 1982, 2016, Oracle.  All rights reserved.

SQL> conn sys/xxzx7817600@jypdb as sysdba
Connected.
SQL> conn jy/jy@jypdb
ERROR:
ORA-01033: ORACLE initialization or shutdown in progress
Process ID: 0
Session ID: 0 Serial number: 0


Warning: You are no longer connected to ORACLE.

在MOS上有篇文档” Connecting To A 12c RAC Pluggable Database Intermittently Fails With ORA-1033 (Doc ID 1998112.1)”描述相关问题,原因有两个,一是pdb所使用的服务名与pdb数据库名相同,二是PDB没有在所有RAC实例上open,说使用pdb数据库名作为服务名对于RAC来说不是一个最佳方案,因为当实例使用SCAN来注册pdb名时并且节点监听到pdb被mounted。这可能造成连接被发送到pdb被mounted的实例上,当以非sysdba权限登录时就会出现ora-0133错误。

pdb的服务名确实是使用pdb名作为其服务名

[grid@jytest1 ~]$ lsnrctl status

LSNRCTL for Linux: Version 12.2.0.1.0 - Production on 16-MAY-2017 18:42:17

Copyright (c) 1991, 2016, Oracle.  All rights reserved.

Connecting to (DESCRIPTION=(ADDRESS=(PROTOCOL=IPC)(KEY=LISTENER)))
STATUS of the LISTENER
------------------------
Alias                     LISTENER
Version                   TNSLSNR for Linux: Version 12.2.0.1.0 - Production
Start Date                02-MAY-2017 11:14:02
Uptime                    14 days 7 hr. 28 min. 15 sec
Trace Level               off
Security                  ON: Local OS Authentication
SNMP                      OFF
Listener Parameter File   /u01/app/product/12.2.0/crs/network/admin/listener.ora
Listener Log File         /u01/app/grid/diag/tnslsnr/jytest1/listener/alert/log.xml
Listening Endpoints Summary...
  (DESCRIPTION=(ADDRESS=(PROTOCOL=ipc)(KEY=LISTENER)))
  (DESCRIPTION=(ADDRESS=(PROTOCOL=tcp)(HOST=10.138.130.175)(PORT=1521)))
  (DESCRIPTION=(ADDRESS=(PROTOCOL=tcp)(HOST=10.138.130.171)(PORT=1521)))
  (DESCRIPTION=(ADDRESS=(PROTOCOL=tcps)(HOST=jytest1.jydba.net)(PORT=5500))(Security=(my_wallet_directory=/u01/app/oracle/product/12.2.0/db/admin/jy/xdb_wallet))(Presentation=HTTP)(Session=RAW))
Services Summary...
Service "+ASM" has 1 instance(s).
  Instance "+ASM1", status READY, has 1 handler(s) for this service...
Service "+ASM_CRS" has 1 instance(s).
  Instance "+ASM1", status READY, has 1 handler(s) for this service...
Service "+ASM_DATA" has 1 instance(s).
  Instance "+ASM1", status READY, has 1 handler(s) for this service...
Service "+ASM_TEST" has 1 instance(s).
  Instance "+ASM1", status READY, has 1 handler(s) for this service...
Service "4b2c6373ae2547cce053ab828a0a7ca3" has 1 instance(s).
  Instance "jy1", status READY, has 1 handler(s) for this service...
Service "4e0ba8d9d278217be053ab828a0a1330" has 1 instance(s).
  Instance "jycs1", status READY, has 1 handler(s) for this service...
Service "jy" has 1 instance(s).
  Instance "jy1", status READY, has 1 handler(s) for this service...
Service "jyXDB" has 1 instance(s).
  Instance "jy1", status READY, has 1 handler(s) for this service...
Service "jycs" has 1 instance(s).
  Instance "jycs1", status READY, has 1 handler(s) for this service...
Service "jycsXDB" has 1 instance(s).
  Instance "jycs1", status READY, has 1 handler(s) for this service...
Service "jycspdb" has 1 instance(s).
  Instance "jycs1", status READY, has 1 handler(s) for this service...
Service "jypdb" has 1 instance(s).
  Instance "jy1", status READY, has 1 handler(s) for this service...
Service "orcl" has 1 instance(s).
  Instance "orcl1", status READY, has 1 handler(s) for this service...
The command completed successfully

pdb数据库在所有实例上都open了

SQL> select open_mode from v$database;

OPEN_MODE
--------------------
READ WRITE

给pdb增加服务名jypdb_srv

[grid@jytest1 ~]$ su - oracle
Password: 
Last login: Tue May 16 18:39:02 CST 2017 on pts/0
[oracle@jytest1 ~]$ srvctl add service  -db jy -pdb jypdb -s jypdb_srv  -preferred "jy1" -available "jy2"
[oracle@jytest1 ~]$ srvctl start service -db jy -s jypdb_srv

[grid@jytest1 ~]$ lsnrctl status

LSNRCTL for Linux: Version 12.2.0.1.0 - Production on 16-MAY-2017 18:56:55

Copyright (c) 1991, 2016, Oracle.  All rights reserved.

Connecting to (DESCRIPTION=(ADDRESS=(PROTOCOL=IPC)(KEY=LISTENER)))
STATUS of the LISTENER
------------------------
Alias                     LISTENER
Version                   TNSLSNR for Linux: Version 12.2.0.1.0 - Production
Start Date                02-MAY-2017 11:14:02
Uptime                    14 days 7 hr. 42 min. 54 sec
Trace Level               off
Security                  ON: Local OS Authentication
SNMP                      OFF
Listener Parameter File   /u01/app/product/12.2.0/crs/network/admin/listener.ora
Listener Log File         /u01/app/grid/diag/tnslsnr/jytest1/listener/alert/log.xml
Listening Endpoints Summary...
  (DESCRIPTION=(ADDRESS=(PROTOCOL=ipc)(KEY=LISTENER)))
  (DESCRIPTION=(ADDRESS=(PROTOCOL=tcp)(HOST=10.138.130.175)(PORT=1521)))
  (DESCRIPTION=(ADDRESS=(PROTOCOL=tcp)(HOST=10.138.130.171)(PORT=1521)))
  (DESCRIPTION=(ADDRESS=(PROTOCOL=tcps)(HOST=jytest1.jydba.net)(PORT=5500))(Security=(my_wallet_directory=/u01/app/oracle/product/12.2.0/db/admin/jy/xdb_wallet))(Presentation=HTTP)(Session=RAW))
Services Summary...
Service "+ASM" has 1 instance(s).
  Instance "+ASM1", status READY, has 1 handler(s) for this service...
Service "+ASM_CRS" has 1 instance(s).
  Instance "+ASM1", status READY, has 1 handler(s) for this service...
Service "+ASM_DATA" has 1 instance(s).
  Instance "+ASM1", status READY, has 1 handler(s) for this service...
Service "+ASM_TEST" has 1 instance(s).
  Instance "+ASM1", status READY, has 1 handler(s) for this service...
Service "4b2c6373ae2547cce053ab828a0a7ca3" has 2 instance(s).
  Instance "jy1", status READY, has 1 handler(s) for this service...
  Instance "jy1", status READY, has 2 handler(s) for this service...
Service "4e0ba8d9d278217be053ab828a0a1330" has 1 instance(s).
  Instance "jycs1", status READY, has 1 handler(s) for this service...
Service "jy" has 1 instance(s).
  Instance "jy1", status READY, has 1 handler(s) for this service...
Service "jyXDB" has 1 instance(s).
  Instance "jy1", status READY, has 1 handler(s) for this service...
Service "jycs" has 1 instance(s).
  Instance "jycs1", status READY, has 1 handler(s) for this service...
Service "jycsXDB" has 1 instance(s).
  Instance "jycs1", status READY, has 1 handler(s) for this service...
Service "jycspdb" has 1 instance(s).
  Instance "jycs1", status READY, has 1 handler(s) for this service...
Service "jypdb" has 2 instance(s).
  Instance "jy1", status READY, has 1 handler(s) for this service...
  Instance "jy1", status READY, has 2 handler(s) for this service...
Service "jypdb_srv" has 2 instance(s).
  Instance "jy1", status READY, has 1 handler(s) for this service...
  Instance "jy1", status READY, has 2 handler(s) for this service...
Service "orcl" has 1 instance(s).
  Instance "orcl1", status READY, has 1 handler(s) for this service...
The command completed successfully

使用新服务名再次以非sysdba权限登录成功
SQL> conn jy/jy@jypdb_srv
Connected.
SQL>

Oracle 12c Grid Infrastructure for a Standalone Server with a New Database on Oracle Linux 7

Oracle 12CR2发布了,学习的季节也到了,学习的第一步就是得安装数据库,这篇文章介绍如何在Oracle Linux 7.1上安装Oracle 12c Grid Infrastructure for a Standalone Server with a New Database

检查Linux内核与软件包
1.检查linux版本

[root@jytest ~]# cat /etc/oracle-release
Oracle Linux Server release 7.1
[root@jytest ~]# cat /etc/redhat-release
Red Hat Enterprise Linux Server release 7.1 (Maipo)

2.检查内核版本

[root@jytest ~]# uname -r
3.8.13-55.1.6.el7uek.x86_64

3.检查需要的软件包是否安装

rpm -q package_name

也可以指定系统结构信息,例如:

rpm -qa --queryformat "%{NAME}-%{VERSION}-%{RELEASE} (%{ARCH})\n" | grep package_name

也可以将查询多个软件包的语句组合在一起,并查看正确的软件版本.

[root@jytest ~]# rpm -q binutils compat-libstdc++ gcc glibc libaio libgcc libstdc++ make sysstat unixodbc
binutils-2.23.52.0.1-30.el7.x86_64
package compat-libstdc++ is not installed
gcc-4.8.3-9.el7.x86_64
glibc-2.17-78.0.1.el7.x86_64
libaio-0.3.109-12.el7.x86_64
libgcc-4.8.3-9.el7.x86_64
libstdc++-4.8.3-9.el7.x86_64
make-3.82-21.el7.x86_64
sysstat-10.1.5-7.el7.x86_64
package unixodbc is not installed

禁用Transparent HugePages
对于Red Hat Enterprise Linux kernels:

#cat /sys/kernel/mm/redhat_transparent_hugepage/enabled

其它kernels:

#cat /sys/kernel/mm/transparent_hugepage/enabled

下面是输出示例,显示Transparent HugePages被使用[always]标记被启用
[always] never
如果Transparent HugePages从内核中被删除,那么/sys/kernel/mm/transparent_hugepage或/sys/kernel/mm/redhat_transparent_hugepage文件会不存在。

为了禁用transparent hugepage执行以下操作:
1.向内核心/etc/grub.conf文件中增加以下记录

transparent_hugepage=never

2.重启操作系统

#reboot

创建用户组

[root@jytest /]# groupadd asmadmin
[root@jytest /]# groupadd asmdba
[root@jytest /]# groupadd asmoper
[root@jytest /]# groupadd dba
[root@jytest /]# groupadd oper
[root@jytest /]# groupadd oinstall
[root@jytest /]# groupadd backupdba
[root@jytest /]# groupadd dgdba
[root@jytest /]# groupadd kmdba
[root@jytest /]# groupadd racdba

创建用户

[root@jytest /]# useradd  -g oinstall -G dba,asmdba,backupdba,dgdba,kmdba,racdba,oper 
oracle
[root@jytest /]# useradd  -g oinstall -G asmadmin,asmdba,asmoper,dba grid

[root@jytest /]# passwd oracle
Changing password for user oracle.
New password: 
BAD PASSWORD: The password is shorter than 8 characters
Retype new password: 
passwd: all authentication tokens updated successfully.
[root@jytest /]# passwd grid
Changing password for user grid.
New password: 
BAD PASSWORD: The password is shorter than 8 characters
Retype new password: 
passwd: all authentication tokens updated successfully.

以root用户创建“Oracle inventory 目录”

[root@jytest /]# mkdir -p /u01/app/oraInventory
[root@jytest /]# chown -R grid:oinstall /u01/app/oraInventory
[root@jytest /]# chmod -R 775 /u01/app/oraInventory

以root用户创建“Grid Infrastructure BASE 目录”

[root@jytest /]# mkdir -p /u01/app/grid
[root@jytest /]# chown -R grid:oinstall /u01/app/grid
[root@jytest /]# chmod -R 775 /u01/app/grid

以root用户创建“Grid Infrastructure Home 目录”

[root@jytest /]# mkdir -p /u01/app/product/12.2.0/crs
[root@jytest /]# chown -R grid:oinstall /u01/app/product/12.2.0/crs
[root@jytest /]# chmod -R 775 /u01/app/product/12.2.0/crs

以root用户创建“Oracle Base 目录”

[root@jytest /]# mkdir -p /u01/app/oracle
[root@jytest /]# chown -R oracle:oinstall /u01/app/oracle
[root@jytest /]# chmod -R 775 /u01/app/oracle

以root用户创建“Oracle RDBMS Home 目录”

[root@jytest /]# mkdir -p /u01/app/oracle/product/12.2.0/db
[root@jytest /]# chown -R oracle:oinstall /u01/app/oracle/product/12.2.0/db
[root@jytest /]# chmod -R 775 /u01/app/oracle/product/12.2.0/db

创建一个tmp目录

[root@jytest /]# mkdir /u01/tmp
[root@jytest /]# chmod a+wr /u01/tmp

设置环境变量

[root@jytest /]# su - grid
[grid@jytest ~]$ vi .bash_profile
# .bash_profile

# Get the aliases and functions
if [ -f ~/.bashrc ]; then
        . ~/.bashrc
fi

# User specific environment and startup programs

PATH=$PATH:$HOME/.local/bin:$HOME/bin

export PATH

TEMP=/u01/tmp
TMPDIR=/u01/tmp
export TEMP TMPDIR
export LD_ASSUME_KERNEL=3.8.13
export ORACLE_BASE=/u01/app/grid
export ORACLE_HOME=/u01/app/product/12.2.0/crs
export ORACLE_SID=+ASM
export NLS_LANG=AMERICAN_AMERICA.ZHS16GBK
export ORA_NLS33=$ORACLE_HOME/ocommon/nls/admin/data
LD_LIBRARY_PATH=$ORACLE_HOME/lib:/lib:/usr/lib
LD_LIBRARY_PATH=$LD_LIBRARY_PATH:/usr/local/lib
export LD_LIBRARY_PATH
export PATH=$PATH:$ORACLE_HOME/bin
CLASSPATH=$ORACLE_HOME/JRE:$ORACLE_HOME/jlib:$ORACLE_HOME/rdbms/jlib
CLASSPATH=$CLASSPATH:$ORACLE_HOME/network/jlib
export CLASSPATH
umask=022


TEMP=/u01/tmp
TMPDIR=/u01/tmp
export TEMP TMPDIR
export LD_ASSUME_KERNEL=3.8.13
export ORACLE_BASE=/u01/app/oracle
export ORACLE_HOME=/u01/app/oracle/product/12.2.0/db
export ORACLE_SID=jy
export ORACLE_UNQNAME=jy
export NLS_LANG=AMERICAN_AMERICA.ZHS16GBK
export ORA_NLS33=$ORACLE_HOME/ocommon/nls/admin/data
LD_LIBRARY_PATH=$ORACLE_HOME/lib:/lib:/usr/lib
LD_LIBRARY_PATH=$LD_LIBRARY_PATH:/usr/local/lib
export LD_LIBRARY_PATH
export PATH=$PATH:$ORACLE_HOME/bin
CLASSPATH=$ORACLE_HOME/JRE:$ORACLE_HOME/jlib:$ORACLE_HOME/rdbms/jlib
CLASSPATH=$CLASSPATH:$ORACLE_HOME/network/jlib
export CLASSPATH
umask=022

修改内核参数编辑/etc/sysctl.conf文件

fs.aio-max-nr = 1048576
fs.file-max = 6815744
kernel.shmall = 2097152
kernel.shmmax = 4294967295
kernel.shmmni = 4096
kernel.sem = 250 32000 100 128
net.ipv4.ip_local_port_range = 9000 65500
net.core.rmem_default = 262144
net.core.rmem_max = 4194304
net.core.wmem_default = 262144
net.core.wmem_max = 1048576


[root@jytest3 ~]# sysctl -p
fs.aio-max-nr = 1048576
fs.file-max = 6815744
kernel.shmall = 2097152
kernel.shmmax = 4294967295
kernel.shmmni = 4096
kernel.sem = 250 32000 100 128
net.ipv4.ip_local_port_range = 9000 65500
net.core.rmem_default = 262144
net.core.rmem_max = 4194304
net.core.wmem_default = 262144
net.core.wmem_max = 1048576

修改oarcle参数的shell限制
在/etc/security/limits.conf中添加以下参数:

grid soft nproc 2047
grid hard nproc 16384
grid soft nofile 1024
grid hard nofile 65536
grid soft stack 10240
grid hard stack 32768
grid soft memlock 3145728
grid hard memlock 3145728

oracle soft nproc 2047
oracle hard nproc 16384
oracle soft nofile 1024
oracle hard nofile 65536
oracle soft stack 10240
oracle hard stack 32768
oracle soft memlock 3145728
oracle hard memlock 3145728

修改shell的默认参数文件,在/etc/profile文件中添加以下内容:

if [ $USER = "oracle" ]; then
if [ $SHELL = "/bin/ksh" ]; then
ulimit -p 16384
ulimit -n 65536
else
ulimit -u 16384 -n 65536
fi
fi


if [ $USER = "grid" ]; then
if [ $SHELL = "/bin/ksh" ]; then
ulimit -p 16384
ulimit -n 65536
else
ulimit -u 16384 -n 65536
fi
fi

对C shell(csh or tcsh)在/etc/csh.login文件中增加以下代码

if ( $USER == "oracle" ) then
limit maxproc 16384
limit descriptors 65536
endif

if ( $USER == "grid" ) then
limit maxproc 16384
limit descriptors 65536
endif

配置创建ASM磁盘组的asm磁盘

[root@jytest3 ~]# fdisk -l

Disk /dev/sdb: 21.5 GB, 21474836480 bytes, 41943040 sectors
Units = sectors of 1 * 512 = 512 bytes
Sector size (logical/physical): 512 bytes / 512 bytes
I/O size (minimum/optimal): 512 bytes / 512 bytes


Disk /dev/sdc: 21.5 GB, 21474836480 bytes, 41943040 sectors
Units = sectors of 1 * 512 = 512 bytes
Sector size (logical/physical): 512 bytes / 512 bytes
I/O size (minimum/optimal): 512 bytes / 512 bytes


Disk /dev/sda: 53.7 GB, 53687091200 bytes, 104857600 sectors
Units = sectors of 1 * 512 = 512 bytes
Sector size (logical/physical): 512 bytes / 512 bytes
I/O size (minimum/optimal): 512 bytes / 512 bytes
Disk label type: dos
Disk identifier: 0x000209aa

   Device Boot      Start         End      Blocks   Id  System
/dev/sda1   *        2048     1026047      512000   83  Linux
/dev/sda2         1026048   104857599    51915776   8e  Linux LVM

Disk /dev/mapper/ol-root: 47.7 GB, 47747956736 bytes, 93257728 sectors
Units = sectors of 1 * 512 = 512 bytes
Sector size (logical/physical): 512 bytes / 512 bytes
I/O size (minimum/optimal): 512 bytes / 512 bytes


Disk /dev/mapper/ol-swap: 5368 MB, 5368709120 bytes, 10485760 sectors
Units = sectors of 1 * 512 = 512 bytes
Sector size (logical/physical): 512 bytes / 512 bytes
I/O size (minimum/optimal): 512 bytes / 512 bytes

查看磁盘uuid

[root@jytest3 ~]# /usr/lib/udev/scsi_id -g -u /dev/sdb
36000c295f8b38933c37ef4a42f446599
[root@jytest3 ~]# /usr/lib/udev/scsi_id -g -u /dev/sdc
36000c29739826dc8ef28ef9a3589d3a0

udev绑定

[root@jytest3 ~]# vi /etc/udev/rules.d/99-my-asmdevices.rules


KERNEL=="sd*[!0-9]", ENV{DEVTYPE}=="disk", SUBSYSTEM=="block",  PROGRAM=="/usr/lib/udev/scsi_id -g -u -d $devnode",  RESULT=="36000c295f8b38933c37ef4a42f446599", RUN 
+="/bin/sh -c 'mknod /dev/asmdisk01 b  $major $minor; chown grid:oinstall /dev/asmdisk01; chmod 0660 /dev/asmdisk01'"

KERNEL=="sd*[!0-9]", ENV{DEVTYPE}=="disk", SUBSYSTEM=="block",  PROGRAM=="/usr/lib/udev/scsi_id -g -u -d $devnode",  RESULT=="36000c29739826dc8ef28ef9a3589d3a0", RUN 
+="/bin/sh -c 'mknod /dev/asmdisk02 b  $major $minor; chown grid:oinstall /dev/asmdisk02; chmod 0660 /dev/asmdisk02'"

~

[root@jytest3 ~]# /sbin/udevadm trigger --type=devices --action=change
[root@jytest3 ~]# ls -lrt /dev/asm*
brw-rw----. 1 grid oinstall 8, 32 Mar  8 22:24 /dev/asmdisk02
brw-rw----. 1 grid oinstall 8, 16 Mar  8 22:24 /dev/asmdisk01

解压GI安装压缩包:

[grid@jytest3 soft]cd /u01/app/grid/product/12.2.0/crs/
[grid@jytest3 soft]# unzip -q /soft/linuxx64_12201_grid_home.zip


配置vnc
检查系统是否已经安装vncserver软件包
[root@jytest3 system]# rpm -qa|grep tigervnc
tigervnc-server-minimal-1.2.80-0.30.20130314svn5065.el7.x86_64
tigervnc-license-1.2.80-0.30.20130314svn5065.el7.noarch

没有安装执行以下命令进行安装

[root@jytest3 /]# cd soft
[root@jytest3 soft]# yum -y install tigervnc-server-1.2.80-0.30.20130314svn5065.el7.x86_64.rpm
Loaded plugins: langpacks
Examining tigervnc-server-1.2.80-0.30.20130314svn5065.el7.x86_64.rpm: tigervnc-server-1.2.80-0.30.20130314svn5065.el7.x86_64
Marking tigervnc-server-1.2.80-0.30.20130314svn5065.el7.x86_64.rpm to be installed
Resolving Dependencies
--> Running transaction check
---> Package tigervnc-server.x86_64 0:1.2.80-0.30.20130314svn5065.el7 will be installed
--> Finished Dependency Resolution
http://public-yum.oracle.com/repo/OracleLinux/OL7/UEKR3/x86_64/repodata/repomd.xml: [Errno 14] curl#6 - "Could not resolve host: public-yum.oracle.com; Unknown error"
Trying other mirror.
http://public-yum.oracle.com/repo/OracleLinux/OL7/latest/x86_64/repodata/repomd.xml: [Errno 14] curl#6 - "Could not resolve host: public-yum.oracle.com; Unknown error"
Trying other mirror.

Dependencies Resolved

=======================================================================================================================================================================
 Package                     Arch               Version                                      Repository                                                           Size
=======================================================================================================================================================================
Installing:
 tigervnc-server             x86_64             1.2.80-0.30.20130314svn5065.el7              /tigervnc-server-1.2.80-0.30.20130314svn5065.el7.x86_64             488 k

Transaction Summary
=======================================================================================================================================================================
Install  1 Package

Total size: 488 k
Installed size: 488 k
Downloading packages:
Running transaction check
Running transaction test
Transaction test succeeded
Running transaction
Warning: RPMDB altered outside of yum.
  Installing : tigervnc-server-1.2.80-0.30.20130314svn5065.el7.x86_64                                                                                              1/1 
  Verifying  : tigervnc-server-1.2.80-0.30.20130314svn5065.el7.x86_64                                                                                              1/1 

Installed:
  tigervnc-server.x86_64 0:1.2.80-0.30.20130314svn5065.el7                                                                                                             

Complete!

之前的版本,如果安装vnc一般都需要使用vncserver命令来设置口令,然后配置/etc/sysconfig/vncservers文件。
在Oracle Linux7中,虽然然还存在这个文件,不过其内容只有如下一行:

root@jytest3 soft]#  cat /etc/sysconfig/vncservers
# THIS FILE HAS BEEN REPLACED BY /lib/systemd/system/vncserver@.service

复制文件

[root@jytest3 soft]# cp /lib/systemd/system/vncserver@.service /etc/systemd/system/vncserver_root@:2.service

编辑vncserver_root@:2.service文件将文件中的用root替换

[root@jytest3 soft]# cd /etc/systemd/system/
[root@jytest3 system]# vi vncserver_root@:2.service
# The vncserver service unit file
#
# Quick HowTo:
# 1. Copy this file to /etc/systemd/system/vncserver@:.service
# 2. Edit  and vncserver parameters appropriately
#   ("runuser -l  -c /usr/bin/vncserver %i -arg1 -arg2")
# 3. Run `systemctl daemon-reload`
# 4. Run `systemctl enable vncserver@:.service`
#
# DO NOT RUN THIS SERVICE if your local area network is
# untrusted!  For a secure way of using VNC, you should
# limit connections to the local host and then tunnel from
# the machine you want to view VNC on (host A) to the machine
# whose VNC output you want to view (host B)
#
# [user@hostA ~]$ ssh -v -C -L 590N:localhost:590M hostB
#
# this will open a connection on port 590N of your hostA to hostB's port 590M
# (in fact, it ssh-connects to hostB and then connects to localhost (on hostB).
# See the ssh man page for details on port forwarding)
#
# You can then point a VNC client on hostA at vncdisplay N of localhost and with
# the help of ssh, you end up seeing what hostB makes available on port 590M
#
# Use "-nolisten tcp" to prevent X connections to your VNC server via TCP.
#
# Use "-localhost" to prevent remote VNC clients connecting except when
# doing so through a secure tunnel.  See the "-via" option in the
# `man vncviewer' manual page.


[Unit]
Description=Remote desktop service (VNC)
After=syslog.target network.target

[Service]
Type=simple
# Clean any existing files in /tmp/.X11-unix environment
ExecStartPre=/bin/sh -c '/usr/bin/vncserver -kill %i > /dev/null 2>&1 || :'
ExecStart=/sbin/runuser -l root -c "/usr/bin/vncserver %i"
PIDFile=/root/.vnc/%H%i.pid
ExecStop=/bin/sh -c '/usr/bin/vncserver -kill %i > /dev/null 2>&1 || :'

[Install]
"vncserver_root@:2.service" 45L, 1739C written

启用vncserver配置

[root@jytest3 system]# systemctl enable vncserver_root@:2.service
ln -s '/etc/systemd/system/vncserver_root@:2.service' '/etc/systemd/system/multi-user.target.wants/vncserver_root@:2.service'

启动vncserver服务

[root@jytest3 system]# vncserver

You will require a password to access your desktops.

Password:
Verify:
xauth:  file /root/.Xauthority does not exist

New 'jytest3:1 (root)' desktop is jytest3:1

Creating default startup script /root/.vnc/xstartup
Starting applications specified in /root/.vnc/xstartup
Log file is /root/.vnc/jytest3:1.log

关闭防火墙

[root@jytest3 system]# systemctl stop firewalld
[root@jytest3 system]# systemctl disable firewalld
rm '/etc/systemd/system/dbus-org.fedoraproject.FirewallD1.service'
rm '/etc/systemd/system/basic.target.wants/firewalld.service'


用vnc登录服务器安装软件

[root@jytest3 Desktop]# xhost +
access control disabled, clients can connect from any host
[root@jytest3 Desktop]# su - grid
Last login: Tue Mar  7 17:50:57 CST 2017 on pts/0
[grid@jytest3 ~]$ cd /soft/grid


[grid@jytest3 crs]$ ./gridSetup.sh 
ERROR: Unable to verify the graphical display setup. This application requires X display. Make sure that xdpyinfo exist under PATH variable.

Can't connect to X11 window server using '10.138.135.167:1.0' as the value of the DISPLAY variable.

出现在错误,并且错误信息提示需要设置环境变量DISPLAY,下面设置环境变量DISPLAY

[grid@jytest3 grid]$ exit
logout
[root@jytest3 Desktop]# xdpyinfo
name of display:    :1
version number:    11.0
vendor string:    The X.Org Foundation
vendor release number:    11500000
X.Org version: 1.15.0
maximum request size:  16777212 bytes
motion buffer size:  256
bitmap unit, bit order, padding:    32, LSBFirst, 32
image byte order:    LSBFirst
number of supported pixmap formats:    6
...省略...只需要记录name of display:的值
[root@jytest3 Desktop]# xhost +
access control disabled, clients can connect from any host
[root@jytest3 Desktop]# su - grid
Last login: Tue Mar  7 17:50:40 CST 2017 on pts/0
[grid@jytest3 ~]$ export DISPLAY=:1(这时设置为name of display的值:1)
[grid@jytest3 ~]$ xdpyinfo
name of display:    :1
version number:    11.0
vendor string:    The X.Org Foundation
vendor release number:    11500000
X.Org version: 1.15.0
maximum request size:  16777212 bytes
motion buffer size:  256
bitmap unit, bit order, padding:    32, LSBFirst, 32
image byte order:    LSBFirst
number of supported pixmap formats:    6
...省略...
[grid@jytest3 ~]$cd /u01/app/grid/product/12.2.0/crs/
[grid@jytest3 crs]$ ./gridSetup.sh

选择for a Standalone Server (Oracle Restart)


现在可以让安装程序来以root用户自动执行安装所需要执行的脚本,指定root用户的密码


检查磁盘组data是否创建成功

[grid@jytest3 ~]$ asmcmd lsdg
State    Type    Rebal  Sector  Logical_Sector  Block       AU  Total_MB  Free_MB  Req_mir_free_MB  Usable_file_MB  Offline_disks  Voting_files  Name
MOUNTED  NORMAL  N         512             512   4096  4194304     40960    40760                0           20380              0             N  DATA/

安装数据库软件

[root@jytest3 soft]# unzip linuxx64_12201_database.zip -d 

[root@jytest3 Desktop]# xhost +
access control disabled, clients can connect from any host

[root@jytest3 Desktop]# xdpyinfo
name of display:    :1
version number:    11.0
vendor string:    The X.Org Foundation
vendor release number:    11500000
X.Org version: 1.15.0
maximum request size:  16777212 bytes
motion buffer size:  256
bitmap unit, bit order, padding:    32, LSBFirst, 32
image byte order:    LSBFirst
number of supported pixmap formats:    6
...省略...只需要记录name of display:的值

[root@jytest3 Desktop]# su - oracle
Last login: Thu Mar  9 04:17:35 CST 2017 on pts/2
[oracle@jytest3 ~]$ export DISPLAY=:1
[oracle@jytest3 ~]$ cd /soft/database
[oracle@jytest3 database]$ ./runInstaller


执行脚本

[root@jytest3 /]# ./u01/app/oracle/product/12.2.0/db/root.sh
Performing root user operation.

The following environment variables are set as:
    ORACLE_OWNER= oracle
    ORACLE_HOME=  /u01/app/oracle/product/12.2.0/db

Enter the full pathname of the local bin directory: [/usr/local/bin]: 
The contents of "dbhome" have not changed. No need to overwrite.
The contents of "oraenv" have not changed. No need to overwrite.
The contents of "coraenv" have not changed. No need to overwrite.

Entries will be added to the /etc/oratab file as needed by
Database Configuration Assistant when a database is created
Finished running generic part of root script.
Now product-specific root actions will be performed.
Do you want to setup Oracle Trace File Analyzer (TFA) now ? yes|[no] : 
yes
Installing Oracle Trace File Analyzer (TFA).
Log File: /u01/app/oracle/product/12.2.0/db/install/root_jytest3_2017-03-09_15-33-03-156667468.log
Finished installing Oracle Trace File Analyzer (TFA)

创建数据库

[oracle@jytest3 database]$ dbca


在创建的过程中出现了以下错误

[Thread-301] [ 2017-03-09 22:15:26.774 CST ] [PostDBCreationStep.executeImpl:1156]  Exception while Starting with HA Database Resource PRCR-1079 : Failed to start resource ora.jy.db
CRS-5017: The resource action "ora.jy.db start" encountered the following error: 
ORA-01017: invalid username/password; logon denied
. For details refer to "(:CLSN00107:)" in "/u01/app/grid/diag/crs/jytest3/crs/trace/ohasd_oraagent_grid.trc".

CRS-2674: Start of 'ora.jy.db' on 'jytest3' failed
ORA-01017: invalid username/password; logon denied

数据库jy确实没能通过oracle restart自动启动

[grid@jytest3 ~]$ crsctl stat res -t
--------------------------------------------------------------------------------
Name           Target  State        Server                   State details       
--------------------------------------------------------------------------------
Local Resources
--------------------------------------------------------------------------------
ora.DATA.dg
               ONLINE  ONLINE       jytest3                  STABLE
ora.LISTENER.lsnr
               ONLINE  ONLINE       jytest3                  STABLE
ora.asm
               ONLINE  ONLINE       jytest3                  Started,STABLE
ora.ons
               OFFLINE OFFLINE      jytest3                  STABLE
--------------------------------------------------------------------------------
Cluster Resources
--------------------------------------------------------------------------------
ora.cssd
      1        ONLINE  ONLINE       jytest3                  STABLE
ora.diskmon
      1        OFFLINE OFFLINE                               STABLE
ora.driver.afd
      1        ONLINE  ONLINE       jytest3                  STABLE
ora.evmd
      1        ONLINE  ONLINE       jytest3                  STABLE
ora.jy.db
      1        ONLINE  OFFLINE                               Instance Shutdown,ST
                                                             ABLE
--------------------------------------------------------------------------------

如是手动启动数据库

[root@jytest3 ~]# su - oracle
Last login: Thu Mar  9 22:08:36 CST 2017 on pts/4
[oracle@jytest3 ~]$ echo $ORACLE_SID
jy
[oracle@jytest3 ~]$ sqlplus / as sysdba

SQL*Plus: Release 12.2.0.1.0 Production on Thu Mar 9 22:17:21 2017

Copyright (c) 1982, 2016, Oracle.  All rights reserved.

Connected to an idle instance.

SQL> startup
ORACLE instance started.

Total System Global Area 2516582400 bytes
Fixed Size                  8795904 bytes
Variable Size            1358956800 bytes
Database Buffers         1140850688 bytes
Redo Buffers                7979008 bytes
Database mounted.
Database opened.

[grid@jytest3 trace]$ crsctl stat res -t
--------------------------------------------------------------------------------
Name           Target  State        Server                   State details       
--------------------------------------------------------------------------------
Local Resources
--------------------------------------------------------------------------------
ora.DATA.dg
               ONLINE  ONLINE       jytest3                  STABLE
ora.LISTENER.lsnr
               ONLINE  ONLINE       jytest3                  STABLE
ora.asm
               ONLINE  ONLINE       jytest3                  Started,STABLE
ora.ons
               OFFLINE OFFLINE      jytest3                  STABLE
--------------------------------------------------------------------------------
Cluster Resources
--------------------------------------------------------------------------------
ora.cssd
      1        ONLINE  ONLINE       jytest3                  STABLE
ora.diskmon
      1        OFFLINE OFFLINE                               STABLE
ora.driver.afd
      1        ONLINE  ONLINE       jytest3                  STABLE
ora.evmd
      1        ONLINE  ONLINE       jytest3                  STABLE
ora.jy.db
      1        ONLINE  ONLINE       jytest3                  Open,HOME=/u01/app/o
                                                             racle/product/12.2.0
                                                             /db,STABLE
--------------------------------------------------------------------------------

到此安装完成!

Oracle 12cr2 数据库之间跨网络传输表,分区或子分区

为了跨网络传输表,可以在执行导入操作时使用network_link参数,这样导入操作将会使用数据库链路而不用先导出dump文件。其操作步骤如下:
1.选择一组表,分区或子分区。
如果是要传输分区,那么在传输表操作中可以指定一个表的分区,并且在同一操作中没有其它的表将被传输。如果在传输表操作中中只有表分区的子集被导出,那么在导入后每个分区将变成非分区表。

2.在源数据库中,将要被传输的表,分区或子分区所在表空间设置为只读模式。为了查询表所在的表空间可以查询dba_tables视图,为了查询表空间的所有文件可以查询dba_data_files视图。

3.传输表,分区或子分区所在表空间的所有数据文件到目标数据库。如果源平台与目标平台的字节编码不一样,那么可以使用以下
任何一种方法来转换数据文件。
–使用dbms_file_transfer包中的get_file或put_file过程来传输数据文件,它们会自动将数据文件转换为目标平台的字节编码。

–使用rman的convert命令来将数据文件转换为目标平台的字节编码。

4.在目标数据库上执行导入操作

5.可选操作,将源数据库中的表空间设置为读写模式

下面的例子将介绍如何使用跨网传输表,分区或子分区的方法来将一个数据库中的hr.emp_test与oe.orders_test表传输到另一个数
据库中。其中源平台与目标平台的字节编码相同。

1.先在源数据库中创建表hr.emp_test与oe.orders_test

SQL> create tablespace emp_test datafile '+DATADG/jyrac/datafile/emp_test_01.dbf' size 100M  autoextend off  extent management local segment space management auto;
Tablespace created

SQL> create tablespace orders_test datafile '+DATADG/jyrac/datafile/orders_test_01.dbf' size 100M  autoextend off  extent management local segment space management auto;
Tablespace created


SQL> create table hr.emp_test tablespace emp_test as select * from hr.employees;
Table created

SQL> create table oe.orders_test tablespace orders_test as select * from oe.orders;
Table created

2.在目标数据库中创建数据库链路连接到源数据库

SQL> conn sys/xxzx7817600@jypdb as sysdba
Connected.


SQL> create public database link jyrac_link
  2    connect to jy identified by "jy"
  3    using '(DESCRIPTION =
  4      (ADDRESS_LIST =
  5        (ADDRESS = (PROTOCOL = TCP)(HOST =10.138.130.153)(PORT = 1521))
  6      )
  7      (CONNECT_DATA =
  8        (SERVER = DEDICATED)
  9        (SERVICE_NAME =jyrac)
 10      )
 11    )';

Database link created.

3.将源数据库中表hr.emp_test与oe.orders_test所在的表空间设置为只读状态

SQL> alter tablespace emp_test read only;
Tablespace altered

SQL> alter tablespace orders_test read only;
Tablespace altered

SQL> select tablespace_name,status from dba_tablespaces;
TABLESPACE_NAME                STATUS
------------------------------ ---------
SYSTEM                         ONLINE
SYSAUX                         ONLINE
UNDOTBS1                       ONLINE
TEMP                           ONLINE
USERS                          ONLINE
UNDOTBS2                       ONLINE
EXAMPLE                        ONLINE
TEST                           ONLINE
SALES_TEST                     ONLINE
EMP_TEST                       READ ONLY
ORDERS_TEST                    READ ONLY
11 rows selected

4.将表空间tem_test与orders_test的所有数据文件复制到目标数据库中
在源数据库中创建目录tts_datafile(存储数据文件)

SQL> create or replace directory tts_datafile as '+datadg/jyrac/datafile/';

Directory created.

SQL> grant execute,read,write on directory tts_datafile to public;

Grant succeeded.

在目标数据库中创建目录tts_datafile(存储数据文件)

SQL> create or replace directory tts_datafile as '+DATA/JY/4B2C6373AE2547CCE053AB828A0A7CA3/DATAFILE/';

Directory created.

SQL> grant execute,read,write on directory tts_datafile to public;

Grant succeeded.


SQL> exec dbms_file_transfer.get_file(source_directory_object =>'TTS_DATAFILE',source_file_name => 'emp_test_01.dbf',source_database =>'jyrac_link',destination_directory_object => 'TTS_DATAFILE',destination_file_name => 'emp_test_01.dbf');
PL/SQL procedure successfully completed

SQL> exec dbms_file_transfer.get_file(source_directory_object =>'TTS_DATAFILE',source_file_name => 'orders_test_01.dbf',source_database =>'jyrac_link',destination_directory_object => 'TTS_DATAFILE',destination_file_name => 'orders_test_01.dbf');
PL/SQL procedure successfully completed


ASMCMD [+data/jy/4B2C6373AE2547CCE053AB828A0A7CA3/datafile] > ls -lt  
Type      Redund  Striped  Time             Sys  Name
DATAFILE  UNPROT  COARSE   JUN 06 22:00:00  N    orders_test_01.dbf => +DATA/jy/4B2C6373AE2547CCE053AB828A0A7CA3/DATAFILE/FILE_TRANSFER.303.945987633
DATAFILE  UNPROT  COARSE   JUN 06 22:00:00  N    emp_test_01.dbf => +DATA/jy/4B2C6373AE2547CCE053AB828A0A7CA3/DATAFILE/FILE_TRANSFER.302.945987591
DATAFILE  UNPROT  COARSE   JUN 06 22:00:00  Y    FILE_TRANSFER.303.945987633
DATAFILE  UNPROT  COARSE   JUN 06 22:00:00  Y    FILE_TRANSFER.302.945987591
DATAFILE  UNPROT  COARSE   JUN 06 19:00:00  N    sales_test_01.dbf => +DATA/jy/4B2C6373AE2547CCE053AB828A0A7CA3/DATAFILE/FILE_TRANSFER.301.945975283
DATAFILE  UNPROT  COARSE   JUN 06 19:00:00  Y    FILE_TRANSFER.301.945975283
DATAFILE  UNPROT  COARSE   JUN 05 23:00:00  Y    SYSAUX.275.939167015
DATAFILE  UNPROT  COARSE   JUN 02 16:00:00  N    users01.dbf => +DATA/jy/4B2C6373AE2547CCE053AB828A0A7CA3/DATAFILE/FILE_TRANSFER.298.945620417
DATAFILE  UNPROT  COARSE   JUN 02 16:00:00  N    test01.dbf => +DATA/jy/4B2C6373AE2547CCE053AB828A0A7CA3/DATAFILE/FILE_TRANSFER.300.945620337
DATAFILE  UNPROT  COARSE   JUN 02 16:00:00  N    example01.dbf => +DATA/jy/4B2C6373AE2547CCE053AB828A0A7CA3/DATAFILE/FILE_TRANSFER.299.945620391
DATAFILE  UNPROT  COARSE   JUN 02 16:00:00  Y    SYSTEM.274.939167015
DATAFILE  UNPROT  COARSE   JUN 02 16:00:00  Y    FILE_TRANSFER.300.945620337
DATAFILE  UNPROT  COARSE   JUN 02 16:00:00  Y    FILE_TRANSFER.299.945620391
DATAFILE  UNPROT  COARSE   JUN 02 16:00:00  Y    FILE_TRANSFER.298.945620417
DATAFILE  UNPROT  COARSE   JUN 02 00:00:00  N    testtb01.dbf => +DATA/jy/4B2C6373AE2547CCE053AB828A0A7CA3/DATAFILE/TESTTB.295.944828399
DATAFILE  UNPROT  COARSE   JUN 02 00:00:00  Y    UNDO_2.277.939167063
DATAFILE  UNPROT  COARSE   JUN 02 00:00:00  Y    UNDOTBS2.278.945029905
DATAFILE  UNPROT  COARSE   JUN 02 00:00:00  Y    UNDOTBS1.273.939167015
DATAFILE  UNPROT  COARSE   JUN 02 00:00:00  Y    TESTTB.295.944828399

5.在目标数据库中执行导入操作

[oracle@jytest1 tts]$ impdp system/xxzx7817600@JYPDB_175 network_link=jyrac_link transportable=always transport_datafiles='+data/jy/4B2C6373AE2547CCE053AB828A0A7CA3/datafile/emp_test_01.dbf','+data/jy/4B2C6373AE2547CCE053AB828A0A7CA3/datafile/orders_test_01.dbf' tables=hr.emp_test,oe.orders_test logfile=imp_tables.log directory=tts_dump

Import: Release 12.2.0.1.0 - Production on Tue Jun 6 22:24:24 2017

Copyright (c) 1982, 2017, Oracle and/or its affiliates.  All rights reserved.

Connected to: Oracle Database 12c Enterprise Edition Release 12.2.0.1.0 - 64bit Production
Starting "SYSTEM"."SYS_IMPORT_TABLE_01":  system/********@JYPDB_175 network_link=jyrac_link transportable=always transport_datafiles=+data/jy/4B2C6373AE2547CCE053AB828A0A7CA3/datafile/emp_test_01.dbf,+data/jy/4B2C6373AE2547CCE053AB828A0A7CA3/datafile/orders_test_01.dbf tables=hr.emp_test,oe.orders_test logfile=imp_tables.log directory=tts_dump 
Processing object type TABLE_EXPORT/TABLE/PLUGTS_BLK
Processing object type TABLE_EXPORT/TABLE/TABLE
Processing object type TABLE_EXPORT/TABLE/END_PLUGTS_BLK
Job "SYSTEM"."SYS_IMPORT_TABLE_01" successfully completed at Tue Jun 6 22:24:57 2017 elapsed 0 00:00:30

6.可选操作,将源数据库中的表空间emp_test与orders_test设置为读写模式

SQL> alter tablespace emp_test read write;
Tablespace altered

SQL> alter tablespace orders_test read write;
Tablespace altered

SQL> select tablespace_name,status from dba_tablespaces;
TABLESPACE_NAME                STATUS
------------------------------ ---------
SYSTEM                         ONLINE
SYSAUX                         ONLINE
UNDOTBS1                       ONLINE
TEMP                           ONLINE
USERS                          ONLINE
UNDOTBS2                       ONLINE
EXAMPLE                        ONLINE
TEST                           ONLINE
SALES_TEST                     ONLINE
EMP_TEST                       ONLINE
ORDERS_TEST                    ONLINE
11 rows selected